Available with Standard or Advanced license.Available with Workflow Manager license.
The Job Information button will present you with the Job Information window. This is a dockable window in ArcMap and can be treated like every other window. You can access job properties and extended properties, job history, job notes, job attachments, and step description.
Updating job properties
Prerequisite:
You can view and update properties of a job within ArcMap.
- Start ArcMap through Workflow Manager, or use Job List to activate a job.
- Enable the Workflow Manager toolbar and click the Job Information
 button.
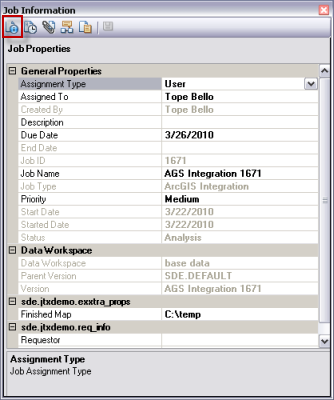
 - Click the Job Properties button on the Job Information window.
The Job Properties tab appears.
- Choose the properties and make edits.
You can modify job assignment, job name, due date, data workspace, versions, and extended properties.
- Click Save to store your changes.

Adding comments to job history
Prerequisite:
You can view job history and add comments to the history of a job.
- Start ArcMap through Workflow Manager, or use Job List to activate a job.
- Enable the Workflow Manager toolbar and click the Job Information
 button.
 - Click the Job History button on the Job Information window.
The Job History dialog box is activated.
A list of existing activities is displayed and grouped based on date.

- Double-click the date.
The activities for that date are displayed.
- Double-click an activity.
The details of that activity are displayed.
- Click Add Comment.
The Enter Comment dialog box appears.
- Type your comment and click OK.
The comment is added to the history log.
Managing job attachments
Prerequisite:
You can add, view, and delete attachments of a job.
- Start ArcMap through Workflow Manager, or use Job List to activate a job.
- Enable the Workflow Manager toolbar and click the Job Information
 button.
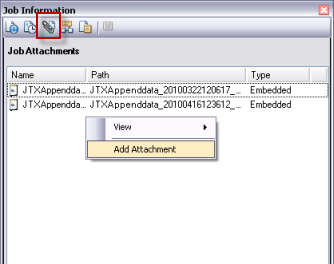
 - Click the Job Attachment button on the Job Information window.
The Attachments dialog box is activated and a list of existing attachments is displayed.
- To add a new attachment, perform the following steps:
- Right-click in the contents view and click Add.
- Choose to link or embed the attachment.
- Browse to the file you want to attach and click OK.
The attachment is added to the job.
- To delete an attachment, perform the following steps:
- Select an existing attachment.
- Right-click and click Delete.
The attachment is deleted from the job.
- To view an attachment, perform the following steps:
- Select an existing attachment.
- Right-click and click View.
The file opens in the default associated program.

Executing job steps through the Step Description window
Prerequisite:
The Step Description window allows you to execute the current job step from within ArcMap. It also presents you with more descriptive information configured on the individual step types.
- Start ArcMap through Workflow Manager, or use Job List to activate a job.
- Enable the Workflow Manager toolbar and click the Job Information
 button.
 - Click the Step Description button on the Job Information window.
The Step Description dialog box appears.

The current step or steps are displayed in the drop-down list, and the execution tools are also available to execute steps or check steps as completed.
- Click the execution tools to complete a step.
The current step is completed and the workflow moves to the next step.
Adding job information on the Notes tab
Prerequisite:
You can add notes to a job from the Notes tab.
- Start ArcMap through Workflow Manager, or use Job List to activate a job.
- Enable the Workflow Manager toolbar and click the Job Information
 button.
 - Click the Notes button on the Job Information window.
The Notes dialog box appears.
- Enter any details to capture more job-specific information.
- Click Save to store the information.