Available with Standard or Advanced license.
The Parcel Editor toolbar contains the tools and menu commands needed to access and work with your parcel fabric, for example, the Select Parcel Features tool, the New Parcel tool and the Parcel Details dialog box. Other parcel editing tools and commands such as the Maintain Control Points dialog box and the Parcel Explorer window are also available on the Parcel Editor toolbar. You can also start and stop an edit session from the Parcel Editor toolbar.

| Tool | Description |
|---|---|
Select Parcel Features | Displays the parcel fabric selection cursor which is used to select and interact with parcels and lines in a parcel fabric layer. Right-click a parcel to access common parcel editing commands. |
New Parcel | Opens the Parcel Details dialog box which is used for the data entry of new parcels. Click Keep And Join |
Maintain Control Points | Opens the Control dialog box which is used for adding, deleting, and running a check fit of control points in a parcel fabric. Control points displayed in the current map extent are listed in the list box. |
Match Control Point | Opens the Control dialog box which is used to link currently listed control points to parcel fabric points. |
Create Connection | Opens the Create Connection Line dialog box which is used for creating connection lines between two chosen fabric points. Connection lines are used to connect isolated parcel blocks so that a parcel network is formed that can be adjusted by the fabric least-squares adjustment. |
Mean Points | Displays a crosshair cursor that is used to drag a box around fabric points to merge them into a single point. Points are only merged if they do not have lines between them. |
Add Line Point | Opens the Add Line Point dialog box which is used for adding line points to parcel points that should sit on adjacent parcel boundaries, but not split the boundaries. The boundary is identified by choosing a start and an end point of the boundary. |
Delete Line Point | Opens the Delete Line Point dialog box which is used to delete an existing line point. |
Parcel Details | Opens the Parcel Details dialog box which is used for creating new parcels and viewing the properties of a selected parcel. |
Parcel Explorer | Opens the Parcel Explorer dockable window which lists selected parcels by their plan. A list of unjoined parcels and saved parcel constructions is also displayed. |
Point Report | Opens the Point Report dialog box that is used to display geometrical information about points in the parcel fabric. |
Name Parcels | Displays a crosshair cursor which is used to drag a line over adjacent parcels for sequential naming. Double-click to finish dragging the line and to open the Parcel Sequence Naming dialog box. |
Annotate Parcel Courses | Opens the Annotate Selected Features dialog box, which is used to create annotation for a selection of parcels in the parcel fabric. Duplicate dimensions are removed. |
Transform Parcels | Opens the Transform Parcels toolbar which is used to transform and move a selection of parcels. The tool becomes available when there is a selection of parcels present in the map display. |
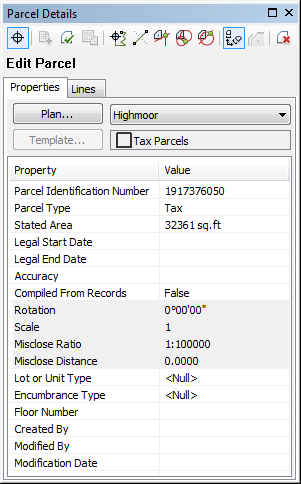
Parcel Details dialog box
The Parcel Details dialog box is used when editing and creating parcels. It can be opened by clicking the Parcel Details button  on the Parcel Editor toolbar. Parcel attributes of a selected or opened parcel are displayed under the Properties tab. On this tab, you can also specify the parcel's related plan and set feature templates for new parcels. The Lines tab displays parcel traverse and misclose information. When a parcel is open for editing or when a new parcel is being created, several other parcel editing commands become available, such as COGO commands and other parcel construction commands.
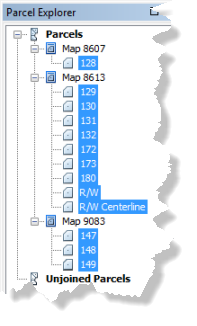
Parcel Explorer window
The Parcel Explorer window can be opened by clicking the Parcel Explorer button  on the Parcel Editor toolbar. The Parcel Explorer window lists selected parcels by their plan. If the current parcel fabric has unjoined parcels, these parcels are listed under Unjoined Parcels. You can select and right-click parcels either in the map or in the Parcel Explorer window to access various parcel editing commands and tools.
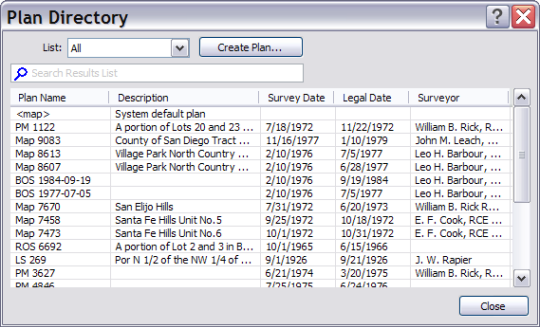
The Plan Directory dialog box
The Plan Directory dialog box can be accessed from the Parcel Editor menu on the Parcel Editor toolbar. The Plan Directory dialog box can also be accessed from the Parcel Details dialog box when editing parcels. On the Plan Directory dialog box, you can find a list of all available plans existing in the parcel fabric. A plan or record of survey is the legal recorded document that defines and describes a parcel or parcels. Plan information is stored in the nonspatial Plans table of the parcel fabric. You can create a new plan from the Plan Directory dialog box, or you can migrate plan information into the parcel fabric when migrating parcels. If you choose not to work with plans, you can use the default system <map> plan when editing parcels.
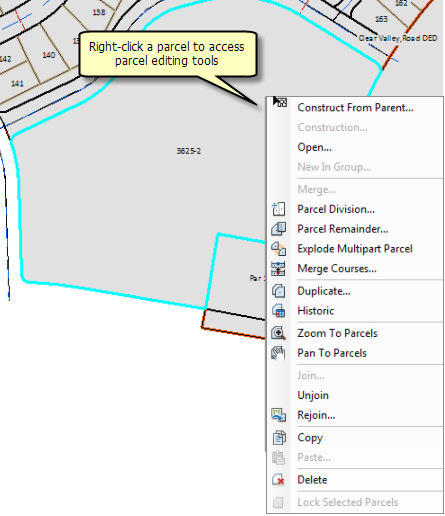
Parcel editing tools
In an edit session, use the Select Parcel Features tool  to right-click a parcel, open it and edit its attributes. When you right-click a parcel, you can also access commands such as Parcel Division, Construct from parent, and Parcel Remainder.
Parcel Editor Options dialog box
The Parcel Editor Options dialog box is opened by clicking the Parcel Editor menu on the Parcel Editor toolbar and clicking Options. Under the Tolerances tab, you can set parcel fabric editing options such as snapping tolerances, closure tolerances and join tolerances. Under the Adjustments tab, you can set the default parcel traverse adjustment type. Under the Advanced tab you can choose how parcels are displayed when opened.
Searching for parcels
Search using the Find tool
The Find tool  located on the Tools toolbar allows you to search for features using an attribute value or a portion of an attribute value. When entering a portion of an attribute value, the Find tool will return a list of features that contain that value in any of the field's attributes. You can search all the layers in the map or you can search a specified map layer.
Learn more about the Find tool
You can use the Find tool to search for parcels in the Local Government Information Model enabled parcel fabric layer in ArcMap. If you are searching for tax parcels, you would search using the Parcel Identification Number (PIN) attribute field in the Tax Parcels map layer.
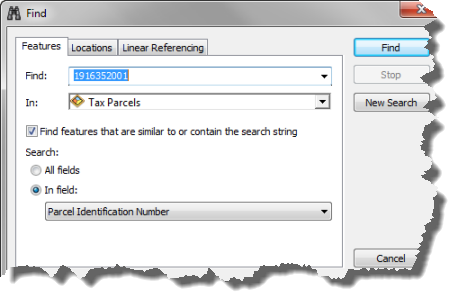
When entering a portion of a parcel PIN, the Find tool will return a list of parcels that contain that value in their PIN. For optimal search performance in the map template, it is recommended that you enter the whole attribute value (the whole parcel PIN), and specify the specific parcel layer in which to search, for example, the Tax Parcels map layer.
Search results are displayed in a new window pane at the bottom of the Find dialog box. Right-click a row result to zoom to or pan to the parcel.
Search using an address
The Locations tab on the Find dialog box allows you to search for features using an address together with an address locator. You can search for parcels based on a typed street address. Select an address locator, for example, 10.0 North America Geocode service and type the street address of the parcel or parcels you want to find in the Single Line Input text box. You can type the whole address or a portion of the address, for example, 1184 Copperwood Dr. Once you have typed the address, click Find to perform the search.
Search results are displayed in a new window pane at the bottom of the Find dialog box. Right-click a row result to zoom to or pan to the parcel.
Search using the parcel plan
You can search for a parcel by zooming to or panning to the area of the parcel's plan (not the system default <map> plan).
The parcel fabric plan represents the legal document recording a parcel merge, subdivision, and so on. Parcels are created in plans. Plans are managed in the Plan Directory dialog box, which is opened by clicking Parcel Editor > Plan Directory.
You can create a new plan by clicking Create Plan on the Plan Directory dialog box. When setting the Accuracy category for a plan, all parcels in the plan will inherit that accuracy value. If you don't want to use plans, you can create parcels in the system default <map> plan.
To search for parcels by plan, open the Plan Directory dialog box (Parcel Editor > Plan Directory and locate the plan containing the parcels you want to zoom to. Right-click the plan and click Zoom To Parcels or Pan To Parcels.

 to save and join the new parcel to the parcel fabric or click
  to exit out of the data entry environment.


