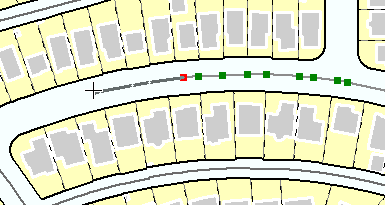
Tracing is a quick and accurate way of creating new segments that follow the shapes of other features. You can trace directly on top of a feature or apply an offset value. To trace, use either the Line or Polygon tool in conjunction with the Trace construction method on the palette on the Editor toolbar (or the Feature Construction mini toolbar).
Tracing is particularly useful when the features you want to follow have curves or intricate shapes, since snapping is more difficult in those cases. For example, when digitizing a forest boundary that is adjacent to a river, tracing the river is an easy way to create the forest segments shared with the river.
In another scenario, suppose you want to create new lines to represent the road centerlines through a neighborhood. By tracing, you can create new segments that follow the parcel boundaries yet constructed at an offset value to represent the road centerlines.

When tracing, you can specify several settings. To open the Trace Options dialog box, right-click while tracing or press the O key. To trace at an offset, enter a value into the Offset text box. If you enter 0, you will trace directly on top of the existing features. This is one way of duplicating segments in existing features. You also can specify to trace only a certain length or set the appearance of the corners—mitered, beveled, or rounded. In addition, you can choose to remove self-intersecting loops. If the offset distance is large enough, self-intersecting loops are created to preserve any shape attribute values. By checking this option, you automatically remove these loops and drop the associated vertices.
By default, the trace can follow along any feature near your pointer. If you want to trace only features that are selected, hold down the CTRL key while tracing. There is also an option for tracing selected features on the Trace Options dialog box. (If you turn on the option, CTRL then does the reverse, and temporarily allows you to trace any feature.)
- These steps can be used to create vertices in either lines or polygons:
To create a vertex in a line
Click a line feature template in the Create Features window and click the Line tool
 .
.To create a vertex in a polygon
Click a polygon feature template in the Create Features window and click the Polygon tool
 .
. - Click Trace
 on the Editor toolbar palette.
- Optionally, right-click and click Trace Options or press the O key to set an offset value and other options as desired. If you want to trace directly on top of existing features, enter a value of 0.
- Click the map to create the first vertex and start tracing.
- Drag to trace along a feature. If you trace too far or trace in the wrong direction, you can move the pointer backward over what you have traced. If you have clicked to stop the trace and add the vertices, you can click Undo to remove all vertices added during the trace. Press ESC if you need to cancel the trace.
- As you are tracing, you can change which features are being traced by pointing to them and clicking or dragging. If you want to trace only selected features, hold down the CTRL key. When tracing complicated segments, you can press the SPACEBAR to suspend snapping temporarily if you find the trace is getting too slow.
- When tracing at an offset, you can press the TAB key to trace on the opposite side of the edge. This simply makes the offset value negative on the Trace Options dialog box.
- To pan the map while tracing, press either the C key or the middle mouse button. You can also use continuous map panning if you are using basemap layers.
- Optionally, you can switch between tracing and other segment construction methods using the Feature Construction mini toolbar or the palette on the Editor toolbar. For example, this allows you to trace, create a straight or curved segment, then return to tracing.
- Right-click anywhere on the map and click Finish Sketch.