In this topic
- Geoprocessing
- Additional Considerations
- Geoprocessing Services
- Layer and data usage during tool execution
- Edit sessions and background geoprocessing
Geoprocessing
Since ArcGIS 9.2, geoprocessing jobs (i.e. tools or models) can run programmatically using the GeoProcessor.execute() method. The line of code immediately following this method cannot be executed until the geoprocessing tool has completed. Consequently, when a geoprocessing job takes a significant amount of time, the custom application pauses and is unresponsive to the user.
For more information on executing a geoprocessing tool, see Running a geoprocessing tool.
Background geoprocessing
Processing geoprocessing tools in the background is new at the release of ArcGIS 10. Using the GeoProcessor.executeAsync() method, you can execute tools in the background of your custom ArcGIS application. This means that an ArcGIS JavaBean (for example, MapBean, PageLayoutBean, GlobeBean, or SceneBean) will remain responsive to user interaction while a tool is executed in a background process. In other words, data can be viewed and queried while a tool is executing.
Executing a geoprocessing tool in the background requires the following tasks (each step will be expanded upon in greater detail below, a simply synopsis is provided here):
- Define a class that implements the IGeoProcessorEvents3 interface. This interfaces is new at the release of ArcGIS 10 and contains methods that called in response to Events related to executing geoprocessing tools in the background.
- Implement all the interface methods. As part of your contract, you must stub out all the methods contained in the IGeoProcessorEvents3 interface and provided your business logic for events that you wish to respond to. Each method will be discussed in greater detail below.
- Instantiate an object of the class that implements the IGeoProcessorEvents3 interface. This object, referred to as the handler object in Java, is used in the next step.
- Register the handler object created in step 3 above on your geoprocessor object. The GeoProcessor class contains a new method registerGeoProcessorEvents3() that allows you to pass in your handler object, since your handler object will know how to respond to the events generated by background geoprocessing.
- Submit the geoprocessing tool for background execution.
The text below contains a detailed description of each of the following steps. Code snippets presented below are used to help explain the concepts, but might not necessarily reflect a true working scenario in the sense that you will not be able to copy and paste the code into Eclipse and just execute the scenario. If you are familiar with executing GeoProcessing tools, then you should be able to build an application after reading this document. See below for links to relevant documentation if you are not familiar with executing geoprocessing tools using Java.
Step 1: Define class that implements the IGeoProcessor3 interface
When executing geoprocessing tools in the background, your application needs to be able to respond when the tool is finished, since another process is used to execute the geoprocessing tools. To achieve this, a Java class must be defined to implement the IGeoProcess3 interface. The IGeoProcessor3 interface is new at ArcGIS 10 and contains all of the methods that can be fired during the background execution. These events are used to notify your custom application about various aspects of the execution process, for example, when a geoprocessing tool has completed execution.
In the example scenario, a custom command that was used to extend an ArcGIS Engine application was used to implement the IGeoProcessorEvents3 interface as seen in the following code snippet:
[Java]
public class ExecuteGP extends BaseCommand implements IGeoProcessorEvents3{}
Notice that the keywords extends and implements are used in the above class definition. The extends keyword is used to inherit from the BaseCommand class, which allows you to define a custom commend for an ArcGIS Engine application (see Creating custom commands and tools for full details). The second keyword, and more relevant to this discussion, is the implements keyword used to indicate an interface that the Java class must implement.
In Eclipse, this process can be expedited by using the IDE tools to stub out all of the required methods. To achieve this, right-click within the editor for the Java class you are defining, select Source, then click Override/Implement Methods… from the list of options. If done correctly, the following dialog should appear (or one similar to it):
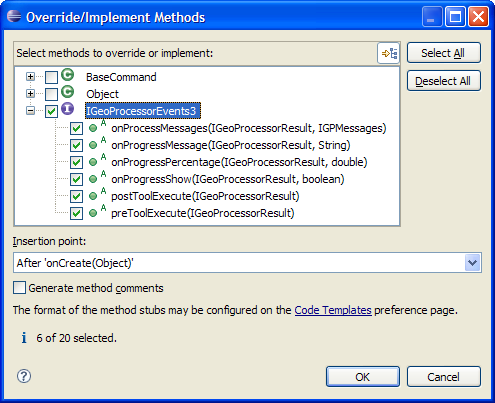
Notice that the IGeoProcessorEvents3 interface is present with all of the methods enabled for implementation. Also note that the BaseCommand class is present (since it's being extended in this case). Clicking OK on this dialog will stub out all of the method signatures as such:
[Java]
public class ExecuteGP extends BaseCommand implements IGeoProcessorEvents3{

    @Override public void onProcessMessages(IGeoProcessorResult result, IGPMessages
        msgs)throws IOException, AutomationException{
        //Application specific code
    }

    @Override public void onProgressMessage(IGeoProcessorResult result, String
        message)throws IOException, AutomationException{
        //Application specific code
    }

    @Override public void onProgressPercentage(IGeoProcessorResult result, double
        percentage)throws IOException, AutomationException{
        //Application specific code
    }

    @Override public void onProgressShow(IGeoProcessorResult result, boolean show)
        throws IOException, AutomationException{
        //Application specific code
    }

    @Override public void postToolExecute(IGeoProcessorResult result)throws
        IOException, AutomationException{
        //Application specific code

    }

    @Override public void preToolExecute(IGeoProcessorResult result)throws
        IOException, AutomationException{
        //Application specific code
    }
}
Step 2: Implement applicable interface methods
At this stage, you need to provide the implementation details for the methods that you wish to respond to for events from the background geoprocessing process. You can provide your business logic for each method in the interface or only the methods you wish. The following looks at each method in greater detail with some code examples to help show their purpose:
onProcessMessages(IGeoProcessorResult result, IGPMessages pMsgs)
The following method is invoked when a message has been posted while the geoprocessing tool is being executed in the background process. The result object passed into this method can be used to retrieve the tool reporting the message. For example, you might have multiple tools being executed on the background geoprocessing queue and you do not know which tool is reporting the message. The pMsgs object gives the message(s) that are being posted by the tool. The following code sample shows you how to report these messages to the standard output (code can easily be modified to report messages in your custom application).
[Java]
@Override public void onProcessMessages(IGeoProcessorResult result, IGPMessages
    pMsgs)throws IOException, AutomationException{

    for (int messageCount = 0; messageCount < pMsgs.getCount(); messageCount++){
        System.out.println("Message " + messageCount + " is: " + pMsgs.getMessage
            (messageCount).getDescription());

        //Application specific code
    }

}
The result object, even though not utilized in the above code, can be useful for retrieving information, such as the name of the tool reporting the message (some additional examples will be illustrated below). Also, it's important to note that an IGPMessages object is return, which represent messages that are generated during validation and execution of a geoprocessing tool. This differs from the next method described below, where only a String message is returned (see below for a detailed explanation). Examples of these types of messages can included the following:
Executing: Buffer "C:/pathToInputData/dataset" "C:/pathToOutputData/dataset" "10 Unknown" FULL ROUND NONE #
Succeeded at Fri Jan 08 13:54:02 (Elapsed Time: 1.00 seconds)
The following message is useful because it reports the parameters that were used in this fictional example to execute the buffer tool. It also reports that the operation was successful and how long it took to execute.
onProgressMessage(IGeoProcessorResult result, String message)
The onProgressMessage() method is invoked depending on which geoprocessing tool is executed and how much data it is processing. The message returned in this instance reports on the execution of a tool as appropriate. For example, when buffering a line dataset a message reported before the tool execution begins is the following:
Buffer lines
This reports that the lines are going to be buffered by the buffer tool. It can also return status like messages, such as the following:
Buffering…
This indicates that the buffering is in progress. As these examples show, these messages are user friendly and help notify the end user on the status of the background execution. Ideally these work well in a status bar that can be easily created, and appending messages as this method is invoked.
onProgressPercentage(IGeoProcessorResult result, double percentage)
The onProgressPercentage() method is invoked depending on which geoprocessing tool is executed and how much data it is processing. The double returned in this instance represents a precentage of the work completed by the tool being executed. This method is useful if you wish to report a progress bar to represent the percentage of the work completed. Java provides the JProgressBar, which can be used to display the percentage for end users (just be aware that it requires a int value and you are receiving a double). The following example code could be used to represent this percentage in the JProgressBar:
[Java]
@Override public void onProgressPercentage(IGeoProcessorResult result, double
    percentage)throws IOException, AutomationException{
    int progressPercentage = (new Double(percentage)).intValue();

    if (progressBar.getValue() < progressPercentage)
        progressBar.setValue(progressPercentage);

}
The code above uses the Double class to convert the primitive double data type into a primitive int data type (as it is required by the setValue() Java API call). To set the value of the JProgressBar object (i.e. progressBar in the above code sample).
onProgressShow(IGeoProcessorResult result, boolean show)
The onProgressShow() method is invoked when progress messages are available. The Boolean value will return true if a progress message is available; otherwise, false is returned. Some geoprocessing tools might not return progress messages and thus this method can be used to avoid displaying a status bar when it is not necessary.
postToolExecute(IGeoProcessorResult result)
This method is invoked immediately after a tool is executed by the background GeoProcessor process. All tools invoke this method when background execution has stopped. The result object passed into this method has the return value of a tool when executed, the status of a job, and geoprocessing messages. In general, the IGeoProcessorResult interface always returns the output values of a tool when it has finished executing. The return value is an object. Typically, this object is the path to the output dataset created or edited by a tool, but it can be other value types, such as a number or a boolean. If an output for a tool is a multi-parameter, the values are returned in a string that consists of multiple strings separated by a semicolon. When a tool has executed, the return value and all messages can be retrieved. See the following code example:
[Java]
@Override public void postToolExecute(IGeoProcessorResult result)throws IOException,
    AutomationException{

    IGeoProcessorResult2 result2 = (IGeoProcessorResult2)result;

    if (result2.getStatus() == esriJobStatus.esriJobSucceeded){
        //Check that there are no information or warning messages.
        if (result2.getMaxSeverity() == 0){
            //Get the return value
            Object returnValue = result.getReturnValue();

            //Application specific code, for example,
            //find the layer to which this return value corresponds.
        }
        else{
            //Application specific code
        }
    }
    else{
        //Get all messages
        IGPMessages messages = result2.getResultMessages();

        for (int index = 0; index < result2.getMessageCount(); index++){
            IGPMessage2 messages2 = (IGPMessage2)messages.getMessage(index);

            //Application specific code
        }
    }
For general information about message severity levels, see Geoprocessing messages.
preToolExecute(IGeoProcessorResult result)
All tools start by invoking the following method just before a tool is taken from the geoprocessing process queue and executed in the background. At this time, the tool's IGeoProcessorResult.getStatus() attribute is still esriJobStatus.esriJobWaiting. As examined above, the progress message methods can fire during tool execution. Whether or not they fire depends on which tool is executing and how much data it is processing. It might be useful in your application to determine which tool this event applies to. The following code illustrates this (it assumes that the CopyFeatures tool is one of the possible tools waiting to execute in the queue):
[Java]
@Override public void preToolExecute(IGeoProcessorResult result)throws IOException,
    AutomationException{

    IGeoProcessorResult2 result2 = (IGeoProcessorResult2)result;

    //Determine if this is the tool to handle this event
    if (result2.getProcess().getTool().getName().equalsIgnoreCase("CopyFeatures") &&
        result2.getInput(0).getAsText().equalsIgnoreCase("C:\\pathToInputDataset")
        && result2.getOutput(0).getAsText().equalsIgnoreCase(
        "C:\\pathToOutputDataset")){
        //Application specific code
    }
}
Notice in this code sample that a couple additional checks are made to verify that the tool you are looking at is in fact the one that is expected (it does not just check the name of the tool). Since you can use the tool multiple times in a model, for example, you might require these additional tests to truly verify that you have the correct tool by verifying it's input and output. This may not be necessary if the tool is only used one time in the model as an example.
Step 3: Instantiate the handler object
In this step, you need to obtain an object of the class that implements the IGeoProcessorEvents3 interface. For example, the source code above defines a class called ExecuteGP that implements this interface. Thus, the code to instantiate an object of this class would be as follows:
[Java]
ExecuteGP executeGP = new ExecuteGP();
It's also possible to instantiate this object at the time you execute Step 4, as defined next. This scenario is examined further in Step 4.
Step 4: Register the handler with the geoprocessing object
At this point, you have defined a class that implements the IGeoProcessorEvents3 interface (steps 1 and 2) and have instantiated and instance of this class (step 3). Step 4 will registerd this handler object with the GeoProcessor object. The following code sample illustrates instantiating the GeoProcessor and calling the registerGeoProcessor3() method to register the handler created in step 3 above.
[Java]
GeoProcessor gp = new GeoProcessor();

//Register the executeGP object with the GeoProcessor object
gp.registerGeoProcessorEvent3(executeGP);
There are two alternative approaches that can be taken to registering the handler. The above scenario created the handler, then called the registerGeoProcessorEvent3() method to register it. One alternative is to instantiate the handler at the time of registration as the following line of code illustrates:
[Java]
//Register the handler object with the GeoProcessor object
gp.registerGeoProcessorEvent3(new ExecuteGP());
The final alternative assumes that you are instantiating the GeoProcessor object inside the class that defines the IGeoProcessorEvents3 interface. In the code examples above the ExecuteGP implements this interface and also instantiates the GeoProcessor object inside the class definition. In this instance, the following third option can be used.
[Java]
//Register the handler object with the GeoProcessor object
gp.registerGeoProcessorEvent3(this);
The this reference, in this instance, referring the to ExecuteGP to refer to an object of the class that the line of code is contained within.
Step 5: Submit the geoprocessing tool for background execution
Step 1-4 generates all of the setup necessary to execute the geoprocessing tool in the background. The GeoProcessor object provides two methods to achieve this step. The first method, executeASync(String name, IVariantArray ipValues), requires the name of the geoprocessing tool (syntax: "ToolName_ToolboxAlias"; e.g. Buffer_analysis) and the parameters for the geoprocessing tools (see, Running a geoprocessing tool, for details).
The second overloaded method, executeASync(GPTool tool), only requires an object of the tool to be executed.
The second overloaded method, executeASync(GPTool tool), can only be used for custom ArcGIS Desktop applications.
To submit a tool for the geoprocessor to run, create the GeoProcessor object, then submit the parameterized tool to the first executeASync() method as shown in the following code:
[Java]
GeoProcessor gp = new GeoProcessor();

gp.registerGeoProcessorEvents3(this);
gp.executeASync("Buffer_analysis", bufferValues);
In this code scenario, this, refers to the ExecuteGP class that this code is defined within. The executeASync() method receives the tool name and the values necessary for executing the tool.
Alternatively, the overloaded method can be used in the following fashion:
[Java]
GeoProcessor gp = new GeoProcessor();
gp.registerGeoProcessorEvents3(this);

Buffer buffer = new Buffer();
buffer.setInFeatures("C://pathToInputData"); //Set the input
buffer.setOutFeatureClass("C://pathToOutputFeatureClass"); //Set the output
buffer.setBufferDistanceOrField(new Integer(10)); //Set the buffer distance

gp.executeASync(buffer);
Both executeASync() methods submit tools to a geoprocessing queue that exists in the current process. At this time, the tools IGeoProcessorResult object that is returned when the executeASync() method is called as a status attribute with the value esriJobStatus.esriJobWaiting. A tool on the geoprocessing queue will not execute until the method that added the tool to the queue has been fully processed. Tools are executed in a background process in the order in which they were added to the queue.
The input and output parameters for each geoprocessing tool are documented in the toolbox to which a tool belongs. For a description of each toolbox, see the Geoprocessing Tool Reference under the Geoprocessing section of the ArcObjects developer guide of this Java Help System.
Additional Considerations
The following section looks at some additional considerations that might apply to your use of processing geoprocessing tools in the background.
Geoprocessing Services
If the geoprocessing task is in a service executed on a server, the mechanism to execute the task and listen for feedback is described in Running a geoprocessing tool in detail. To run multiple geoprocessing tasks asynchronously with each other, use multi-threaded execution on the server.
Layer and data usage during tool execution
When a tool is waiting to execute, an application is free to use data that is input to a tool or that will be overwritten by the output of a tool. During tool execution, the following tasks can be accomplished:
- Changing the visibility, selectability, and connection details of a layer to a tool or that will be overwritten by the output of a tool.
- Searching and selecting data input to a geoprocessing tool - for example, using the IFeatureLayer.search() and IFeatureClass.select() methods.
During tool execution, the following tasks succeed or fail depending on what the geoprocessing tool is currently doing with the data:
- Editing table rows of input or output data in or out of an edit session.
- Using the IFeatureLayer.search() and IFeatureClass.select() methods on output data. The set of table rows returned is undefined, since the table is in the process of being populated.
When these methods are run on output data from a geoprocessing tool, the geoprocessing tool can fail and return an esriJobStatus.esriJobFail status. During tool execution, you cannot obtain a schema lock on input and output data, and schema changes made without a schema lock will not take effect.
Edit sessions and background geoprocessing
This section describes what actions the ArcGIS application can take if an geoprocessing tool is being executed during an edit session or, conversely, if an edit session is started while executing a tool in the background.
Start editing, then execute a tool in the background
Before executing a geoprocessing tool, check whether the user is editing the dataset's input to and output from the tool. The best practice is, if editing, to prompt the user to save edits and stop editing. This can be achieved in the preToolExecute() method that you can write code similar to the following:
[Java]
public void preToolExecute(IGeoprocessorResult result){

    IGeoProcessorResult2 result2 = (IGeeoProcessorResult2)result;

    //Get the single feature class input parameter
    IGPParameter parameter = (IGPParameter)result2.getProcess().getInputParameters()
        .getElement(0);

    String parameterPath = "";

    if (parameter.getDataType().getDisplayName().equalsIgnoreCase("FeatureClass")){
        parameterPath = parameter.getValue().getAsText();
    }

    //Check whether this dataset is being edited.
    EngineEditor engineEditor = new EngineEditor();

    if (engineEditor.getEditState() == esriEngineEditState.esriEngineStateEditing &&
        engineEditor.getEditWorkspace() != null){
        IEnumDatasetName datasetNames =
            engineEditor.getEditWorkspace.getDatasetNames(esriDatasetType.esriDTAny);

        IDatasetName name = datasetNames.next();

        while (name != null){
            String path = engineEditor.getEditWorkspace().getPathName() + "\\" +
                name.getName();

            if (path.equalsIgnoreCase(parameterPath)){
                //This dataset is being edited. Prompt the user to stop editing.
            }

        }

    }

}
If editing is not stopped, the geoprocessing tool will fail. This failure is confirmed by checking for the esriJobStatus.esriJobFail status and reading the IGeoProcessorResult messages in the preToolExecute() method.
Another option is to let the user continue editing, cancel the background geoprocessing or let it fail, then rever to executing the geoprocessing tool using the alternative execute methods. In the preToolExecute() method, call IGeoProcessorResult2.cancel() method, then check that the tool is cancelled using the status of the result object passed into the preToolExecute() method, then use either execute() method. The alternative execute() method prevents the user from interacting with the application until the geoprocessing tool has completed. This option may be preferable to requiring the user to save or discard edits, especially if the geoprocessing tool completes in a timely manner. All edits that the tool has made in the edit workspace are saved when editing is stopped.
Execute a tool in the background, then start editing
If your edited map contains layers and source data that are input to or output from geoprocessing tools, the start editing functionality will not be blocked. However, if your edited map contains only layers and source data that are the output to geoprocessing tools, the start editing functionality will be blocked.
The start editing process is only blocked by the background geoprocessing process during tool execution. It is possible that your application will attempt to start editing before it can be blocked. Therefore, before the user or application starts editing data, check whether or not this data is (or will become) the input to or output from any geoprocessing tool that is queued for execution or is executing. To do this, maintain a list of IGeoProcessorResult2 objects with the result of each geoprocessing tool you have queued, then catch the IEditEvents.onStartEditing or IWorkspaceEditEvents.onStartEditing event. If any tool is running or is scheduled to run, check each tool's parameters (from the list of IGeoProcessorResult2 objects) against the edited workspace, as shown in the previous code example.
See Also:
Running a geoprocessing toolAccessing geoprocessing tools and toolboxes
| Development licensing | Deployment licensing |
|---|---|
| Engine Developer Kit | Engine |
| ArcGIS for Desktop Basic | ArcGIS for Desktop Basic |
| ArcGIS for Desktop Standard | ArcGIS for Desktop Standard |
| ArcGIS for Desktop Advanced | ArcGIS for Desktop Advanced |