
The easiest and recommended way to add a custom menu is to build an add-in. For information on using add-ins, see Building add-ins for ArcGIS Desktop.
In this topic
- Create a class library
- Add references
- Delete the class1 file
- Create MyBaseMenu
- Understand and edit MyBaseMenu
- Add a custom command as a menu item
- Compile the project
- Add and use MyBaseMenu in ArcMap
- Debug the menu
- Deploy the command
Create a class library
To create a class library, perform the following steps:
- Open Visual Studio.
- Click File, click New, and click Project. The New Project dialog box opens.
To complete this scenario, use C# or Visual Basic (VB) .NET. The code for both languages is shown, and the full solutions for both languages are included in the associated sample. However, this topic only shows the C# dialog boxes and screen shots since the dialog boxes and views you interact with in VB.NET are very similar.
- Select Visual C# or Visual Basic under the Project types area, click the ArcGIS node, then click Desktop.
- Click the Class Library (ArcMap) template under the Templates area.
- Name the project CustomMenu and click Browse to navigate to the location where you want to save the project. See the following screen shot:
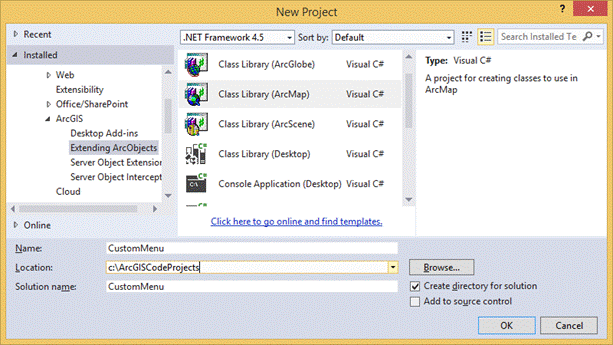
- Click OK to create the project. The ArcGIS Project Wizard dialog box opens.
If the Create directory for solution check box is selected, Visual Studio creates a subdirectory of the selected directory to store your project files. The name of the new directory will be the specified project name.
Add references
To add references to the ESRI object libraries to your .NET project and reference System.Drawing, perform the following steps:
- As part of the ArcGIS Visual Studio Integration Framework features, the ArcGIS Project Wizard steps you through adding references to .NET assemblies. The ArcGIS Project Wizard appears after you click OK on the New Project dialog box. Although there are other formats for viewing the available ESRI references, this walkthrough uses the default Filter by: Product Features view. See the following screen shot:

- Since you are creating an ArcGIS Desktop application, only assemblies relevant to ArcGIS Desktop display. Click to expand the Desktop ArcMap node and select the following assemblies:
- ESRI.ArcGIS.ADF.Local
- ESRI.ArcGIS.ArcMapUI
- ESRI.ArcGIS.Carto
- ESRI.ArcGIS.DataSourcesFile
- ESRI.ArcGIS.Display
- ESRI.ArcGIS.Framework
- ESRI.ArcGIS.Geodatabase
- ESRI.ArcGIS.Geometry
- ESRI.ArcGIS.System
- ESRI.ArcGIS.SystemUI
To select multiple items at once, press and hold the Ctrl key while you click each item, then click Add to include the references under the Selected Assemblies area. See the following screen shot: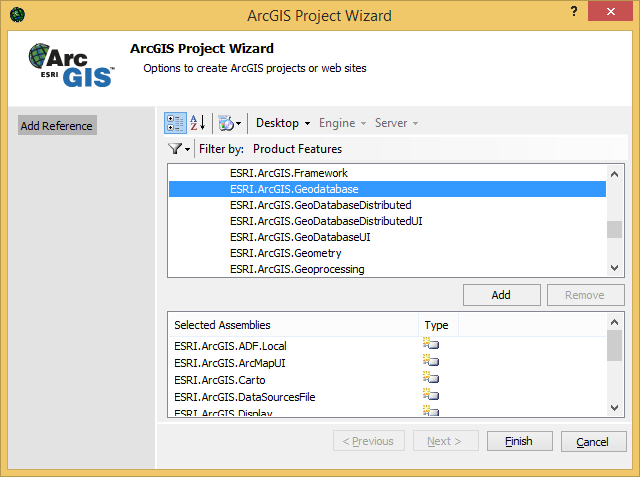
- Click Finish to create the project.
- To reference System.Drawing, click the Project menu, click Add Reference, click the .NET tab, and click System.Drawing under the Component Name area. See the following screen shot:

- Click OK. The assembly reference is added.
- To view recently added references, reopen the Add Reference dialog box, and click the Recent tab.
- Click OK to close the dialog box.
Delete the class1 file
When your project is created, a class1 file (either .cs or .vb, depending on the selected language) is added to the project by default; however, this walkthrough does not use this file. Right-click the class1 file in Solution Explorer, click Delete, and click OK to permanently delete the file.
Create MyBaseMenu
- In Solution Explorer, right-click the project, click Add, and click New Item. The Add New Item dialog box opens.
- Under the Categories area, click the Common Items node, and click ArcGIS.
- Click Base Menu under the Templates area, name the class MyBaseMenu.cs (C#) or MyBaseMenu.vb (VB .NET), and click Add. See the following screen shot:
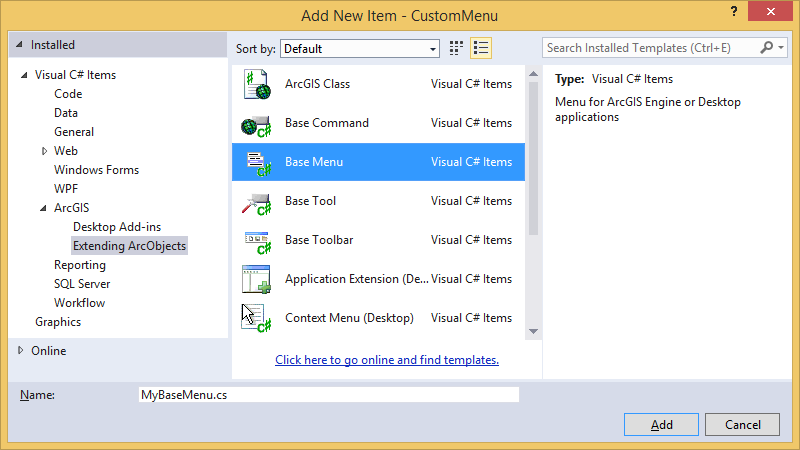
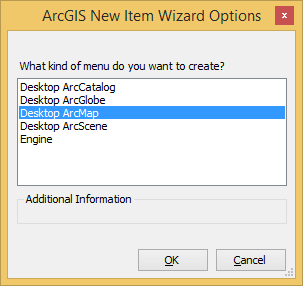
The ArcGIS New Item Wizard Options dialog box opens.
- Click Desktop ArcMap, and click OK. See the following screen shot:
As part of the ArcGIS Visual Studio Integration Framework features, when you use the Add Item templates for Desktop ArcMap commands, most of the plumbing code is done. One main goal of the MyBaseMenu template code is to make it easy for you to add ArcObjects functionality to your application in the form of menu items. In this section, some of the plumbing code is explained in more detail along with any modifications that may be necessary (see the MyBaseMenu.vb or MyBaseMenu.cs code examples for details).
- The MyBaseMenu class inherits from the BaseMenu abstract base class. Abstract classes are classes that cannot be instantiated and are sometimes partially implemented or not implemented at all. BaseMenu provides a basic implementation for IMenuDef.
- Since you want your menu to appear as a root level item with the other ArcMap menu items on the graphical user interface (GUI), implement the ESRI.ArcGIS.Framework.IRootLevelMenu interface. This can be done by modifying the code as shown in the following code example:
public sealed class MyBaseMenu: BaseMenu, ESRI.ArcGIS.Framework.IRootLevelMenu
<ComClass(MyBaseMenu.ClassId, MyBaseMenu.InterfaceId, MyBaseMenu.EventsId), _
          ProgId("CustomMenus.MyBaseMenu")> _
          Public NotInheritable Class MyBaseMenu
    Inherits BaseMenu
    Implements ESRI.ArcGIS.Framework.IRootLevelMenu
- COM registration functions and globally unique identifiers (GUID) are automatically added. These allow ArcObjects to use the .NET code. You do not need to edit these sections unless you want different GUIDs or want to add the menu to additional component categories. For more information, see Using ArcObjects (COM-based) in .NET and Binary compatibility.
- Another piece of menu template plumbing code is the Name property. The Name property is the internal name of the menu when accessing it by code. You do not need to edit this section, since you specified the name of your menu in the Add New Item dialog box.
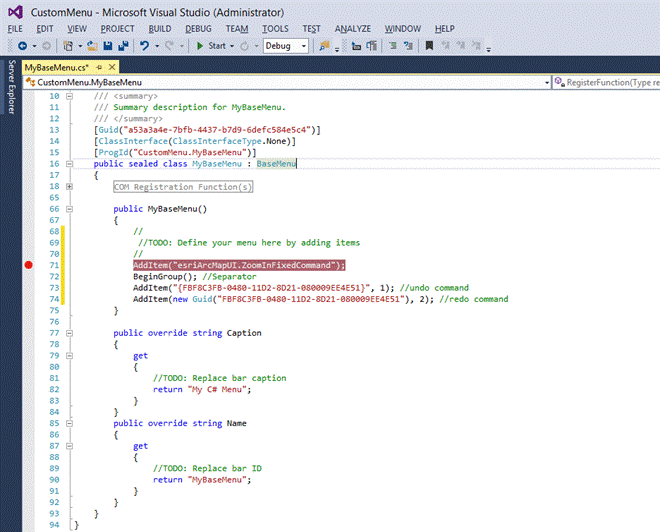
- Another important piece of plumbing code in the class template that needs an explanation and modification is the constructor. For the constructor, uncomment a few lines of code to add some predefined ArcMap commands to the menu. These command items are added by their ProgID or class identifier (CLSID). See the following code example for the changes to make:
public MyBaseMenu()
{
    //
    // TODO: Define your menu by adding items.
    //
    AddItem("esriArcMapUI.ZoomInFixedCommand");
    BeginGroup(); //Separator.
    AddItem("{FBF8C3FB-0480-11D2-8D21-080009EE4E51}", 1); //Undo command.
    AddItem(new Guid("FBF8C3FB-0480-11D2-8D21-080009EE4E51"), 2); //Redo command.
}
Public Sub New()
    '
    'TODO: Define your menu by adding items.
    '
    AddItem("esriArcMapUI.ZoomInFixedCommand")
    BeginGroup() 'Separator.
    AddItem("{FBF8C3FB-0480-11D2-8D21-080009EE4E51}", 1) 'Undo command.
    AddItem(New Guid("FBF8C3FB-0480-11D2-8D21-080009EE4E51"), 2) 'Redo command.
End Sub
For a complete list of the available ProgID and CLSID ArcMap commands that can be added to the menu, see ArcMap commands.
- The final piece of plumbing code in the class template that needs an explanation and modification is the Caption property. The Caption property is the text that displays for the menu when it is added to the ArcMap GUI. See the following code example for the changes to make:
public override string Caption
{
    get
    {
        //TODO: Replace bar caption.
        return "My_Menu";
    }
}
Public Overrides ReadOnly Property Caption() As String
Get
'TODO: Replace bar caption.
Return "My_Menu"
End Get
End Property
Add a custom command as a menu item
In the preceding section, you learned that you can add existing ArcMap commands to your menu by calling the AddItem function and passing in the desired CLSID or ProgID. In this section you will learn that you can create your own commands and add them to your menu as well. This is accomplished by adding a command using the ArcGIS item template, implementing some functionality, then adding your command to the menu.
The following steps add the functionality of adding a shapefile to ArcMap:
-
In Solution Explorer, right-click the project, click Add, and click New Item. The Add New Item dialog box opens.
-
Under the Categories area, click the Common Items node, then click ArcGIS.
-
Under the Templates area, click Base Command, name the class AddShapefile.cs (C#) or AddShapefile.vb (VB .NET), then click Add. See the following screen shot:
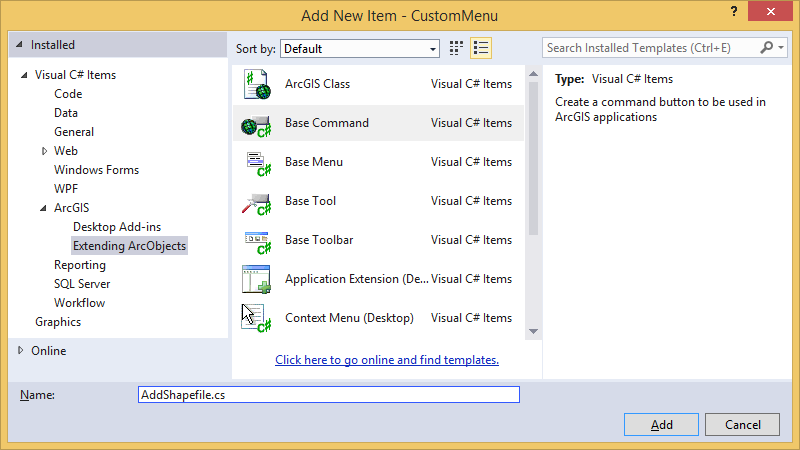
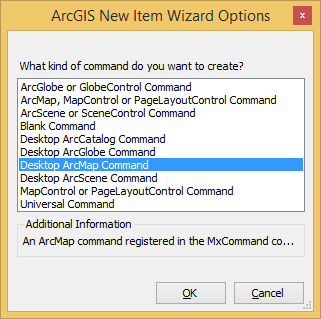
The ArcGIS New Item Wizard Options dialog box opens. - Click Desktop ArcMap Command, and click OK (this adds the template code for the AddShapefile class). See the following screen shot:
5. By default, a bitmap is added to your project. This bitmap will be the icon you click in ArcMap to use as your custom command. You can customize the bitmap with the image editor. To accomplish this, double-click AddShapefile.bmp on Solution Explorer and use Visual Studio's tools to design your bitmap file. See the following screen shot for the edits made to the bitmap:
Modify the constructor of the AddShapefile class as shown in the following code example:
public AddShapefile()
{

    base.m_category="Developer Samples";
    base.m_caption="Add Shapefile";
    base.m_message="Adds a shapefile to the focus map";
    base.m_toolTip="Adds a shapefile";
    base.m_name="CustomMenus_AddShapefile";

    try
    {
        string bitmapResourceName=GetType().Name + ".bmp";
        base.m_bitmap=new Bitmap(GetType(), bitmapResourceName);
    }
    catch (Exception ex)
    {
        System.Diagnostics.Trace.WriteLine(ex.Message, "Invalid Bitmap");
    }
}
Public Sub New()

    MyBase.New()

    MyBase.m_category="Developer Samples"
    MyBase.m_caption="Add Shapefile"
    MyBase.m_message="Adds a shapefile to the focus map"
    MyBase.m_toolTip="Adds a shapefile"
    MyBase.m_name="CustomMenus_AddShapefile"

    Try
    Dim bitmapResourceName As String=Me.GetType().Name + ".bmp"
    MyBase.m_bitmap=New Bitmap(Me.GetType(), bitmapResourceName)
    Catch ex As Exception
    System.Diagnostics.Trace.WriteLine(ex.Message, "Invalid Bitmap")
    End Try

End Sub
An item of interest in the added template plumbing code in the AddShapefile class is the m_application member variable, which is assigned the ArcMap application in the OnCreate event and is the hook for this class to begin its functionality.
- Another feature of the ArcGIS Visual Studio Integration Framework is ArcGIS snippets. ArcGIS snippets are chunks of ArcObjects reusable code that can be inserted into your project. To access ArcGIS snippets, right-click the Visual Studio code editor window at the necessary insertion point (before the end of the class file), and Insert Snippet: Double-click `ArcObjects` from the popup window. Double-click 'Mapping'. Double click the 'Add Shapefile Using OpenFileDialog' snippet.
#region "Add Shapefile Using OpenFileDialog"
public void AddShapefileUsingOpenFileDialog(ESRI.ArcGIS.Carto.IActiveView activeView)
{
    //Parameter check.
    if (activeView == null)
    {
        return ;
    }

    // Use the OpenFileDialog class to choose the shapefile to load.
    System.Windows.Forms.OpenFileDialog openFileDialog=new
        System.Windows.Forms.OpenFileDialog();
    openFileDialog.InitialDirectory="c:\\";
    openFileDialog.Filter="Shapefiles (*.shp)|*.shp";
    openFileDialog.FilterIndex=2;
    openFileDialog.RestoreDirectory=true;
    openFileDialog.Multiselect=false;

    if (openFileDialog.ShowDialog()=System.Windows.Forms.DialogResult.OK)
    {
        // The user chose a particular shapefile.

        // The returned string will be the full path, file name, and file extension for the chosen
        // shapefile. Example: "C:\test\cities.shp".
        string shapefileLocation=openFileDialog.FileName;

        if (shapefileLocation != "")
        {
            // Ensure the user chooses a shapefile.

            // Create a new ShapefileWorkspaceFactory CoClass to create a new workspace.
            ESRI.ArcGIS.Geodatabase.IWorkspaceFactory workspaceFactory=new
                ESRI.ArcGIS.DataSourcesFile.ShapefileWorkspaceFactoryClass();

            // System.IO.Path.GetDirectoryName(shapefileLocation) returns the directory part of the
            // string. Example: "C:\test\".
            ESRI.ArcGIS.Geodatabase.IFeatureWorkspace featureWorkspace=
                (ESRI.ArcGIS.Geodatabase.IFeatureWorkspace)
                workspaceFactory.OpenFromFile(System.IO.Path.GetDirectoryName
                (shapefileLocation), 0); // Explicit Cast

            // System.IO.Path.GetFileNameWithoutExtension(shapefileLocation) returns the base file
            // name (without extension). Example: "cities".
            ESRI.ArcGIS.Geodatabase.IFeatureClass featureClass =
                featureWorkspace.OpenFeatureClass
                (System.IO.Path.GetFileNameWithoutExtension(shapefileLocation));

            ESRI.ArcGIS.Carto.IFeatureLayer featureLayer=new
                ESRI.ArcGIS.Carto.FeatureLayerClass();
            featureLayer.FeatureClass=featureClass;
            featureLayer.Name=featureClass.AliasName;
            featureLayer.Visible=true;
            activeView.FocusMap.AddLayer(featureLayer);

            // Zoom the display to the full extent of all layers in the map.
            activeView.Extent=activeView.FullExtent;
            activeView.PartialRefresh
                (ESRI.ArcGIS.Carto.esriViewDrawPhase.esriViewGeography, null, null);
        }
        else
        {
            // The user did not choose a shapefile.
            // Do whatever remedial actions as necessary.
            // System.Windows.Forms.MessageBox.Show("No shapefile chosen", "No Choice #1",
            // System.Windows.Forms.MessageBoxButtons.OK,
            // System.Windows.Forms.MessageBoxIcon.Exclamation);
        }
    }
    else
    {
        // The user did not choose a shapefile and clicked Cancel or closed the dialog box by
        // clicking the X button.
        // Do whatever remedial actions as necessary.
        // System.Windows.Forms.MessageBox.Show("No shapefile chosen", "No Choice #2",
        // System.Windows.Forms.MessageBoxButtons.OK,
        // System.Windows.Forms.MessageBoxIcon.Exclamation);
    }
}

#endregion
#Region "Add Shapefile Using OpenFileDialog"

Public Sub AddShapefileUsingOpenFileDialog(ByVal activeView As ESRI.ArcGIS.Carto.IActiveView)

    'Parameter check.
    If activeView Is Nothing Then
        Return
    End If

    ' Use the OpenFileDialog class to choose the shapefile to load.
    Dim openFileDialog As System.Windows.Forms.OpenFileDialog=New System.Windows.Forms.OpenFileDialog
    openFileDialog.InitialDirectory="c:\"
    openFileDialog.Filter="Shapefiles (*.shp)|*.shp"
    openFileDialog.FilterIndex=2
    openFileDialog.RestoreDirectory=True
    openFileDialog.Multiselect=False

    If openFileDialog.ShowDialog=System.Windows.Forms.DialogResult.OK Then

        ' The user chose a particular shapefile.
        ' The returned string will be the full path, file name, and file extension for the chosen
        ' shapefile. Example: "C:\test\cities.shp".
        Dim shapefileLocation As String=openFileDialog.FileName

        If shapefileLocation <> "" Then

            ' Ensure the user chooses a shapefile.

            ' Create a new ShapefileWorkspaceFactory CoClass to create a new workspace.
            Dim workspaceFactory As ESRI.ArcGIS.Geodatabase.IWorkspaceFactory=New ESRI.ArcGIS.DataSourcesFile.ShapefileWorkspaceFactoryClass

            ' System.IO.Path.GetDirectoryName(shapefileLocation) returns the directory part of the
            ' string. Example: "C:\test\".
            Dim featureWorkspace As ESRI.ArcGIS.Geodatabase.IFeatureWorkspace=CType(workspaceFactory.OpenFromFile(System.IO.Path.GetDirectoryName(shapefileLocation), 0), ESRI.ArcGIS.Geodatabase.IFeatureWorkspace) ' Explicit Cast

            ' System.IO.Path.GetFileNameWithoutExtension(shapefileLocation) returns the base
            ' filename (without extension). Example: "cities".
            Dim featureClass As ESRI.ArcGIS.Geodatabase.IFeatureClass=featureWorkspace.OpenFeatureClass(System.IO.Path.GetFileNameWithoutExtension(shapefileLocation))
            Dim featureLayer As ESRI.ArcGIS.Carto.IFeatureLayer=New ESRI.ArcGIS.Carto.FeatureLayerClass
            featureLayer.FeatureClass=featureClass
            featureLayer.Name=featureClass.AliasName
            featureLayer.Visible=True
            activeView.FocusMap.AddLayer(featureLayer)

            ' Zoom the display to the full extent of all layers in the map.
            activeView.Extent=activeView.FullExtent
            activeView.PartialRefresh(ESRI.ArcGIS.Carto.esriViewDrawPhase.esriViewGeography, Nothing, Nothing)

        Else

            ' The user did not choose a shapefile.
            ' Do whatever remedial actions as necessary.
            ' System.Windows.Forms.MessageBox.Show("No shapefile chosen", "No Choice #1",
            ' System.Windows.Forms.MessageBoxButtons.OK,
            'System.Windows.Forms.MessageBoxIcon.Exclamation)

        End If

    Else

        ' The user did not choose a shapefile and clicked Cancel or closed the dialog box by
        ' clicking the X button.
        ' Do whatever remedial actions as necessary.
        ' System.Windows.Forms.MessageBox.Show("No shapefile chosen", "No Choice #2",
        ' System.Windows.Forms.MessageBoxButtons.OK,
        ' System.Windows.Forms.MessageBoxIcon.Exclamation)

    End If

End Sub

#End Region
To collapse the ArcGIS snippet, click the plus (+) sign next to #region"Add Shapefile Using OpenFileDialog". The code's functionality is still available; however, the code in that region is hidden making the file easier to read when there is a lot of code.
- Now that the snippet is in place, call it from the OnClick method to execute the code when the custom command is clicked in ArcMap via the menu. The AddShapefileUsingOpenFileDialog function requires an ESRI.ArcGIS.Carto.IActiveView reference. See the following code example:
The OnClick function is in the Overridden Class Methods region. If necessary, expand that region by clicking the plus (+) sign to see the method.
public override void OnClick()
{
    IMxDocument mxDocument=m_application.Document as IMxDocument;
    AddShapefileUsingOpenFileDialog(mxDocument.ActiveView);
}
Public Overrides Sub OnClick()
Dim mxDocument As IMxDocument
mxDocument=m_application.Document As IMxDocument
AddShapefileUsingOpenFileDialog(mxDocument.ActiveView)
End Sub
- The final step in adding a custom command as a menu item is to create an instance of the AddShapefile class, then use the AddItem function in the constructor of the MyBaseMenu class. Modify the code as shown in the following code example in the MyBaseMenu.cs or MyBaseMenu.vb file:
public MyBaseMenu()
{
    //
    // Define the menu by adding items.
    //
    AddItem("esriArcMapUI.ZoomInFixedCommand");
    BeginGroup(); //Separator.
    AddItem("{FBF8C3FB-0480-11D2-8D21-080009EE4E51}", 1); //Undo command.
    AddItem(new Guid("FBF8C3FB-0480-11D2-8D21-080009EE4E51"), 2); //Redo command.

    BeginGroup(); //Add a separator.
    AddItem("CustomMenus.AddShapefile");
}
Public Sub New()
    '
    ' Define the menu by adding items.
    '
    AddItem("esriArcMapUI.ZoomInFixedCommand")
    BeginGroup() 'Separator.
    AddItem("{FBF8C3FB-0480-11D2-8D21-080009EE4E51}", 1) 'Undo command.
    AddItem(New Guid("FBF8C3FB-0480-11D2-8D21-080009EE4E51"), 2) 'Redo command

    BeginGroup() ' Add a separator.
    AddItem("CustomMenus.AddShapefile", 3)
End Sub
The string that is added using the AddItem method is CustomMenus.AddShapefile. This is analogous to a ProgID for an existing ArcMap command. To determine� the string to use for a command in a .NET project, look at the root namespace in the project's properties. In this example, it's CustomMenu. Append a dot (.) and the name of the class file you want to instantiate. In this example, it's AddShapefile.
Compile the project
Build the project by performing the following steps:
- Save the project.
- Click the Build menu and click Build Solution.
- View the output window at the bottom of the Visual Studio .NET IDE. If the project builds correctly, a report shows that the build succeeded.
Check the results of the build operation by viewing the project's subdirectories. By default, build a debug version of the project. The .dll file that results from the build operation is stored in the Bin\Debug subdirectory of your project. This directory also contains debug information (.pdb) and a type library (.tlb) file produced by the Assembly Registration tool.
The obj subdirectory of the project directory contains temporary files used by the compiler and by Visual Studio.
- If you successfully followed this walkthrough, the build succeeds, and you can close Visual Studio since the custom command has been created. If your build operation did not succeed, select the Error List window to view the errors, correct the errors as indicated, and close Visual Studio once you have a successful build.
If you double-click the error, the line of code causing the error is automatically selected.
Add and use MyBaseMenu in ArcMap
To use the custom MyBaseMenu menu in ArcMap, perform the following steps:
- Start ArcMap.
- Click the Customize menu, and click Customize Mode. The Customize dialog box opens.
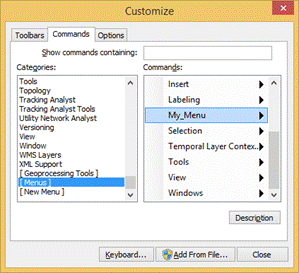
- Click the Commands tab and in the Categories area, scroll down and click [Menus]. See the following screen shot:
If you do not see your category or command, verify Register for COM Interop is checked in your Visual Studio project's properties under the Build tab, then rebuild the project.
- In the Commands area, click My_Menu, drag it onto the ArcMap GUI in the menu bar area, then click Close. You can now access the functionality on your custom menu. See the following screen shot:

Debug the menu
Running the command in debug mode allows you to step through the code when it's executed (helpful when you receive bugs in your work). Even if you don't need to debug the code created in this walkthrough, familiarize yourself with these steps.
When you created your project, ArcMap.exe was set as the application to use for debugging by the ArcGIS Visual Studio Integration Framework. The following steps go through the process of setting it. Set it when you work with a project that is not created by the ArcGIS Visual Studio Integration Framework or if the project user file (*.csproj.user or *.vbproj.user) gets removed (where the debugging setting is stored).
When you created your project, ArcMap.exe was set as the application to use for debugging by the ArcGIS Visual Studio Integration Framework. The following steps go through the process of setting it. Set it when you work with a project that is not created by the ArcGIS Visual Studio Integration Framework or if the project user file (*.csproj.user or *.vbproj.user) gets removed (where the debugging setting is stored).
- Return to the solution in the Visual Studio IDE.
- Verify that ArcMap.exe is set as the external program to use for debugging. This is another feature set for you by the ArcGIS project template when you create your project.
- Right-click the CustomMenu project in the Solution Explorer window and click Properties.
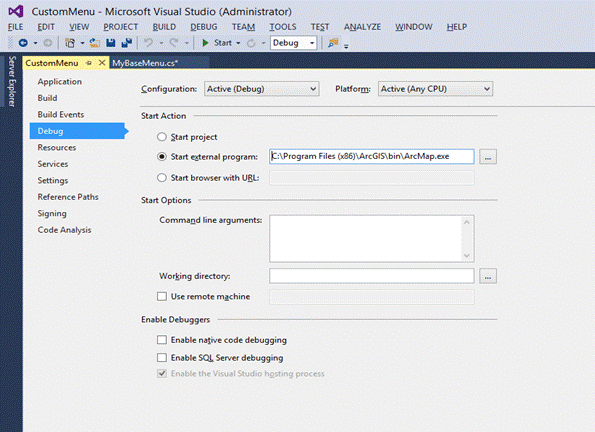
- Click the Debug tab on the property page.
- Under the Start Action area, select Start external program to use ArcMap.exe in the Bin folder of your ArcGIS install directory. See the following screen shot:
Debugging preferences are not set in the associate sample files since that information is stored in the project user file (*.csproj.user or *.vbproj.user) and these files are not included with the samples. If you're trying to debug using the provided sample, set ArcMap.exe as the debug application.
If the project user file has been removed since you created the project, Start Action will be set to Start project. To debug, select Start external application and browse to ArcMap.exe.
With the default installation settings, ArcMap.exe is installed in \Program Files\ArcGIS\Bin.
- In the code window for the MyBaseMenu file, find the class constructor - MyBaseMenu() in C#, New() in VB .NET - and set a breakpoint. To set a breakpoint in the Visual Studio IDE, click the margin indicator bar (the gray area on the left side of the code editor) next to the code where you want the breakpoint set. See the following screen shot:
- Click the Debug menu and click Start Debugging (or press F5); Visual Studio runs ArcMap. Follow the steps in the Add and use MyBaseMenu in ArcMap section to review the code. When the MyBaseMenu class is instantiated, the debugger returns to Visual Studio and allows you to step through the code one line at a time with the buttons on the debugging toolbar.
Deploy the command
Once you have created your command, run it on another user's ArcGIS Desktop application. To do this, deploy your command. For more information, see the Deploying custom components.
See Also:
Creating toolbars and menusSample: Add a custom menu created in .NET to ArcGIS Desktop
Creating commands and tools
Deploying custom components
| Development licensing | Deployment licensing |
|---|---|
| ArcGIS Desktop Basic | ArcGIS Desktop Basic |
| ArcGIS Desktop Standard | ArcGIS Desktop Standard |
| ArcGIS Desktop Advanced | ArcGIS Desktop Advanced |