
In this topic
- About creating a command by inheriting from BaseCommand
- Create a class library
- Add references
- Delete the class1 file
- Create a ZoomToLayer command
- Change the default icon bitmap
- Inherit the BaseCommand abstract class
- Add code to the overridden constructor of BaseCommand
- Add ZoomToLayer functionality
- Expose the ZoomToLayer class to COM
- Compile the project
- Use the command in ArcMap
- Debug the command
- Deploy the command
About creating a command by inheriting from BaseCommand
This walkthrough shows how to create a simple command that zooms the extent of the selected layer. This command is written by inheriting from the Esri BaseCommand class available in the Application Developer Framework (ADF) assembly.
Create a class library
To create a class library, follow these steps:
- Start Visual Studio.
While this walkthrough refers to and shows screen shots from Visual Studio 2008 running on Windows Vista, you can also follow it on Windows XP. The sample associated with this walkthrough contains the solution and project files for Visual Studio 2010.
- Click File, click New, and click Project.
To complete this scenario, use C# or Visual Basic (VB) .NET. The code for both is shown, and the full solutions for both languages are included in the associated sample. However, this topic only shows the C# dialog boxes in the screen shots, since the dialog boxes and views you interact with in VB .NET are very similar.
- On the New Project dialog box, click the Visual C# or Visual Basic Projects node under the Project types pane, click the ArcGIS node, then click the Desktop node.
Depending on whether you selected C# or VB .NET as your main language when you installed Visual Studio, the other language will be in the Other Languages node under the Project types pane.
- Click the Class Library (ArcMap) template under the Templates pane.
- Name the project CommandInheritingBaseCommand and browse to the location where you want to save the project. See the following screen shot:
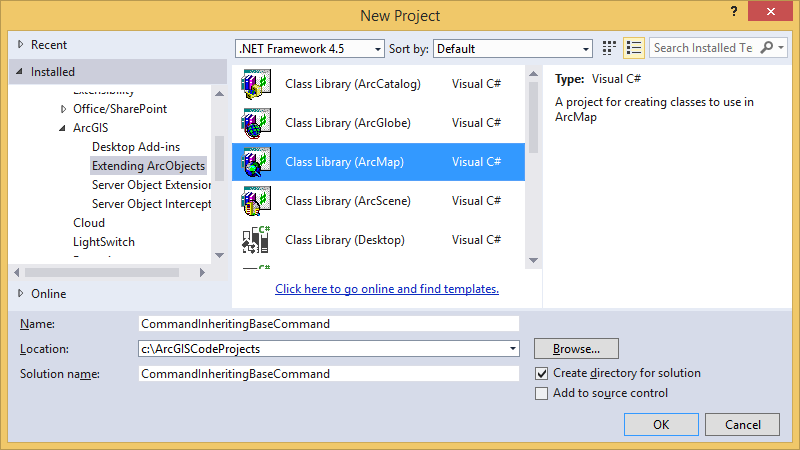
- Click OK on the New Project dialog box to create the project.
If the Create directory for solution check box is selected, Visual Studio creates a subdirectory of the selected directory to store your project files. The name of the new directory will be the project name you specified.
Add references
You will need to add references to the Esri object libraries to your C# project and reference System.Drawing.
In VB 6 or VC++ ArcObjects projects, add a reference to the Esri object libraries, which contain information about Component Object Model (COM) objects. Although .NET cannot use COM objects directly, the COM interoperability services provided by the .NET framework allows you to use COM objects in your .NET project. Using the tools available in Visual Studio, you can create a runtime callable wrapper, which allows a .NET component to create and call methods on a COM object. However, Esri provides .NET runtime callable wrappers for you, and you will use them to instantiate and make calls on the objects in the Esri object libraries from your .NET project.
Esri also provides the ESRI.ArcGIS.ADF.Local assembly that will be used in this walkthrough. It contains the ESRI.ArcGIS.ADF.BaseClasses namespace, which provides abstract classes you inherit from to help create a command or tool. It also contains the ESRI.ArcGIS.ADF.CATIDs namespace that contains classes to help you register your components to Esri component categories.
To add references, follow these steps:
-
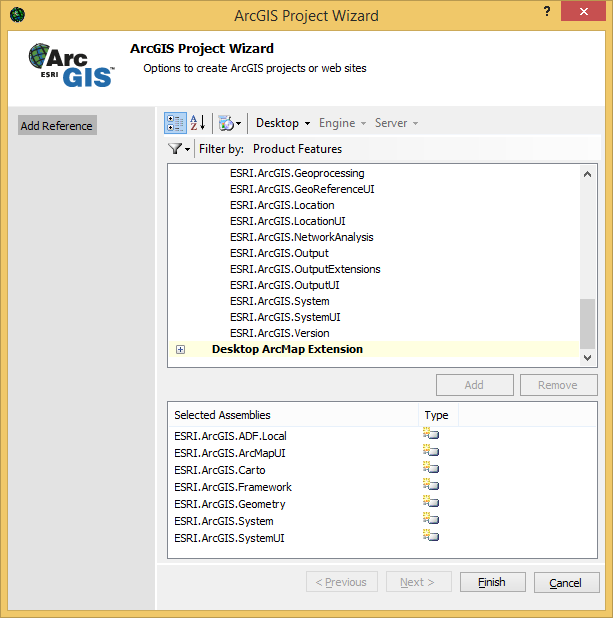
As part of the ArcGIS Visual Studio Integration Framework features, the ArcGIS Project Wizard guides you through adding in references to .NET assemblies. The ArcGIS Project Wizard appears after you click OK from the previously shown New Project dialog box. Although there are other formats for viewing the available Esri references, use the default Filter by: Product Features view. See the following screen shot:

-
Since you are creating an ArcGIS Desktop application, only assemblies relevant for ArcGIS Desktop display. Click the Desktop ArcMap node and select the following assemblies: ESRI.ArcGIS.ADF.Local, ESRI.ArcGIS.ArcMapUI, ESRI.ArcGIS.Carto, ESRI.ArcGIS.Framework, ESRI.ArcGIS.Geometry, ESRI.ArcGIS.System, and ESRI.ArcGIS.SystemUI. To select multiple items at one time, press and hold the Ctrl key, then click each item. Click Add to have your references appear in the Selected Assemblies pane. See the following screen shot:
-
Click Finish to create your project.
-
You still need a reference to System.Drawing; therefore, click the Project menu, click Add Reference, click the .NET tab, then click the System.Drawing assembly under the Component Name area. See the following screen shot:

- Click OK to close the Add Reference dialog box and add the assembly reference.
Recently added references can be seen by clicking the Recent tab on the Add Reference dialog box.
Delete the class1 file
When your project is created, a class1 file (.cs or .vb depending on the language you chose) is added to your project by default. In this walkthrough, you will not use it. Right-click that file in the Solution Explorer and click Delete. Click OK to permanently delete it.
Create a ZoomToLayer command
You will use one of the ArcGIS item templates to add a new class for the ZoomToLayerCommand in your project as shown in the following steps:
-
In the Solution Explorer, right-click the project, click Add, and click New Item.
-
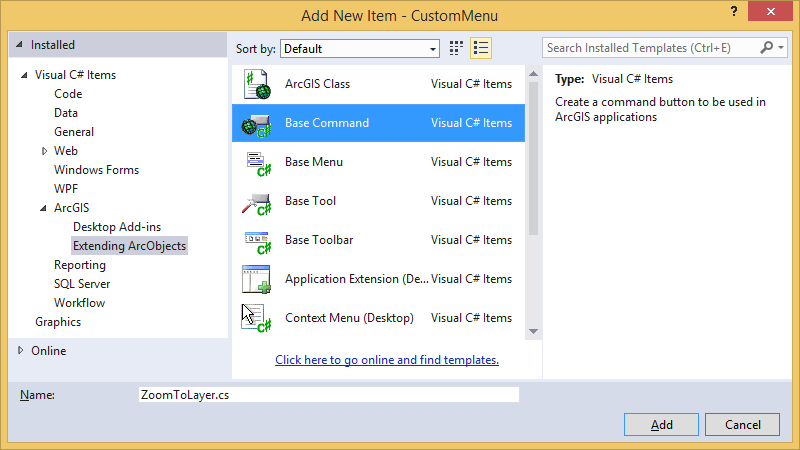
In the Add New Item dialog box, click to expand the project items, then click ArcGIS under the Categories pane. Click Base Command under the Templates pane. Name the class ZoomToLayer.cs (C#) or ZoomToLayer.vb (VB .NET) and click Add. See the following screen shot:
-
When the ArcGIS New Item Wizard Options dialog box appears, click Desktop or ArcMap Command, then click OK. See the following screen shot:

Change the default icon bitmap
By default, a bitmap is added to your project that will serve as the icon you click in ArcMap to use your custom command. You can customize the bitmap used with the image editor. In this example, you will add an existing bitmap file to your project and use this file later to set the icon used for the ZoomToLayer command's button face.
-
In the Solution Explorer, right-click ZoomToLayer.bmp, click Delete, then click OK to permanently delete the ZoomToLayer.bmp file.
-
In the Solution Explorer, right-click the CommandInheritingBaseCommand project, click Add, and click Existing Item.
-
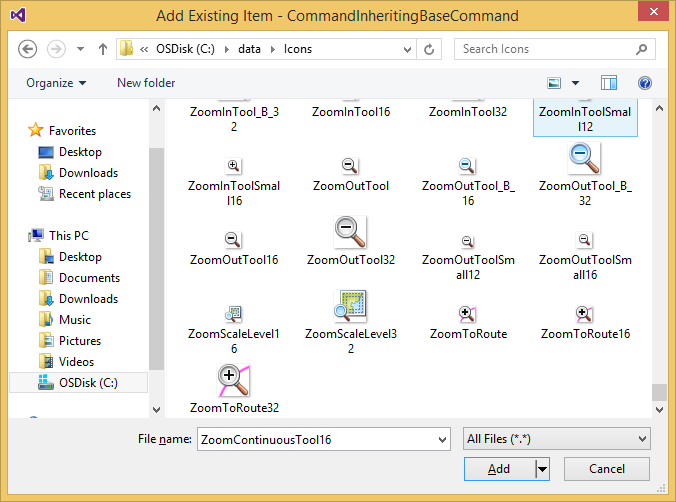
On the Add Existing Item dialog box, click the Files of type drop-down arrow and select Image Files.
-
Browse for an image file and click Add to copy it to your project directory. See the following screen shot:
-
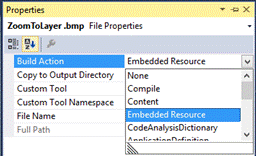
Right-click the image file in the Solution Explorer and click Properties. In the Properties window, click the Build Action drop-down arrow and select Embedded Resource. Name the bitmap file ZoomToLayer.png. See the following screen shot:
The bitmap icon file is ready to use later in this walkthrough.
Inherit the BaseCommand abstract class
The next step in writing the custom command is to set your ZoomToLayer class to inherit from the BaseCommand abstract class.
Abstract classes are classes that cannot be instantiated and are frequently partially implemented or not implemented at all. They are closely related to interfaces; however, they differ significantly from interfaces in that a class can implement multiple interfaces, but it can inherit from only one abstract class.
As part of the ArcGIS Visual Studio Integration Framework features, when you use the Add Item templates for a Desktop ArcMap command, most of the plumbing code is done for you. You automatically get a member variable declared for the IApplication interface, the constructor is set up with stub code, the overridden OnCreate method with the application hook is created, and the overridden OnClick method is stubbed out. See the following code example that shows how the class is set to inherit from BaseCommand:
[C#] public sealed class ZoomToLayer: BaseCommand
Public NotInheritable Class ZoomToLayer
Inherits BaseCommand
By convention, member variables are declared at the beginning of the class definition, although the declarations can be placed anywhere within a class. Member variables of a class are often referred to as class fields in .NET.
To use the VB .NET and C# commands in ArcMap at the same time, the ProgID of the commands has been updated to include a language specifier. See the following code example:
[C#] [ProgId("CommandInheritingBaseCommand.ZoomToLayer")]
<ComClass(ZoomToLayer.ClassId, ZoomToLayer.InterfaceId, ZoomToLayer.EventsId), _
          ProgId("CommandInheritingBaseCommand.ZoomToLayer")>
Add code to the overridden constructor of BaseCommand
Your class now inherits from BaseCommand. You will start adding code to the plumbing code that has been added for you.
-
Scroll in the code window to find the constructor for the ZoomToLayer class in the ZoomToLayer file. All the properties are empty strings and update their values for the command as shown in the following code example:
public ZoomToLayer()
{
    //
    // TODO: Define values for the public properties.
    //
    base.m_category="Developer Samples"; //Localizable text.
    base.m_caption="Zoom To Layer"; //Localizable text.
    base.m_message="Zoom to the extent of the active layer in the TOC";
        //Localizable text.
    base.m_toolTip="Zoom To Layer"; //Localizable text.
    base.m_name="DeveloperSamples_ZoomToLayer";
        //Unique ID, not localizable (for example,  "MyCategory_ArcMapCommand").
    try
    {
        //
        // TODO: If necessary, change the bitmap name.
        //
        string bitmapResourceName=GetType().Name + ".png";
        base.m_bitmap=new Bitmap(GetType(), bitmapResourceName);
    }
    catch (Exception ex)
    {
        System.Diagnostics.Trace.WriteLine(ex.Message, "Invalid Bitmap");
    }
}
' A creatable COM class must have a Public Sub New()
' with no parameters; otherwise, the class will not be
' registered in the COM registry and cannot be created
' via CreateObject.

Public Sub New()
    MyBase.New()
    ' TODO: Define values for the public properties.
    MyBase.m_category="Developer Samples" 'Localizable text.
    MyBase.m_caption="Zoom To Layer" 'Localizable text.
    MyBase.m_message="Zoom to the extent of the active layer in the TOC" 'Localizable text.
    MyBase.m_toolTip="Zoom To Layer" 'Localizable text.
    MyBase.m_name="DeveloperSamples_ZoomToLayer 'Unique ID, not localizable (for example, "MyCategory_ArcMapCommand").
    Try
    'TODO: If necessary, change the bitmap name.
    Dim bitmapResourceName As String=Me.GetType().Name + ".png"
    MyBase.m_bitmap=New Bitmap(Me.GetType(), bitmapResourceName)
    Catch ex As Exception
    System.Diagnostics.Trace.WriteLine(ex.Message, "Invalid Bitmap")
    End Try

End Sub
- Since the bitmap is named the same as the class name, the bitmap section placed there by the integrated development environment (IDE) will use the added bitmap. Change bmp to png if necessary.
- The class constructor is a method that is called when the class is created. You can use it to set up members of the class. In VB .NET, the constructor is named New and in C# its name matches that of the class.
- You can implement the Bitmap, Category, Caption, Name, Message, and Tooltip methods individually; however, it is easier to set the values that should be returned from these methods and rely on the BaseCommand class to provide the implementation for these methods.
- You will leave the other members of ICommand which are not set here to return their default value as implemented by BaseCommand, that is, Enabled=True, Checked = False, HelpFile = "" and HelpContextID = 0.
Add ZoomToLayer functionality
Another feature of the ArcGIS Visual Studio Integration Framework is ArcGIS snippets. ArcGIS snippets are chunks of ArcObjects reusable code that can be inserted into your project. You can access ArcGIS snippets by right-clicking the Visual Studio code editor window at the applicable insertion point, choosing ArcGIS Snippet Finder from the context menu to open the dialog box, typing the desired keyword or keywords, clicking the Search button to retrieve the ArcGIS snippet results, choosing an applicable snippet, and clicking the Insert Code button to add the code to the Visual Studio code editor window. See the following steps:
- To access ArcGIS snippets, right-click the Visual Studio code editor window at the necessary insertion point (before the end of the class file), and Insert Snippet: Double-click `ArcObjects` from the popup window. Double-click 'Mapping'. Double click the 'Zoom to Active Layer in TOC' snippet.
#region "Zoom to Active Layer in TOC"

/// <summary>Zooms to the selected layer in the table of contents (TOC) associated with the active view.</summary>
/// <param name="mxDocument">An IMxDocument interface.</param>
/// <remarks></remarks>
public void ZoomToLayerInTOC(IMxDocument mxDocument)
{
    if (mxDocument == null)
    {
        return ;
    }
    IActiveView activeView=mxDocument.ActiveView;

    // Get the TOC.
    IContentsView IContentsView=mxDocument.CurrentContentsView;

    // Get the selected layer.
    System.Object selectedItem=IContentsView.SelectedItem;
    if (!(selectedItem is ILayer))
    {
        return ;
    }
    ILayer layer=selectedItem as ILayer;

    // Zoom to the extent of the layer and refresh the map.
    activeView.Extent=layer.AreaOfInterest;
    activeView.Refresh();
}

#endregion
#Region "Zoom to Active Layer in TOC"

''' <summary>Zooms to the selected layer in the TOC associated with the active view.</summary>
''' <param name="mxDocument">An IMxDocument interface.</param>
''' <remarks></remarks>

Public Sub ZoomToLayerInTOC(ByVal mxDocument As IMxDocument)

    If mxDocument Is Nothing Then
        Return
    End If

    ' Get the map.
    Dim activeView As IActiveView=mxDocument.ActiveView

    ' Get the TOC.
    Dim contentsView As IContentsView=mxDocument.CurrentContentsView

    ' Get the selected layer.
    Dim selectedItem As System.Object=contentsView.SelectedItem
    If Not (TypeOf selectedItem Is ILayer) Then
        Return
    End If

    Dim layer As ILayer=TryCast(selectedItem, ILayer) ' Dynamic cast.

    ' Zoom to the extent of the layer and refresh the map.
    activeView.Extent=layer.AreaOfInterest
    activeView.Refresh()

End Sub

#End Region
Collapse the ArcGIS snippet by clicking the plus (+) sign next to #region Zoom to Active Layer in TOC to hide the lines of code in that region (functionality is still available). This makes the file easier to read when you have large amounts of code.
-
To take advantage of the functionality for the Zoom to Active Layer in TOC ArcGIS snippet, call the function and supply the appropriate input parameter. The required parameter is an ESRI.ArcGIS.ArcMapUI.IMxDocument interface, and you can use another ArcGIS snippet to get the MxDocument to pass in.
-
To access ArcGIS snippets, right-click the Visual Studio code editor window at the necessary insertion point (before the end of the class file), and Insert Snippet: Double-click `ArcObjects` from the popup window. Double-click 'Mapping'. Double click the 'Page Layout' and then Double-click 'Get PageLayout from ArcMap'.
#region "Get MxDocument from ArcMap"

/// <summary>Get MxDocument from ArcMap.</summary>
/// <param name="application">An IApplication interface that is the ArcMap application.</param>
/// <returns>An IMxDocument interface.</returns>
/// <remarks></remarks>
public IMxDocument GetMxDocument(IApplication application)
{

    if (application == null)
    {
        return null;
    }

    IMxDocument document=application.Document;
    IMxDocument mxDocument=(IMxDocument)(document); // Explicit cast.

    return mxDocument;

}

#endregion
#Region "Get MxDocument from ArcMap"

''' <summary>Get MxDocument from ArcMap.</summary>
''' <param name="application">An IApplication interface that is the ArcMap application.</param>
''' <returns>An IMxDocument interface.</returns>
''' <remarks></remarks>

Public Function GetMxDocument(ByVal application As IApplication) As IMxDocument

    If application Is Nothing Then
        Return Nothing
    End If

    Dim document As IDocument=application.Document
    Dim mxDocument As IMxDocument=CType(document, IMxDocument) ' Explicit cast.

    Return mxDocument

End Function

#End Region
-
Now that the snippets are in place, call them from the OnClick method to execute the code when the custom command is clicked in ArcMap. To call the GetMxDocument method, pass in an ESRI.ArcGIS.Framework.IApplication interface (previously specified) as member variable m_application. To call the ZoomToLayerInTOC method, pass in an ESRI.ArcGIS.ArcMapUI.IMxDocument interface that is the return value from the GetMxDocument method. Call both snippets in order as shown in the following code example:
The OnClick function is in the Overriden class Methods region. If necessary, click the plus (+) sign next to the region to see the method.
/// <summary>
/// Occurs when this command is clicked.
/// </summary>
public override void OnClick()
{
    IMxDocument mxDocument=GetMxDocument(m_application);

    ZoomToLayerInTOC(mxDocument);
}
Public Overrides Sub OnClick()
Dim mxDocument As IMxDocument=GetMxDocument(m_application)
ZoomToLayerInTOC(mxDocument)
End Sub
Expose the ZoomToLayer class to COM
ArcGIS expects your command class to be a COM class; therefore, specify that the .NET class you have created is also exposed as a COM class by creating a COM callable wrapper. This was done for you by the ArcGIS item template you previously used to create the ZoomToLayer class in your project.
To view the code for this step, expand the #region COM Registration Function(s) section of your code.
Compile the project
To build your project, follow these steps:
- Make sure you save your project and the work you have done.
- Click the Build menu and click Build Solution.
You can also press Ctrl+Shift+B or press F1 to build your solution.
- If your project built correctly, a report states the build succeeded in the Output window at the bottom of the Visual Studio .NET IDE.
You can also check the results of the build operation by looking in the subdirectories of your project. By default, you will build a debug version of your project. The dynamic-link library (DLL) that results from the build operation will be stored in the Bin\Debug subdirectory of your project. This directory also contains debug information (.pdb) and a type library (.tlb) file, produced by the Assembly Registration tool.
The obj subdirectory of the project directory contains temporary files used by the compiler and by Visual Studio.
- If you successfully followed this walkthrough, your build will succeed and you can close Visual Studio now that your custom command has been created. If your build operation did not succeed, click View and click Task List to view the errors, correct the errors as indicated, then close Visual Studio when you have a successful build.
If you double-click the task, the line of code causing the error will automatically be selected.
Use the command in ArcMap
To use the custom ZoomToLayer command in ArcMap, follow these steps:
- Start ArcMap and open a map document that has data layers.
- Click the Tools menu and click Customize to open the Customize dialog box. Click the Commands tab, then click Developer Samples under the Categories pane.
- If you do not see your Category or Command, verify Register for COM Interop is checked in your Visual Studio Project Properties under the Build tab and rebuild your project. See the following screen shot:

- If you do not see your Category or Command, verify Register for COM Interop is checked in your Visual Studio Project Properties under the Build tab and rebuild your project. See the following screen shot:
-
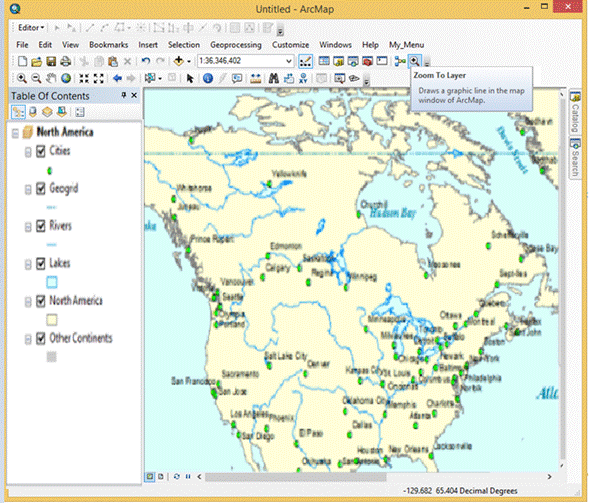
On the Commands pane, click the Zoom To Layer CSharp command, and drag it onto an ArcMap toolbar, then click Close on the Customize dialog box. See the following screen shot:
-
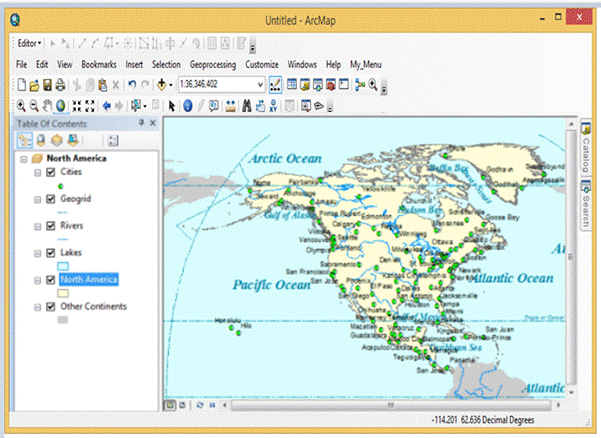
Click any layer in the TOC and click the ZoomToLayer button. The map zooms to the extent of that layer. See the following screen shot:
Debug the command
Running the command in debug mode allows you to step through the code when it is executed. This is helpful when you come across bugs in custom commands. While you should not need to debug the command you have created with this walkthrough, it is important to be familiar with these steps when writing your commands.
When you created your project, ArcMap.exe was set as the application to use for debugging by the ArcGIS Visual Studio Integration Framework. The following steps take you through the process of setting it. Set it when you work with a project not created by the ArcGIS Visual Studio Integration Framework or if the project user file (*.csproj.user or *.vbproj.user) gets removed (as this is where the debugging setting is stored).
-
Return to the solution in the Visual Studio IDE.
-
Verify that ArcMap.exe is set as the external program to use for debugging. This is another feature set for you by the ArcGIS project template when you create your project.
-
Right-click the CommandInheritingBaseCommand project in the Solution Explorer window and click Properties.
-
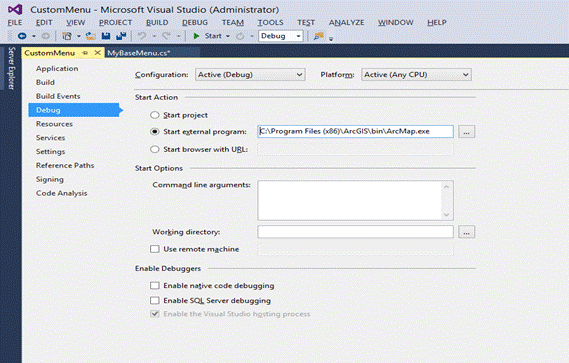
Click the Debug tab on the property page.
-
Under Start Action, set Start external program to use ArcMap.exe in the Bin folder of your ArcGIS install directory. See the following screen shot:
-
The debugging preferences are not set in the associate sample files since that information is stored in the project user file (*.csproj.user or *.vbproj.user) and those files are not included with the samples. If you are debugging using the provided sample, set ArcMap.exe as the debug application.
If the project user file has been removed since you created the project, Start Action will be set to Start project. To debug, set it to Start external application and browse to ArcMap.exe.
With the default installation settings, ArcMap.exe is installed in \Program Files\ArcGIS\Bin.
- Open the code window for the ZoomToLayer file. Find the class constructor (ZoomToLayer() in C#, New in VB .NET) and set a breakpoint. See the following screen shot:
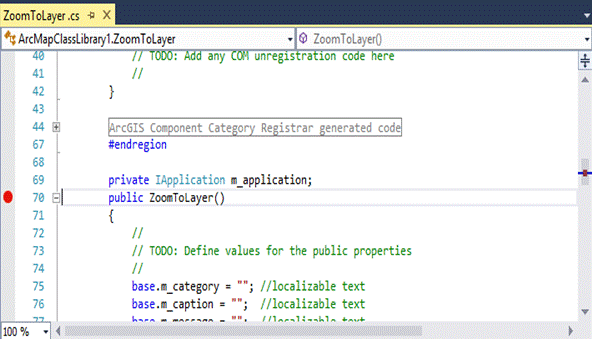
To set a breakpoint in the Visual Studio IDE, click the Margin Indicator bar (gray area on the left side of the code editor) beside the code where you want the breakpoint set.
- Click the Debug menu and click Start Debugging (or press F5). Visual Studio runs ArcMap. Follow the same steps in the Use the command in ArcMap section to go over the code. When the ZoomToLayer class is instantiated, the debugger switches to Visual Studio and allows you to step through the code one line at a time with the buttons on the Debugging toolbar.
Deploy the command
When you have created your command, run it on another user's ArcGIS Desktop application. To do this, deploy your command. For more information, see the Deploying custom components.
See Also:
Creating commands and toolsSample: Create a command by inheriting from BaseCommand
Deploying custom components
| Development licensing | Deployment licensing |
|---|---|
| ArcGIS Desktop Basic | ArcGIS Desktop Basic |
| ArcGIS Desktop Standard | ArcGIS Desktop Standard |
| ArcGIS Desktop Advanced | ArcGIS Desktop Advanced |