
As discussed earlier in the ArcObjects: Foundation of ArcGIS section, ArcGIS applications are built using ArcObjects. The subsequent sections of this topic cover some general guidelines and considerations when developing with ArcObjects. Later topics in this section focus on techniques for this specific API.
CODING STANDARDS
GENERAL CODING TIPS AND RESOURCES
Class diagrams
Object browsers
Component help
Code wizards
Indexing of collections
Accessing collection elements
Enumerator use
Error handling
Notification interfaces
Client side storage
Property By Value and By Reference
Initializing Outbound Interfaces
DATABASE CONSIDERATIONS
Edit sessions
Edit operations
Recycling and nonrecycling cursors
Fetching properties using query filters
Marking changed objects
Update and insert cursors
Shape and ShapeCopy geometry property
USING A TYPE LIBRARY
COM DATA TYPES
USING COMPONENT CATEGORIES
CROSS PLATFORM DEVELOPMENT
CODING STANDARDS
Each of the language-specific topics in Getting Started begins with a section on coding standards for that language. These standards are used internally at ESRI and are followed by the samples that ship with the software.
For simplicity, some samples will not follow the coding standards. For example, it is recommended that when coding in Visual Basic, all types defined within an ESRI object library are prefixed with the library name, for example, esriGeometry.IPolyline. This is only done in samples in which a name clash will occur. Omitting this text makes the code easier to understand for developers new to ArcObjects.
To understand why standards and guidelines are important, consider that in any large software development project, there are many backgrounds represented by the team members. Each programmer has personal opinions concerning how code should look and be built. If each programmer engineers code differently, it becomes increasingly difficult to share work and ideas. On a successful team, the developers adapt their coding styles to the tone set by the group. Often, this means adapting one's code to match the style of existing code in the system.
Initially, this may seem burdensome, but adopting a uniform programming style and set of techniques invariably increases software quality. When all the code in a project conforms to a standard set of styles and conventions, less time is wasted learning the particular syntactic quirks of individual programmers, and more time can be spent reviewing, debugging, and extending the code. Even at a social level, uniform style encourages team-oriented, rather than individualist, outlooks - leading to greater team unity, productivity, and ultimately, better software.
GENERAL CODING TIPS AND RESOURCES
This section on general coding tips will benefit all developers working with ArcObjects no matter what language they are using. Code examples are shown in VBA, however.
Class diagrams
Getting help with the object model is fundamental to successfully working with ArcObjects.The class diagrams are most useful if viewed in the early learning process in printed form. This allows developers to appreciate the overall structure of the object model implemented by ArcObjects. When you are comfortable with the overall structure, the PDF files included with the software distribution can be more effective to work with. The PDF files are searchable; you can use the Search dialog box in Acrobat Reader to find classes and interfaces quickly.
Object browsers
In addition to the class diagram PDF files, the type library information can be viewed using a number of object browsers, depending on your development platform.
Visual Basic and .NET have built-in object browsers; OLEView (a free utility from Microsoft) also displays type library information. The best object viewer to use in this environment is the ESRI object viewer. This object viewer can be used to view type information for any type library that you reference within it. Information on the classes and interfaces can be displayed in Visual Basic, Visual C++, or object diagram format. The object browsers can view coclasses and classes but cannot be used to view abstract classes. Abstract classes are only viewable on the object diagrams, where their use is solely to simplify the models.
Java and C++ developers should refer to the ArcObjects - Javadoc or the ArcGIS Developer Help.
Component help
All interfaces and coclasses are documented in the component help file. Ultimately, this will be the help most commonly accessed when you get to know the object models better.
For Visual Basic and .NET developers, this is a compiled HTML file that can be viewed by itself or when using an integrated developer environment. If the cursor is over an ESRI type when the F1 key is pressed, the appropriate page in the ArcObjects Class Help in the ArcGIS Developer Help system is displayed in the compiled HTML viewer.
For Java and C++ developers, refer to ArcObjects - Javadoc or the ArcGIS Developer Help.
Code wizards
There are a number of code generation wizards available to help with the creation of boilerplate code in Visual Basic, Visual C++, and .NET. Although these wizards are useful in removing the tediousness in common tasks, they do not excuse you as the developer from understanding the underlying principles of the generated code. The main objective should be to read the accompanying documentation and understand the limitations of these tools.
Indexing of collections
All collection-like objects in ArcObjects are zero based for their indexing. This is not the case with all development environments; Visual Basic has both zero- and one-based collections. As a general rule, if the collection base is not known, assume that the collection base is zero. This ensures that a runtime error will be raised when the collection is first accessed (assuming the access of the collection does not start at zero). Assuming a base of one means the first element of a zero-based collection would be missed and an error would only be raised if the end of the collection were reached when the code is executed.
Accessing collection elements
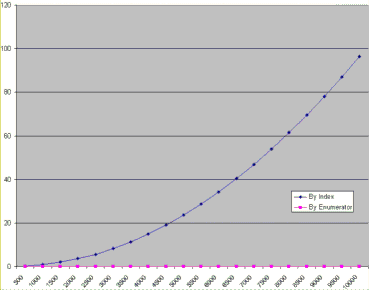
When accessing elements of a collection sequentially, it is best to use an enumerator interface. This provides the fastest method of walking through the collection. The reason for this is that each time an element is requested by index, internally an enumerator is used to locate the element. Hence, if the collection is looped over getting each element in turn, the time taken increases exponentially (y=cxb).
This graph shows the performance benefits of accessing a collection using an enumerator as opposed to the elements index. As expected, the graph shows a classic power trend line (y=cxb ).
Enumerator use
When requesting an enumerator interface from an object, the client has no idea how the object has implemented this interface. The object may create a new enumerator, or it may decide for efficiency to return a previously created enumerator. If a previous enumerator is passed to the client, the position of the element pointer will be at the last accessed element. To ensure that the enumerator is at the start of the collection, the client should reset the enumerator before use.
Error handling
All methods of interfaces, in other words, methods callable from other objects, should handle internal errors and signify success or failure via an appropriate HRESULT. COM does not support passing exceptions out of interface method calls. COM supports the notion of a COM exception. A COM exception utilizes the COM error object by populating it with relevant information and returning an appropriate HRESULT to signify failure. Clients, on receiving the HRESULT, can then interrogate the COM Error object for contextual information about the error. Languages, such as Visual Basic, implement their own form of exception handling.
Exception handling is language specific, and since COM is language neutral, exceptions are not supported.
Notification interfaces
There are a number of interfaces in ArcObjects that have no methods. These are known as notification interfaces. Their purpose is to inform the application framework that the class that implements them supports a particular set of functionality. For instance, the application framework uses these interfaces to determine if a menu object is a root-level menu (IRootLevelMenu) or a context menu (IShortcutMenu).
Client-side storage
Some ArcObjects methods expect interface pointers to point to valid objects prior to making the method call. This is known as client storage since the client allocates the memory needed for the object before the method call. Suppose you have a polygon, and you want to get its bounding box. To do this, use the QueryEnvelope method on IPolygon. If you write the following code:
you'll get an error because the QueryEnvelope method expects you (the client) to create the Envelope. The method will modify the envelope you pass in and return the changed one back to you. The correct code follows:
How do you know when to create and when not to create? In general, all methods that begin with "Query", such as QueryEnvelope, expect you to create the object. If the method name is GetEnvelope, then an object will be created for you. The reason for this client-side storage is performance. When it is anticipated that the method on an object will be called in a tight loop, the parameters need only be created once and simply populated. This is faster than creating new objects inside the method each time.
DISPIDs are unique IDs given to properties and methods for the IDispatch interface to efficiently call the appropriate method using the Invoke method.
This all makes sense assuming that it is the text string property of the text box that is manipulated. What happens if the actual object referenced by the variable Text2 is to be assigned to the variable Text1? If there were only a propput method, it would not be possible; hence, the need for a propputref method. With the propputref method, the following code will achieve the setting of the object reference.
Notice the use of the "Set".
Initializing Outbound Interfaces
When initializing an outbound interface, it is important to only initialize the variable if the variable does not already listen to events from the server object. Failure to follow this rule will result in an infinite loop. As an example, assume there is a variable ViewEvents that has been dimensioned as:
To correctly sink this event handler, you can write code within your initialization routines like this:
Notice in the above code the use of the Is keyword to check for object identity.
DATABASE CONSIDERATIONS
When programming against the database, there are a number of rules that must be followed to ensure that the code will be optimal. These rules are detailed below.
If you are going to edit data programmatically, that is, not use the editing tools in ArcMap, you need to follow these rules to ensure that custom object behavior, such as network topology maintenance or triggering of custom feature-defined methods, is correctly invoked in response to the changes your application makes to the database. You must also follow these rules to ensure that your changes are made within the multiuser editing (long transaction) framework.
Edit sessions
Make all changes to the geodatabase within an edit session, which is bracketed between StartEditing and StopEditing method calls on the IWorkspaceEdit interface found on the Workspace object.
This behavior is required for any multiuser update of the database. Starting an edit session gives the application a state of the database that is guaranteed not to change, except for changes made by the editing application.
In addition, starting an edit session turns on behavior in the geodatabase such that a query against the database is guaranteed to return a reference to an existing object in memory if the object was previously retrieved and is still in use.
This behavior is required for correct application behavior when navigating between a cluster of related objects while making modifications to objects. In other words, when you are not within an edit session, the database can create a new instance of a COM object each time the application requests a particular object from the database.
Edit operations
Group your changes into edit operations, which are bracketed between the StartEditOperation and StopEditOperation method calls on the IWorkspaceEdit interface.
You may make all your changes within a single edit operation if so required. Edit operations can be undone and redone. If you are working with data stored in ArcSDE, creating at least one edit operation is a requirement. There is no additional overhead to creating an edit operation.
Recycling and nonrecycling cursors
Use nonrecycling search cursors to select or fetch objects that are to be updated. Recycling cursors should only be used for read-only operations, such as drawing and querying features.
Nonrecycling cursors within an edit session create new objects only if the object to be returned does not already exist in memory.
Fetching properties using query filters
Always fetch all properties of the object; query filters should always use "*". For efficient database access, the number of properties of an object retrieved from the database can be specified. For example, drawing a feature requires only the OID and the Shape of the feature; hence, the simpler renderers only retrieve these two columns from the database. This optimization speeds up drawing but is not suitable when editing features.
If all properties are not fetched, then object-specific code that is triggered may not find the properties that the method requires. For example, a custom feature developer might write code to update attributes A and B whenever the geometry of a feature changes. If only the geometry was retrieved, then attributes A and B would be found to be missing within the OnChanged method. This would cause the OnChanged method to return an error, which would cause the Store to return an error and the edit operation to fail.
Marking changed objects
After changing an object, mark the object as changed (and ensure that it is updated in the database) by calling Store on the object. Delete an object by calling the Delete method on the object. Set versions of these calls also exist and should be used if the operation is being performed on a set of objects to ensure optimal performance.
Calling these methods guarantees that all necessary polymorphic object behavior built into the geodatabase is executed (for example, updating of network topology or updating of specific columns in response to changes in other columns in ESRI-supplied objects). It also guarantees that developer-supplied behavior is correctly triggered.
Updating and inserting cursors
Never use update cursors or insert cursors to update or insert objects into object and feature classes in an already-loaded geodatabase that has active behavior.
Update and insert cursors are bulk cursor APIs for use during initial database loading. If used on an object or feature class with active behavior, they will bypass all object-specific behavior associated with object creation, such as topology creation, and with attribute or geometry updating, such as automatic recalculation of other dependent columns.
Shape and ShapeCopy geometry property
Make use of a Feature object's Shape and ShapeCopy properties to optimally retrieve the geometry of a feature. To better understand how these properties relate to a feature's geometry, refer to the diagram below to see how features coming from a data source are instantiated into memory for use within an application.
Features are instantiated from the data source using the following sequence:
-
The application requests a Feature object from a data source by calling the appropriate geodatabase API method calls.
-
The geodatabase makes a request to COM to create a vanilla COM object of the desired COM class (normally this class is esriGeoDatabase.Feature).
-
COM creates the Feature COM object.
-
The geodatabase gets attribute and geometry data from a data source.
-
The vanilla Feature object is populated with appropriate attributes.
-
The Geometry COM object is created, and a reference is set in the Feature object.
-
The Feature object is passed to the application.
-
The Feature object exists in the application until it is no longer required.
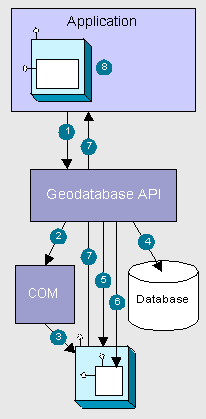
The diagram above clearly shows that the Feature, which is a COM object, has another COM object for its geometry. The Shape property of the feature simply passes the IGeometry interface pointer to this geometry object to the caller that requested the shape. This means that if more than one client requested the shape, all clients point to the same geometry object. Hence, this geometry object must be treated as read-only. No changes should be performed on the geometry returned from this property, even if the changes are temporary. Anytime a change is to be made to a feature's shape, the change must be made on the geometry returned by the ShapeCopy property, and the updated geometry should subsequently be assigned to the Shape property.
USING A TYPE LIBRARY
Since objects from ArcObjects do not implement IDispatch, it is essential to make use of a type library for the compiler to early-bind to the correct data types. This applies to all development environments; although, for Visual Basic, Visual C++, and .NET, there are wizards that help you set this reference.
The type libraries required by ArcObjects are located within the ArcGIS install folder. For example, the COM type libraries can be found in the COM folder, while the .NET Interop assemblies are within the DotNet folder. Many different files can contain type library information including EXEs, DLLs, OLE custom controls (OCXs), and object libraries.
COM DATA TYPES
COM objects talk via their interfaces, and hence, all data types used must be supported by IDL. IDL supports a large number of data types; however, not all languages that support COM support these data types. Because of this, ArcObjects does not make use of all the data types available in IDL but limits the majority of interfaces to the data type supported by Visual Basic. The table below shows the data types supported by IDL and their corresponding types in a variety of languages.
|
Language |
IDL |
Microsoft C++ |
Visual Basic |
Java |
|
Base types |
boolean |
unsigned char |
unsupported |
char |
|
byte |
unsigned char |
unsupported |
char | |
|
small |
char |
unsupported |
char | |
|
short |
short |
Integer |
short | |
|
long |
long |
Long |
int | |
|
hypre |
__int64 |
unsupported |
long | |
|
float |
float |
Single |
float | |
|
double |
double |
Double |
double | |
|
char |
unsigned char |
unsupported |
char | |
|
wchar_t |
cwhar_t |
Integer |
short | |
|
enum |
enum |
Enum |
int | |
|
Interface Pointer |
Interface Pointer |
Interface Ref. |
Interface Ref. | |
|
Extended types |
VARIANT |
VARIANT |
Variant |
ms.com.Variant |
|
BSTR |
BSTR |
String |
java.lang.String | |
|
VARIANT_BOOL |
short (-1/0) |
Boolean |
[true/false] |
Note the extended data types at the bottom of the table: VARIANT, BSTR, and VARIANT_BOOL. While it is possible to pass strings using data types such as char and wchar_t, these are not supported in languages such as Visual Basic. Visual Basic uses BSTRs as its text data type. A BSTR is a length-prefixed wide character array in which the pointer to the array points to the text contained within it and not the length prefix. Visual C++ maps VARIANT_BOOL values onto 0 and -1 for the False and True values, respectively. This is different from the normal mapping of 0 and 1. Hence, when writing C++ code, be sure to use the correct macros - VARIANT_FALSE and VARIANT_TRUE - not False and True.
USING COMPONENT CATEGORIES
Component categories are used extensively in ArcObjects so developers can extend the system without requiring any changes to the ArcObjects code that will work with the new functionality.
ArcObjects uses component categories in two ways. The first requires classes to be registered in the respective component category at all times, for example, ESRI Mx Extensions. Classes, if present in that component category, have an object that implements the IExtension interface and is instantiated when the ArcMap application is started. If the class is removed from the component category, the extension will not load, even if the map document (.mxd file) is referencing that extension.
The second use is when the application framework uses the component category to locate classes and display them to a user to allow some user customization to occur. Unlike the first method, the application remembers (inside its map document) the objects being used and will subsequently load them from the map document. An example of this is the commands used within ArcMap. ArcMap reads the ESRI Mx Commands category when the Customization dialog box is displayed to the user. This is the only time the category is read. Once the user selects a command and adds it to a toolbar, the map document is used to determine what commands should be instantiated.
Now that you've seen two uses of component categories, you will see how to get your classes registered into the correct component category. Development environments have various levels of support for component categories; ESRI provides two ways of adding classes to a component category. The first can only be used for commands and command bars that are added to either ArcMap or ArcCatalog. Using the Add From File button on the Customize dialog box (shown below), it is possible to choose a server. All classes in that server are then added to either the ESRI Gx Commands or the ESRI Mx Commands, depending on the application being customized. Although this utility is useful, it is limited since it adds all the classes found in the server. It is not possible to remove classes, and it only supports two of the many component categories implemented within ArcObjects.
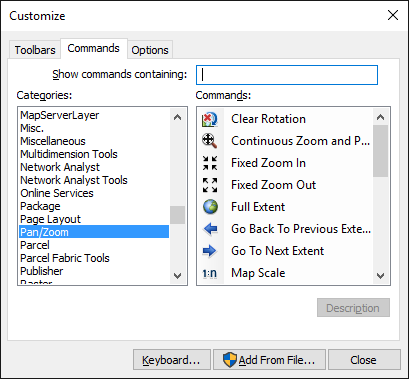
The Customize dialog box in ArcMap and ArcCatalog
Distributed with ArcGIS applications is a utility application called the Component Category Manager, shown below. This small application allows you to add and remove classes from any of the component categories on your system, not just ArcObjects categories. Expanding a category displays a list of classes in the category. You can then use the Add Object button to display a checklist of all the classes found in the server. You check the required classes, and these checked classes are then added to the category.
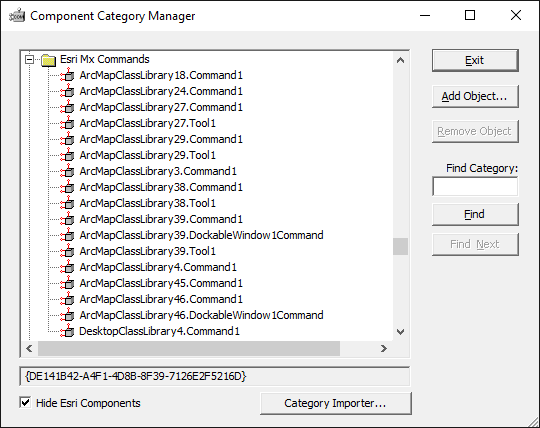
The Component Category Manager
Using these ESRI tools is not the only method to interact with component categories. During the installation of the server on the target user's machine, it is possible to add the relevant information to the registry using a registry script. Below is one such script. The first line tells Windows for which version of regedit this script is intended. The last line, starting with "[HKEY_LOCAL_", executes the registry command; all the other lines are comments in the file.
REGEDIT4
;This Registry Script enters coclasses into their appropriate Component Category
;Use this script during installation of the components
;CoClass:Exporter.ExportingExtension
;CLSID:{E233797D-020B-4AD4-935C-F659EB237065}
;Component Category:ESRI Mx Extensions
[HKEY_LOCAL_MACHINE \SOFTWARE \Classes \CLSID \{E233797D-020B-4AD4-935C-
F659EB237065}\Implemented Categories \{B56A7C45-83D4-11D2-A2E9-080009B6F22B}]
The last line in the script above is one continuous line in the script.
The last method is for the self-registration code off the server to add the relevant classes within the server to the appropriate categories. Not all development environments allow this to be set up. Visual Basic has no support for component categories, although there is an add-in that allows this functionality.
CROSS-PLATFORM DEVELOPMENT
If your application is intended to be deployed on multiple platforms types (Windows or Linux), you should be aware of the following:
-
Paths to data & the data files themselves must have lowercase names. Upper and mixed cases are not supported on Linux implementations of ArcGIS.
-
The path type used must be accessible on Linux machines.
-
If an application running on Linux does not exit cleanly, it is possible that processes will remain. The mwcleanup utility must be used to tidy up these processes. Typing "mwcleanup" at the command line will kill all running ArcGIS applications and clean up all X properties.
-
On Linux, the MWRT_MODE installation property of ArcGIS Engine (Developer Kit and Runtime) determines the default runtime mode for all applications utilizing MainWin, including ArcReader. To run an ArcGIS application in a runtime mode other than the default, you must specify the new mode by setting the MWRT_MODE environment variable before running the application. If you set the variable in a shell environment, it will only affect the runtime mode for applications launched from the same shell.
From a sh/bash shell run:
MWRT_MODE=professional
export MWRT_MODE
arcreader
From a csh shell run:
setenv MWRT_MODE professional
arcreader