
In this topic
Getting started with the SceneControl property pages
To get started with the SceneControl property pages, follow these steps to create a project in Visual Studio:
- Open Microsoft Visual Studio.
- From the File menu, select New, and click Project. The New Project dialog box opens.
- Select either Visual Basic or Visual C# under Project types, then select Windows Forms Application from under Templates to create a Visual Basic Windows application or a Visual C# Windows application, respectively.
- Name the project, click Browse and navigate to a location to save the project, then click OK.
- In the Project window, click View, and click Toolbox to open the toolbox in Visual Studio.
- In the toolbox, click the ArcGIS Windows Forms tab to show the controls in the following illustration:

Adding controls to the form
To add controls to the form, perform the following steps:
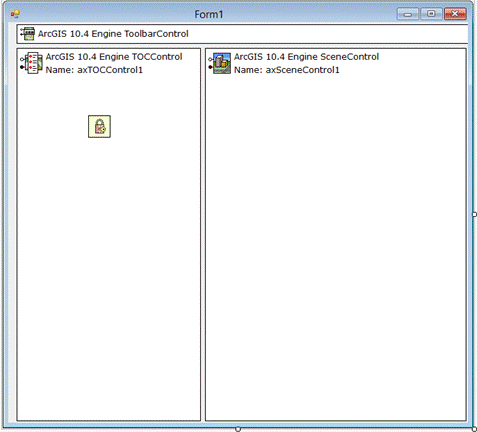
- Click the SceneControl icon in the toolbox. On the form, click and drag from one corner to the opposite corner to place the SceneControl. Alternatively, double-click the SceneControl icon in the toolbox to automatically place the SceneControl on the form. Follow the same procedure to add the TOCControl, ToolbarControl, and LicenseControl icons to the form. Rearrange the control positions and resize the controls to look similar to the following:
- Right-click the SceneControl and click Properties. The SceneControl Properties dialog box opens.
- Click the General tab, and click the Open folder button next to the Scene Document field. See the following screen shot:
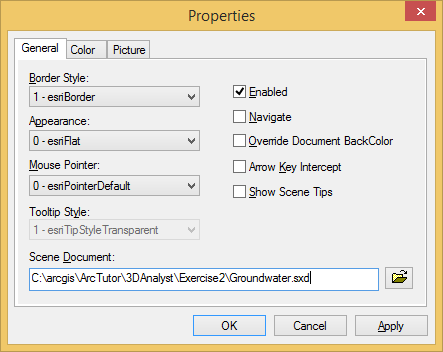
The Select Scene Document dialog box opens. - Navigate to a folder containing the scene document, select the scene document, and click Open.
- On the Properties dialog box, click Apply to link the scene document to the SceneControl, then click OK to close the Properties dialog box.
- Right-click the TOCControl and click Properties. The TOCControl Properties dialog box opens.
- Click the General tab, select AxSceneControl1 from the Buddy Control drop-down list, and click Apply. See the following screen shot:
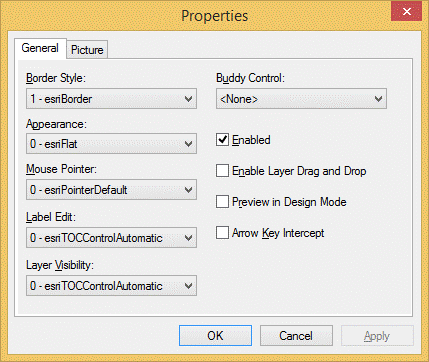
- Click OK to close the TOCControl Properties dialog box.
- Right-click the ToolbarControl and click Properties. The ToolbarControl Properties dialog box opens.
- Click the General tab, select AxSceneControl1 from the Buddy Control drop-down list, and click Apply.
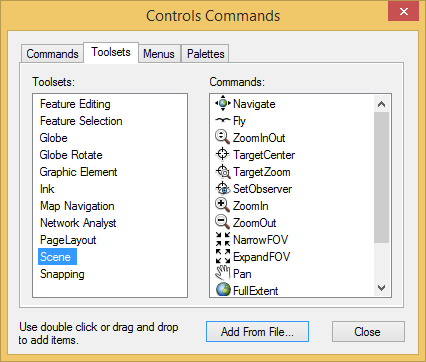
- Click the Items tab on the Properties dialog box and click Add. The Control Commands dialog box opens.
- Click the Toolsets tab, and either double-click the Scene toolset, or drag and drop the toolset onto the Properties dialog box with the Items tab selected. Repeat to add any other commands, toolsets, menus, or palettes, then click Close. See the following screen shot:
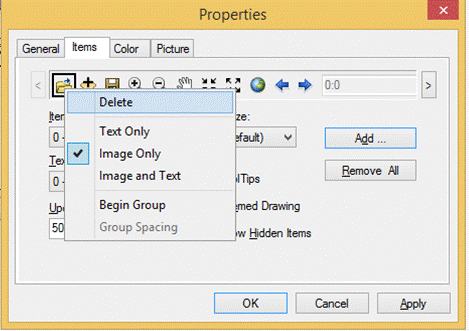
- With the Items tab still selected on the ToolbarControl Properties dialog box, click to choose an item. Drag and drop the selected item to a new position on the ToolbarControl (selection is indicated by the black outline around the item), or drag and drop an item from the ToolbarControl to remove it. Right-click an item to delete it or set its style, group, or group spacing, then click Apply. See the following screen shot:
- Click OK to close the ToolbarControl Properties dialog box.
- Load ArcGIS Engine for Windows at the entry point to your application. See the following code example:
using ESRI.ArcGIS;
...[STAThread] static void Main()
{
    if (!RuntimeManager.Bind(ProductCode.Engine))
    {
        MessageBox.Show(
            "Unable to bind to ArcGIS runtime. Application will be shut down.");
        return ;
    }

    Application.EnableVisualStyles();
    Application.SetCompatibleTextRenderingDefault(false);
    Application.Run(new MainForm());
}
Imports ESRI.ArcGIS
...

Private Sub MyApplication_Startup(ByVal sender As Object, _
                                  ByVal e As Microsoft.VisualBasic.ApplicationServices.StartupEventArgs) _
                                  Handles Me.Startup
    If Not ESRI.ArcGIS.RuntimeManager.Bind(ESRI.ArcGIS.ProductCode.Engine) Then
        MessageBox.Show("Unable to bind to ArcGIS runtime. Application will be shut down.")
        e.Cancel=True 'Abort application start up
    End If
End Sub
- Right-click the LicenseControl and click Properties. The LicenseControl Properties dialog box opens.
- Click the License tab; select the ArcGIS Engine, ArcGIS for Desktop Basic, ArcGIS for Desktop Standard, and ArcGIS for Desktop Advanced check boxes under Products; and select the 3D Analyst check box under Extensions.
- Select the Shutdown this application if the selected licenses are not available check box, and click Apply. See the following screen shot:
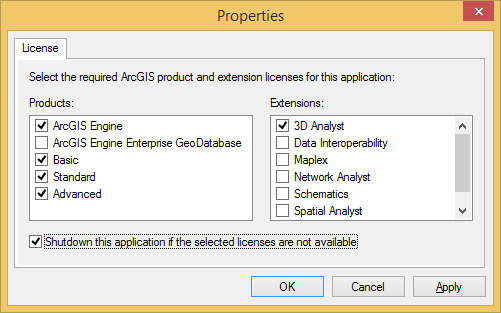
- Click OK to close the LicenseControl Properties dialog box.
- To build the solution, select it from the Build menu.
- Click Start Debugging from the Debug menu to run the application. Toggle layer visibility by interacting with the check boxes on the TOCControl. Select a tool on the ToolbarControl and use it to interact with the SceneControl. See the following screen shot:

See Also:
SceneControl classTo use the code in this topic, reference the following assemblies in your Visual Studio project. In the code files, you will need using (C#) or Imports (VB .NET) directives for the corresponding namespaces (given in parenthesis below if different from the assembly name):
- ESRI.ArcGIS.Version (ESRI.ArcGIS)
| Development licensing | Deployment licensing |
|---|---|
| Engine Developer Kit | Engine: 3D Analyst |
| ArcGIS for Desktop Basic: 3D Analyst | |
| ArcGIS for Desktop Standard: 3D Analyst | |
| ArcGIS for Desktop Advanced: 3D Analyst |