
There are many choices for how to work with ArcGIS ActiveX controls in Visual C++, the first of which is what framework to use to host the controls (for example, ATL or MFC). A second decision is where the control will be hosted (dialog, MDI application, and so forth). This section discusses MFC and hosting the control on a dialog box.
In this topic
Creating an MFC Dialog Box-based Application
If you do not have a dialog box in your application or component, here are the steps to create an MFC dialog box application in VS8.
-
Launch Visual Studio and click File -> New -> Project...
-
Select MFC under Visual C++ folder and select MFC Application. Enter the project name and location and click OK.
-
Under Application Type, change the application type to Dialog Based. The MFC DLL is shared. Click Next.
-
The default settings under User Interface Features are fine, although you can uncheck AboutBox to simplify the application. Click Next.
-
Under Advanced Features ensure that the option to support ActiveX controls is checked. Click Next.
-
This shows you what the wizard will generate. Click Finish.
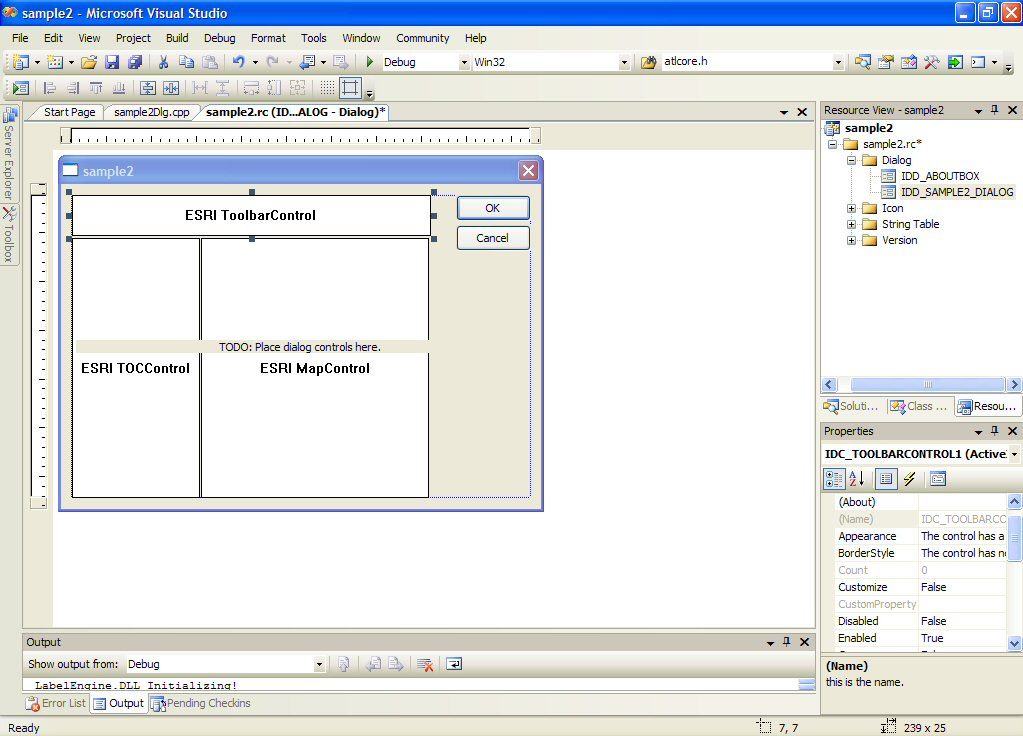
You should now have a simple dialog box-based application. In the resource view, you will see "TODO: Place Dialog Controls Here". You can place buttons, list boxes, and so forth, in this dialog box. The dialog box can also host ActiveX controls; there are two approaches to doing this, as discussed below. You can also compile and run this application.
Hosting Controls on an MFC dialog box and accessing them using IDispatch

Inserting ActiveX controls on a dialog box in Visual Studio C++ design time. The TOCControl and MapControl have been added to the dialog box. The ToolbarControl is next.
-
Right-click the MFC dialog box and click Insert ActiveX control.
-
Double-click a control from the list box. The control appears on the dialog box with a default size.
-
Size and position the control as required.
-
Repeat steps 1 through 3 for each control.
-
You can right-click the control and choose Properties to set the control's design-time properties.
-
To access the control in code, you will need ArcGIS interface definitions for IMapControl, and so on. To do this, use the #import command in your stdafx.h file. See the section Importing ArcGIS type libraries on how to do this.
-
MFC provides control hosting on a dialog box; this will translate Windows messages, such as WM_SIZE, into appropriate control method calls. However, to be able to make calls on a control, there are a few steps you must perform to go from a resource ID to a controls interface. The following code illustrates setting the TOCControl's buddy to be the MapControl:
// Code to set the Buddy property of the TOCControl to be the MapControl
//
// Get a pointer to the PageLayoutControl and TOCControl
IPageLayoutControlPtr ipPageLayoutControl;
GetDlgControl(IDC_PAGELAYOUTCONTROL1, IID_IPageLayoutControl, (void **)
  &ipPageLayoutControl);
ITOCControlPtr ipTOCControl;
GetDlgControl(IDC_TOCCONTROL1, IID_ITOCControl, (void **) &ipTOCControl);

// Get the IDispatch of the PageLayoutControl
IDispatchPtr ipBuddyDisp=ipPageLayoutControl;

// Set the TOCControls Buddy to the map control
ipTOCControl->putref_Buddy(ipBuddyDisp);
- To catch events from the controls, right click the control on the form and choose Add Event Handler to choose a method to be called. The wizard will then automatically generate the necessary MFC sink map macros to listen to events.
Adding Controls to an MFC Dialog Box using IDispatch Wrappers
The design environment showing the TOCControl, MapControl, and ToolbarControl has been added to the Controls toolbar and to the dialog box.
As all ActiveX controls support IDispatch, the following is the typical approach to add an ActiveX control to an MFC project:
-
Click Project, click Add, then click Components and Controls.
-
Click Registered ActiveX Controls.
-
Double-click to select a control (for example, ESRI TOCControl), then click OK to insert a component. Click OK to generate wrappers. This will add an icon for the control to the Controls toolbar in Visual Studio.
-
Additional source files are added to your project (for example, toccontrol.cpp and toccontrol.h). These files contain a wrapper class (for example, CTOCControl) to provide methods and properties to access the control. This class will invoke the control through the IDispatch calling mechanism. Note that IDispatch does incur some performance overhead to package parameters when making method and property calls. The wrapper class inherits from an MFC CWnd class that hosts an ActiveX control.
-
Repeat Steps 1 through 4 to add each control to the project's Controls toolbar.
-
Choose a control from the Controls toolbar and drag it onto the dialog box.
-
Right-click the control and click Properties. This will allow design-time properties to be set on the control. Note: In Visual Studio C++, you cannot set the buddy property of the TOCControl and the ToolbarControl. This environment does not support controls finding other controls at design time. However, this step can be performed in code using the OnInitDialog method.
// Note no addref performed with GetControlUnknown, so no need to release this pointer
LPUNKNOWN pUnk=m_mapcontrol.GetControlUnknown();
LPDISPATCH pDisp=0;
pUnk->QueryInterface(IID_IDispatch, (void **) &pDisp);

// Set TOCControls buddy to be MapControl
m_toccontrol.SetRefBuddy(pDisp);
pDisp->Release();
- Right-click the control and choose Add Variable... Select the resource ID corresponding to the control to give the control a member variable name. The dialog box class member variable can now be used to invoke methods and properties on the control.
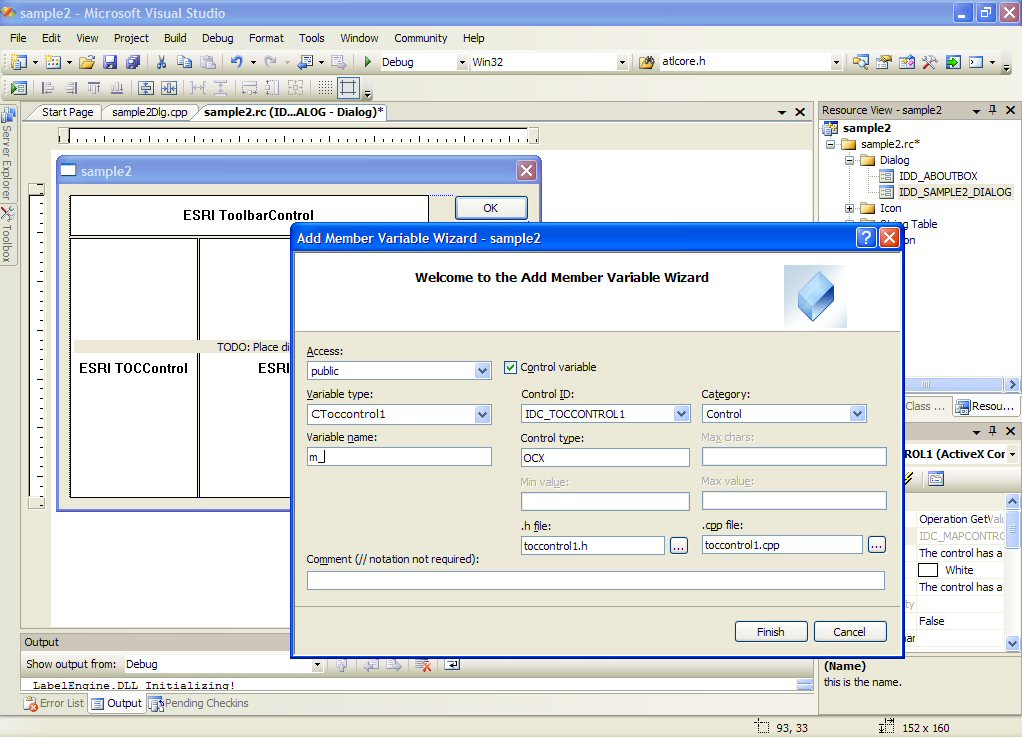
Visual Studio C++ Class Wizard. Adding member variables to the dialog box for the ActiveX Controls. - To catch control events, right click on a control and choose Add Event Handler. In the list of messages, click the event to catch, for example, OnBeginLabelEdit. Choose the dialog box class from the class list and click Add and Edit. A handler for the chosen event will be added to your dialog box class.
Beware! Do not use the method GetIDispatch (inherited from MFC's CCmdTarget) on the wrapper classes; it is intended for objects implementing IDispatch and not the wrapper classes that are calling IDispatch. Instead, to get a control's IDispatch, use m_mapcontrol.GetControlUnknown() followed by QueryInterface to IDispatch. See the above example of setting the buddy property.