
In this topic
- Editor extensions
- Creating a Visual Studio project
- Using the ArcGIS Add-Ins Wizard
- Understanding the XML
- Implementing run time behavior
- Installing the add-in
- Testing the editor extension
- Uninstalling the add-in
Editor extensions
Editor extensions allow you to further customize the editing environment in ArcMap. You can create custom editor extensions using add-ins. If you are unfamiliar with editor extensions, see Understanding editor extensions.
Creating a Visual Studio project
To create a Visual Studio project, complete the following steps:
-
Start Visual Studio.
-
Click File, select New, and click Project. The New Project dialog box appears.
-
Under Project types, expand the Visual Basic or Visual C# project node, expand the ArcGIS node, and click Desktop Add-Ins.
-
Select the ArcMap Add-in template in the Templates pane. Add-in customizations are specific to ArcGIS Desktop applications and can also be created for ArcCatalog, ArcScene, and ArcGlobe.
-
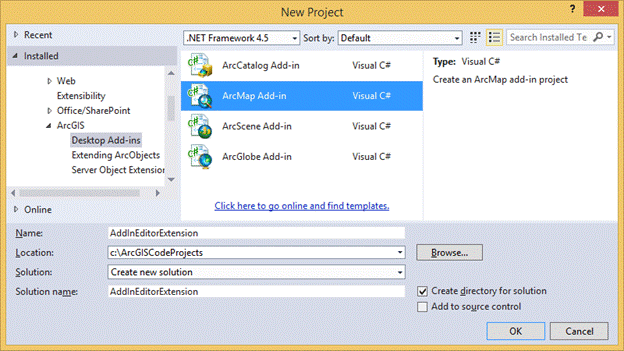
Name the project AddInEditorExtension and browse to the location where you want to save the project. See the following screen shot:
- Click OK to close the dialog box and open the ArcGIS Add-Ins Wizard.
If there are no templates in the Templates pane associated with the Desktop Add-Ins node, verify that your target .NET Framework is set to .NET Framework 4.5 or higher in the drop-down menu in the upper right corner of the New Project dialog box.
Using the ArcGIS Add-Ins Wizard
The ArcGIS Add-Ins Wizard creates appropriate Extensible Markup Language (XML) elements and managed classes required for the add-in based on the input that you provide. To define the customizations to include in your add-in, perform the following steps:
- On the Welcome page, fill in the basic information about the add-in: name, company/publisher, description, and the image. The metadata information you provide about an add-in on the Welcome page is displayed in the Add-In Manager dialog box. You can find help tips about each entry in the dialog box by hovering your mouse pointer over the appropriate help icon.
Fill in the information as shown in the following screen shot: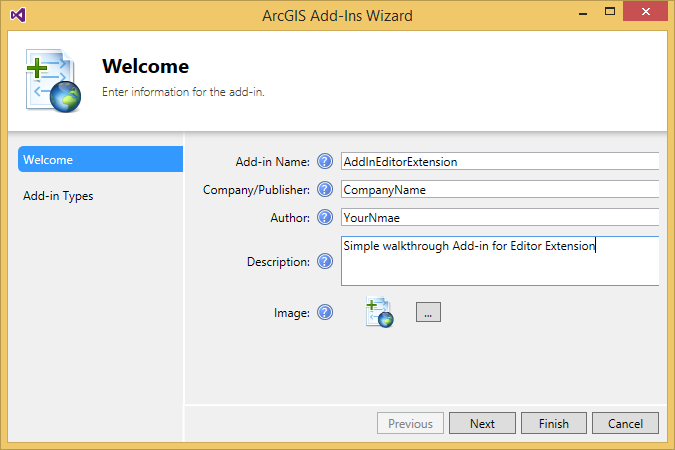
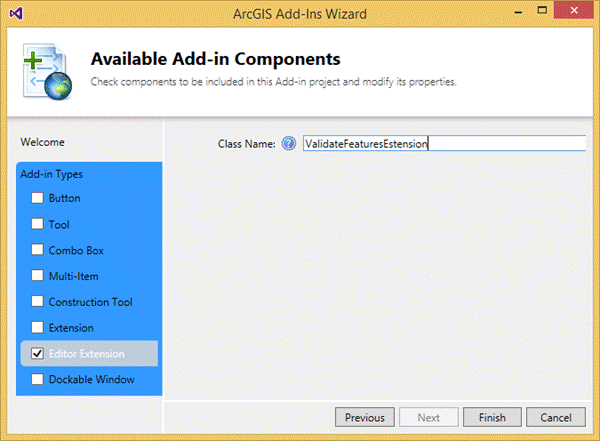
- Click Next. The Available Add-in Components page appears. The Add-in Types section on the left lists the type of customizations that you can add to your add-in.
- Under Add-in Types, select the Editor Extension check box and type ValidateFeaturesExtension as the class name. The ValidateFeaturesExtension class is the managed class that will implement the run time behavior of the editor extension and is created by the wizard with appropriate template code. See the following screen shot:
- Click Finish. An add-in project is created. The following screen shot shows the files created by the wizard as seen in Solution Explorer:
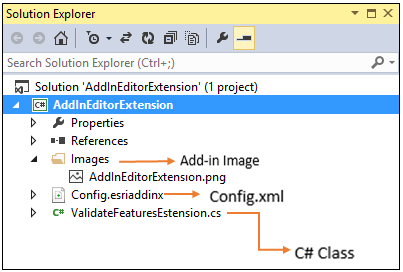
The XML file is named Config.esriaddinx; it will be renamed config.xml after you build the project and install the add-in.
Understanding the XML
The numbers in this section are not steps; rather, they correspond to the numbers in the referenced screen shot.
- The basic add-in information that you provided on the Welcome page of the ArcGIS Add-Ins Wizard (name, company/publisher, description, and image) is included in the XML.
- The Target tag allows you to specify the ArcGIS product and version to which the add-in must be installed.
- The ArcMap element specifies that the custom editor extension must be installed solely in an ArcMap application. You can create add-in components (such as buttons and tools) for ArcCatalog, ArcScene, and ArcGlobe. However, custom editor extensions are applicable to ArcMap applications only.
- The class attribute of the Extension tag specifies the C# or VB .NET managed class that provides the run time behavior of the editor extension. The id attribute provides the unique progid of the extension.
You can create more than one custom editor extension in an add-in.
Implementing run time behavior
Once the wizard has created the template code, you will notice the following:
- The ValidateFeaturesExtension class must inherit the ESRI.ArcGIS.Desktop.AddIns.Extension class.
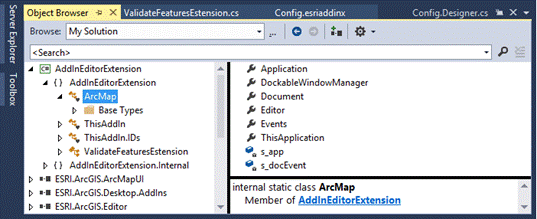
- The template code shows how to wire editor events. Static classes, such as ArcMap, are predefined in config.Designer.cs. The static ArcMap class has several static members - such as application, document, editor, and events - that you can use for your run time implementation. The following screen shot shows the ArcMap class and its static members:
The following code example shows the implementation of run time behavior. When you begin an editing session in ArcMap, the custom editor extension is loaded and ArcMap fires the OnStartup event. In the OnStartup() method, you must wire the OnStartEditing and OnStopEditing editor events. The OnStartEditing event is fired when an editor session starts, and the OnStopEditing event is fired when the edit session ends. The OnStartEditing event implementation wires the onChangeFeature and onCreateFeature edit events that are fired when a feature is created or changed. The onChangeFeature and onCreateFeature Event Handler implementation validates the created or changed feature.
[C#] //Invoked when the editor extension is loaded.
protected override void OnStartup()
{
Events.OnStartEditing += new IEditEvents_OnStartEditingEventHandler
(Events_OnStartEditing);
Events.OnStopEditing += new IEditEvents_OnStopEditingEventHandler
(Events_OnStopEditing);
}
//Invoked at the start of an editor session.
void Events_OnStartEditing()
{
//Since features of shapefiles, coverages, and so on, cannot be validated, ignore wiring
//events for them.
if (ArcMap.Editor.EditWorkspace.Type !=
esriWorkspaceType.esriFileSystemWorkspace)
{
//Wire OnCreateFeature edit event.
Events.OnCreateFeature += new IEditEvents_OnCreateFeatureEventHandler
(Events_OnCreateChangeFeature);
//Wire onChangeFeature edit event.
Events.OnChangeFeature += new IEditEvents_OnChangeFeatureEventHandler
(Events_OnCreateChangeFeature);
}
}
//Invoked at the end of an editor session (Editor->Stop Editing).
void Events_OnStopEditing(bool Save)
{
//Since features of shapefiles, coverages, and so on, cannot be validated, ignore wiring
//events for them.
if (ArcMap.Editor.EditWorkspace.Type !=
esriWorkspaceType.esriFileSystemWorkspace)
{
//Unwire OnCreateFeature edit event.
Events.OnCreateFeature -= new IEditEvents_OnCreateFeatureEventHandler
(Events_OnCreateChangeFeature);
//Unwire onChangeFeature edit event.
Events.OnChangeFeature -= new IEditEvents_OnChangeFeatureEventHandler
(Events_OnCreateChangeFeature);
}
}
//Invoked when a feature is created or modified.
void Events_OnCreateChangeFeature(ESRI.ArcGIS.Geodatabase.IObject obj)
{
IFeature inFeature=(IFeature)obj;
if (inFeature.Class is IValidation)
{
IValidate validate=(IValidate)inFeature;
string errorMessage;
//Validates connectivity rules, relationship rules, topology rules, and so on.
bool bIsvalid=validate.Validate(out errorMessage);
//Report validation result.
if (!bIsvalid)
{
System.Windows.Forms.MessageBox.Show("Invalid Feature\n\n" +
errorMessage);
}
else
{
System.Windows.Forms.MessageBox.Show("Valid Feature");
}
}
}
'Invoked when the editor extension is loaded.
Protected Overrides Sub OnStartup()
AddHandler Events.OnStartEditing, AddressOf Events_OnStartEditing
AddHandler Events.OnStopEditing, AddressOf Events_OnStopEditing
End Sub

'Invoked at the start of the editor session.

Private Sub Events_OnStartEditing()
    'Since features of shapefiles, coverages, and so on, cannot be validated, ignore wiring
    'events for them.
    If ArcMap.Editor.EditWorkspace.Type <> esriWorkspaceType.esriFileSystemWorkspace Then
        'Wire OnCreateFeature edit event.
        AddHandler Events.OnCreateFeature, AddressOf Events_OnCreateChangeFeature
        'Wire onChangeFeature edit event.
        AddHandler Events.OnChangeFeature, AddressOf Events_OnCreateChangeFeature
    End If
End Sub

'Invoked at the end of the edit session.

Private Sub Events_OnStopEditing(ByVal Save As Boolean)
    'Since features of shapefiles, coverages, and so on, cannot be validated, ignore wiring
    'events for them.
    If ArcMap.Editor.EditWorkspace.Type <> esriWorkspaceType.esriFileSystemWorkspace Then
        'Unwire OnCreateFeature edit event.
        RemoveHandler Events.OnCreateFeature, AddressOf Events_OnCreateChangeFeature
        'Unwire onChangeFeature edit event.
        RemoveHandler Events.OnChangeFeature, AddressOf Events_OnCreateChangeFeature
    End If
End Sub

'Invoked when a feature is created or modified.

Private Sub Events_OnCreateChangeFeature(ByVal obj As ESRI.ArcGIS.Geodatabase.IObject)
    Dim inFeature As IFeature=CType(obj, IFeature)
    If TypeOf inFeature.Class Is IValidation Then
        Dim validate As IValidate=CType(inFeature, IValidate)
        Dim errorMessage As String
        Dim bIsvalid As Boolean=validate.Validate(errorMessage)
        If (Not bIsvalid) Then
            System.Windows.Forms.MessageBox.Show("Invalid Feature" & Constants.vbLf + Constants.vbLf & errorMessage)
        Else
            System.Windows.Forms.MessageBox.Show("Valid Feature")
        End If
    End If
End Sub
Installing the add-in
To install the add-in, follow these steps:
- Save the project.
- In Visual Studio, click the Build menu, and click Build Solution.
- View the output window in your Visual Studio .NET IDE. If the project builds correctly, the output shows that the build has succeeded and the add-in has been installed to the current user location.
Testing the editor extension
To test the custom editor extension, complete the following steps:
- Start ArcMap, open a map document, and add data that has connectivity rules, relationship rules, or topology rules associated with it.
- Click Customize and click Add-In Manager. The Add-In Manager dialog box appears. The Add-In Manager dialog box lists the add-ins that are currently installed for the application. Add-in information - such as name, image, and description - is listed on the Add-In Manager dialog box.
- Click Close.
- Click Customize, click Toolbars, and click Editor.
- Dock the Editor toolbar, click Editor, and click Start Editing.
- Select a data feature and move it. This triggers the onChangeFeature event, and the feature is validated for the new location. A message box shows the validation result as shown in the following screen shot:

Uninstalling the add-in
To uninstall the add-in you created, follow these steps:
- In ArcMap, click Customize, and click Add-In Manager. The Add-In Manager dialog box appears.
- Select AddInEditorExtension and click Uninstall Add-In. The corresponding add-in file is deleted from the user location where it was installed.
See Also:
Understanding editor extensions| Development licensing | Deployment licensing |
|---|---|
| ArcGIS Desktop Basic | ArcGIS Desktop Basic |
| ArcGIS Desktop Standard | ArcGIS Desktop Standard |
| ArcGIS Desktop Advanced | ArcGIS Desktop Advanced |