
In this walkthrough a COM class in Visual C++ will be created that implements the esriSystemUI ICommand interface. The command will be created from first principles, without using any of the ESRI utility classes or add-ins for Visual C++.
This command will zoom in by a factor of 2 to the current map, and can be used either in the ArcMap.exe application or any application using ToolbarControl with a MapControl or PageLayoutControl buddy.
Terminology
Microsoft Visual C++: This walkthrough describes how to create an ArcGIS Command in C++ using the Microsoft Visual Studio development environment and the Visual C++ compiler.
COM Server: A COM Server is a binary file that contains the method code for one or more COM classes. A COM Server can be packaged as either a dynamic link library or a normal executable.
Create a new class library
-
Open Visual Studio.
-
Click File, then New, and then Project.
-
Select the Visual C++ Folder and then the ATL sub folder. Click ATL Project, then enter the project name and location of the source files. The project name will be the name given to the project directory and COM Server file. Click OK.
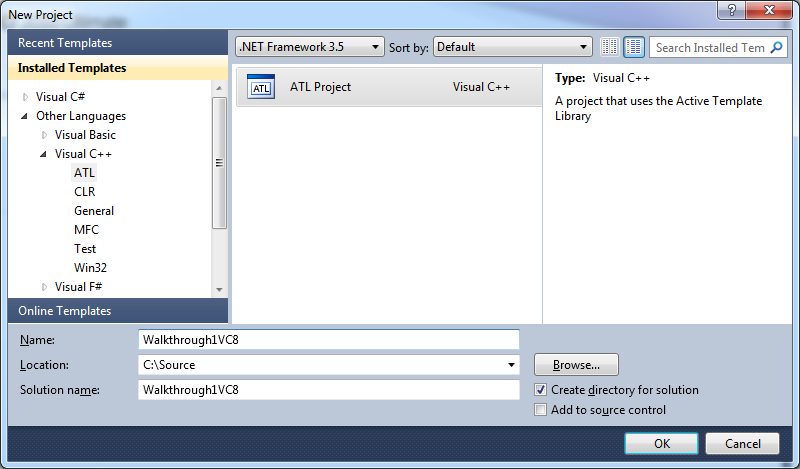 Project Wizard. This example uses the project name Walkthrough1VC8.
 -
On the next dialog box, select "Application Settings" in order to view the settings.
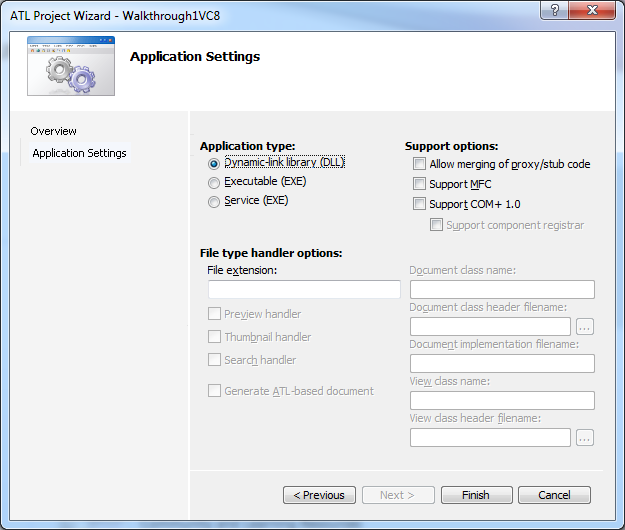 Project Wizard. Choosing the settings for the application.
By default the Attributed Option is disabled. This walkthrough shows how to implement a COM class using attributes. Therefore you need to enable this option.
For further information about attributes read the ATL and Attributes section in the ATL Discussion.
- The Solution tab in the workspace window will show that a C++ file (.cpp) has been created for the COM server, along with files to support precompiled header files and resources. The file has a module attribute that causes the following dll's to be automatically implemented for you:
- DllMain
- DllRegisterServer
- DllUnregisterServer
The majority of these functions simply delegate to the CAtlBaseModule class. An instance of this class is defined in every ATL project as _AtlBaseModule (in ATL 3.0 an instance of CComModule has been defined as _Module, which is now obsolete).
Create a zoom-in command
- With the COM Server code present the ATL COM objects can be added. This is done using the ATL Object wizard. Right click on the projectname "WalkthroughVC8" in the Solution tab in the workspace and then click Add and then Add Class... Select the ATL sub folder and then click on ATL Simple object. Click Add to define a simple object.
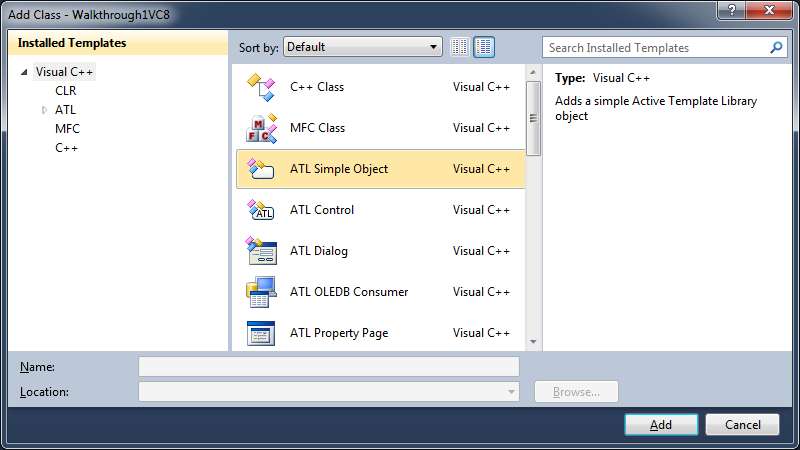 ATL Object Wizard.
- Give the object a name and confirm that the automatically generated names are concise but informative.
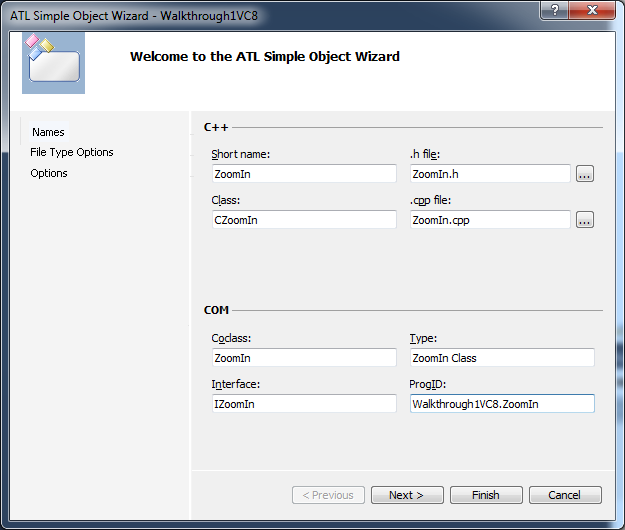 Name allocation of the ATL Object Wizard. This example names the coclass ZoomIn.
- Click the Options tab and set the Interface type to Custom. This ensures that the interface IZoomIn inherits directly from IUnknown and not IDispatch, which is the default - in this way it is the same as all the other ArcObjects interfaces. While this is not necessary, it reduces the size of the COM object when it is instantiated for better memory management.
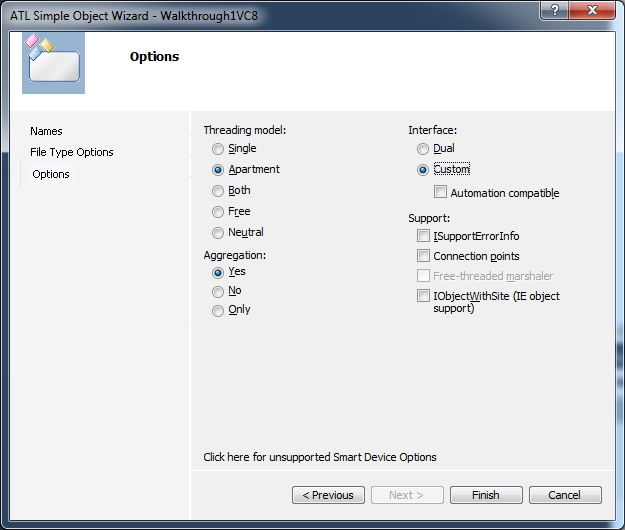 Object Properties Wizard. Defining the characteristics of your COM object.
- Click Finish when finished. This creates two new files, ZoomIn.cpp and ZoomIn.h.
A [coclass] attribute has been created in the header file ZoomIn.h which provides all the code to make the CZoomIn C++ class into a COM coclass. This extra code is obtained by the compiler at compile time and is passed to a component called the ATL Attribute Provider. The ATL Attribute Provider can dynamically generate code that is used by the compiler at compile time.
For further information about attributes and the attribute provider see the references at the end of this walkthrough and the ATL and Attributes section in ATL Discussion.
An [object] attribute has been added to ZoomIn.h to identify a custom interface. This attribute defines a UUID for the interface, a helpstring and the default pointer attribute for all pointers.
The ATL wizard requires that you define a new interface but this is redundant in this walkthrough for our command as we will reusing an existing ArcGIS ICommand interface. If necessary add your own methods here or remove this definition.
[VCPP] // IZoomIn
[object, uuid("297E96B4-D481-47C3-AEEB-CD526016DFDA"), helpstring(
"IZoomIn Interface"), pointer_default(unique)]
One of the aims of C++ attributes is to remove the need to maintain a separate IDL file. Instead, the type descriptions are in C++ files (in this case the coclass attribute) and, during compile time, the compiler constructs a temporary IDL file. This is compiled with MIDL to generate the C++ bindings header file, the type library, and the C proxy-stub DLL files.
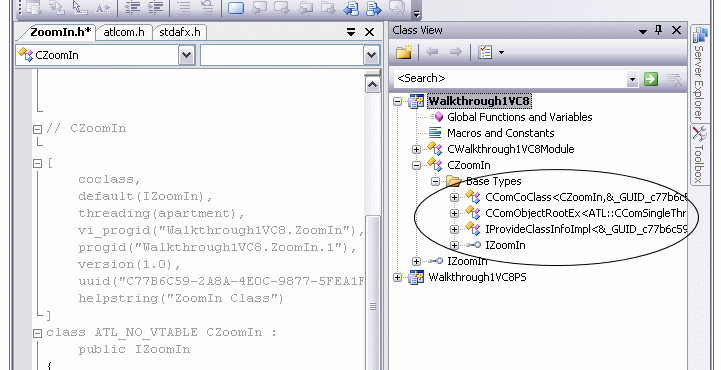
[VCPP] // CZoomIn
[coclass, default(IZoomIn), threading(apartment), vi_progid(
"Walkthrough1VC8.ZoomIn"), progid("Walkthrough1VC8.ZoomIn.1"), version(1.0),
uuid("C77B6C59-2A8A-4E0C-9877-5FEA1F4C02B4"), helpstring("ZoomIn Class")
]class ATL_NO_VTABLE CZoomIn: public IZoomIn
The [coclass] attribute adds an UpdateRegistry method to the class, which in ATL 3.0 would have been added using the various DECLARE_REGISTRY macros.
How registry information are added to the [coclass] attribute will be shown later in this walkthrough.
At this stage, the CPP implementation file is empty, except for some includes. The header file contains the C++ class definition. Notice the inheritance list of the class.
Although publicly created classes (coclasses) must inherit from the class CComCoClass, this is not specified in the code. The code for inheritance from CComCoClass and CComObjectRootEx is injected during compilation using the information from the [coclass] attribute.
During design time you can see the inheritance from CComCoClass and CComObjectRootEx in the class view of the workspace under Bases and Interfaces of the CZoomIn class.
- Confirm that everything has been successful by building the solution.
Reference the ESRI object libraries
In VC++ projects you need to add references to the ESRI object libraries you will be using. These libraries contain information about ESRI COM objects that the compiler requires for you to use these objects in your project. Object libraries have the .olb extension and are to be found in the /com sub-directory of your ArcGIS install. The #import directive is used to pull the contents of an object library into the project workspace by creating type library header or tlh files, which the compiler then uses.
For this project the following object libraries are required: esriSystem.olb, esriSystemUI.olb, esriGeometry.olb, esriDisplay.olb, esriGeoDatabase.olb, esriCarto.olb and esriControlCommands.olb. To find out which library contains an object look up the relevant interface or coclass entry in the ArcGIS Developer Help. Alternatively the ESRI Library Locator tool can be used for this purpose - it is found in from the Start menu in ArcGIS/Developer Tools.
For more efficient compilation, add #import lines to the precompiled header file stdafx.h. These #import directives can be slow to compile, but the precompiled header only needs compiled once after it has been edited. Due to dependencies between the object libraries it is necessary to add the extra imports shown below. Remember to exclude OLE_COLOR, OLE_HANDLE and VARTYPE from the import of esriSystem, since these names clash with Microsoft definitions of the same names. In this example the object libraries are imported using their GUID's rather than path names in order to be independent from the location of the object libraries on the system. An easy way to find the GUID of an object library is the OLE/COM object viewer from the Tools menu.
[VCPP] #pragma warning(push)
#pragma warning(disable : 4192)
//disables warning: automatically excluding 'name' while importing type library 'library'
//import esriSystem.olb
#import "libid:5E1F7BC3-67C5-4AEE-8EC6-C4B73AAC42ED" raw_interfaces_only
raw_native_types no_namespace named_guids exclude("OLE_COLOR", "OLE_HANDLE",
"VARTYPE")
//import esriSystemUI.olb
#import "libid:4ECCA6E2-B16B-4ACA-BD17-E74CAE4C150A" raw_interfaces_only
raw_native_types no_namespace named_guids exclude("OLE_HANDLE", "OLE_COLOR")
//import esriGeometry.olb
#import "libid:C4B094C2-FF32-4FA1-ABCB-7820F8D6FB68" raw_interfaces_only
raw_native_types no_namespace named_guids exclude("OLE_HANDLE", "OLE_COLOR",
"ISegment")
//import esriDisplay.olb
#import "libid:59FCCD31-434C-4017-BDEF-DB4B7EDC9CE0" raw_interfaces_only
raw_native_types no_namespace named_guids exclude("OLE_HANDLE", "OLE_COLOR")
//import esriGeoDatabase.olb
#import "libid:0475BDB1-E5B2-4CA2-9127-B4B1683E70C2" raw_interfaces_only
raw_native_types no_namespace named_guids
//import esriCarto.olb
#import "libid:45AC68FF-DEFF-4884-B3A9-7D882EDCAEF1" raw_interfaces_only
raw_native_types no_namespace named_guids exclude("UINT_PTR")
//import esriControls.olb
#import "libid:033364CA-47F9-4251-98A5-C88CD8D3C808" raw_interfaces_only
raw_native_types no_namespace named_guids
#pragma warning(pop)
You can use path names to import the object libraries but they will vary depending on your installation.
Several warnings would appear, but these have been safely disabled using the #pragma statement. It is advisable to push and pop the warning stack so that the warnings are only disabled for these imports.
Implement the ICommand interface
-
Click the Class View tab in the Workspace browser on the left of the Visual Studio window.
-
Select the class CZoomIn and display the right-click context menu.
Select Add and then click Implement Interface. This opens the Implement Interface Wizard. -
Select Implement Interface from: Registry.
From the Available type libraries combo box select ESRI SystemUI Object Library, which defines the ICommand interface. -
From the Interfaces window select the ICommand interface and move it to the Implement interfaces window using the arrow button. Click Finish.
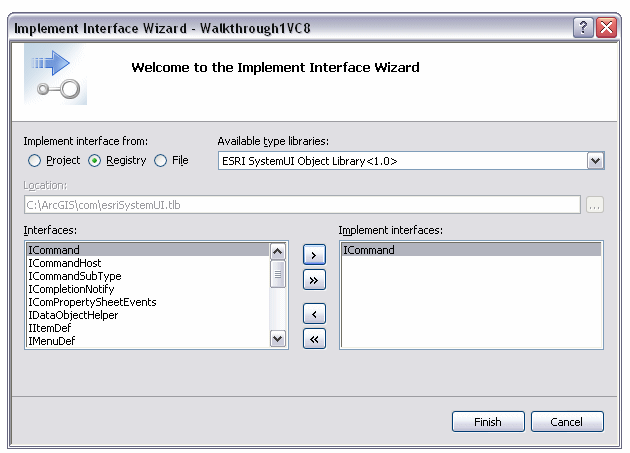
Interface Implementation Wizard.The ICommand interface has been selected from the ESRI SystemUI Object Library.
The wizard adds inherited methods of the ICommand interface that is implemented by CZoomIn. These methods should be moved to the CPP file, leaving only the function prototypes in the header file. The listing below shows the changes required for each function.
The wizard creates this function in the header file.
STDMETHOD(get_Enabled)(VARIANT_BOOL *Enabled)
{
  return E_NOTIMPL;
}
Change the header file to look like this:
[VCPP] STDMETHOD(get_Enabled)(VARIANT_BOOL *Enabled);
Add the methods to the implementation file as follows:
[VCPP] STDMETHODIMP CZoomIn::get_Enabled(VARIANT_BOOL *Enabled)
{
if (Enabled == NULL)
return E_POINTER;
return E_NOTIMPL;
}
Adding a Bitmap
Next we will add a member variable to hold a bitmap resource used by the Command button; this involves changes to the ZoomIn header file and the creation of a Bitmap resource in the resource editor.
-
In the Resource View of the workspace window right click the project Walkthrough1VC8, select Add and then click Add Resource.
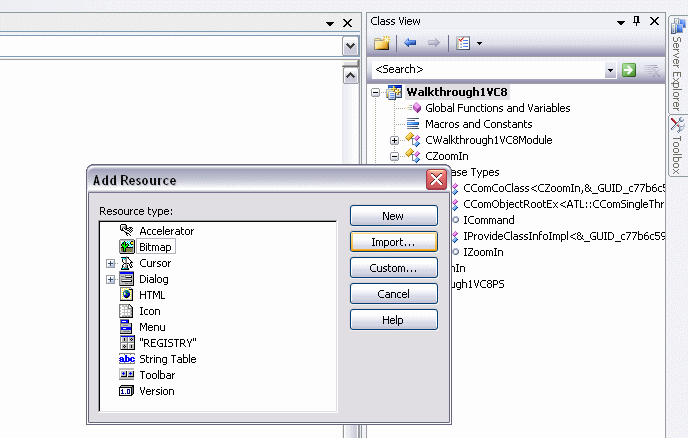
-
Click the import button and navigate to the .bmp file you wish to use as the ZoomIn icon. There is a suitable file in the \Bin\Icons directory of your ArcGIS install called Zoom_in_tool_2.bmp. Copy this into your project, typically these resources go in a "res" subfolder of the project. Click Open when finished. Using the properties for the resource, set the name of the resource to "IDB_ZOOMIN". Add the following member variable to the ZoomIn.h header file.
private:
  HBITMAP m_hBitmap;
This member variable needs code to initialize it in the class constructor and release it in the class destructor. Notice the use of the _AtlBaseModule for access to the handle containing resources. The IDB_ZOOMIN is a bitmap resource defined in the resource editor.
[VCPP] CZoomIn::CZoomIn()
{
m_hBitmap=::LoadBitmap(_AtlBaseModule.GetResourceInstance(),
MAKEINTRESOURCE(IDB_BITMAP2));
}
CZoomIn::~CZoomIn()
{
DeleteObject(m_hBitmap);
}
- Next, add a member variable that will hold a reference to the IHookHelper interface. The HookHelper contains the hook object which is passed in to the command when it is created, and provides access to useful objects such as the ActiveView, FocusMap and PageLayout from the hook. This object is useful as it will allow the ZoomIn command to be used with both the ArcMap application, when an IApplication object is passed in as the hook, and the ActiveX Controls, when the IToolbarControl is the hook.
IHookHelperPtr m_ipHookHelper;
The member variable does not need to be initialized in the class initialization list since it is a smart pointer. Smart pointers are initialized by default to 0. If this were a standard interface pointer it would have to be initialized in the constructor's initialization list.
Now all that is left to do is for the implementation code to be added to the cpp file.
Below are some of the methods of the ICommand interface, with comments.
Note the use of VARIANT_TRUE.
[VCPP] STDMETHODIMP CZoomIn::get_Enabled(VARIANT_BOOL *Enabled)
{
if (Enabled == NULL)
return E_POINTER;
*Enabled=VARIANT_TRUE; // Enable the tool always
return S_OK;
}
Note the use of the windows API calls used to create a BSTR. These strings could also be stored in the project resources in a string table and loaded by ID.
[VCPP] STDMETHODIMP CZoomIn::get_Name(BSTR *Name)
{
if (Name == NULL)
return E_POINTER;
*Name=::SysAllocString(L "ZoomIn x 0.5 VC8");
return S_OK;
}
STDMETHODIMP CZoomIn::get_Caption(BSTR *Caption)
{
if (Caption == NULL)
return E_POINTER;
*Caption=::SysAllocString(L "ZoomIn x 0.5 VC8");
return S_OK;
}
STDMETHODIMP CZoomIn::get_Category(BSTR *Category)
{
if (Category == NULL)
return E_POINTER;
*Category=::SysAllocString(L "Developer Samples");
return S_OK;
}
A simple cast is all that is required here to coerce the bitmap handle into an OLE_HANDLE variable.
[VCPP] STDMETHODIMP CZoomIn::get_Bitmap(OLE_HANDLE *Bitmap)
{
if (Bitmap == NULL)
return E_POINTER;
*Bitmap=(OLE_HANDLE)m_hBitmap;
return S_OK;
}
The OnCreate method is passed the IDispatch interface of the object. Using the QueryInterface support of the smart pointer, it is a simple matter to set the member variable to be the hook. The smart pointer handles the QI.
[VCPP] STDMETHODIMP CZoomIn::OnCreate(IDispatch *hook)
{
m_ipHookHelper.CreateInstance(CLSID_HookHelper);
HRESULT hr=m_ipHookHelper->putref_Hook(hook);
return hr;
}
The OnClick method is implemented to zoom the display by a factor of two. There is no error checking to simplify the code.
[VCPP] STDMETHODIMP CZoomIn::OnClick()
{
// HRESULT checking omitted for clarity
IActiveViewPtr ipActiveView;
m_ipHookHelper->get_ActiveView(&ipActiveView);
IEnvelopePtr ipEnv;
ipActiveView->get_Extent(&ipEnv);
ipEnv->Expand(0.5, 0.5, VARIANT_TRUE);
ipActiveView->put_Extent(ipEnv);
ipActiveView->Refresh();
return S_OK;
}
Adding COM category registration functionality
The final change involves the automatic registration of the class into the appropriate Component Category. This is an optional step, but one that makes installation of the server easier. It means that the end user will see the new command in the Customize dialog box the first time either ArcMap or the ToolbarControl are started after the DLL is registered.
For your convenience, a header file (\ArcGIS\include\CatIDs\ArcCATIDs.h) is provided that defines constants for all the CATIDs used by ArcGIS. You could also have retrieved this information from the registry and created your own constants. This file can be brought into a C++ project using #include to provide CATID definitions.
Add the following lines of code to the [coclass] attribute in ZoomIn.h:
[coclass, threading("apartment"), vi_progid("Walkthrough1VC8.ZoomIn"), progid(
  "Walkthrough1VC8.ZoomIn.1"), version(1.0), uuid(
  "E86E1877-82F5-4560-AF99-1987E23047CD"), helpstring("ZoomIn Class"),

implements_category(__uuidof(CATID_MxCommands)), implements_category(__uuidof
  (CATID_ControlsCommands))]
The project can now be built.
Use the command in ArcMap
You are now ready to use the ZoomIn command in ArcMap.
-
Start ArcMap, and open a map document which has some data layers.
-
Click Tools, Customize and select the Developer Samples category.

-
In the right-hand pane, select the "ZoomIn x 0.5 VC8" command, and drag it on to an ArcMap toolbar. Close the Customize dialog box.
-
Click the new command button to zoom in to the map.
-
Save the document, and then close ArcMap.
Use the command with the ToolbarControl
The Customize dialog for the ToolbarControl is available either via the property pages or can be created at runtime. The first approach is illustrated here.
-
Paste the ToolbarControl and MapControl onto a VC++ dialog.
-
Right-click on the MapControl to open the property page, then from the General tab select a suitable map document.
-
Right-click ToolbarControl to open the property page, then from the General tab choose the MapControl from the BuddyControl list
-
Select the Items tab and click the Add button.
-
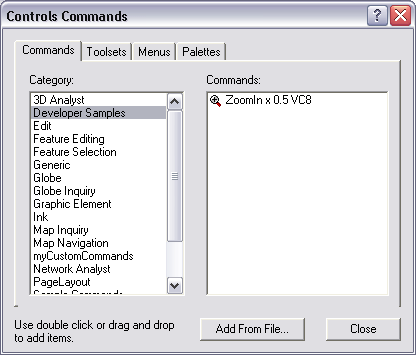
Select the Developer Samples category on the commands tab of the ControlsCommands dialog.
-
In the right-hand pane, select the "ZoomIn x 0.5 VC8" command, and either double click or drag it on to the toolbar. Close the ControlsCommands dialog box and press the OK button on the property pages.
-
Build and run the application.
-
Click the new command button to zoom in to the map.
Stepping through the command with the debugger
If you wish, you can run the command in debug mode, and step through each line of code in turn. How to do so using ArcMap is shown below. The same approach can be used for applications using the Map and Toolbar controls.
-
Return to the Visual Studio environment.
-
In the Solutions View of the Workspace browser , right-click the Walkthrough1VC8 project, and click Properties.
-
In the Debugging category, add ArcMap.exe as the executable for debug session:

-
Close the Project Property dialog box.
-
In the code window, find the class constructor method, put the cursor on the first line of code and press F9 to set a breakpoint.
-
Press F5 to begin a debug session. The buttons on the debug toolbar can then be used to step through the code one line at a time.
Walkthrough References
Further information about ATL and COM programming can be found in ATL Discussion.