Summary
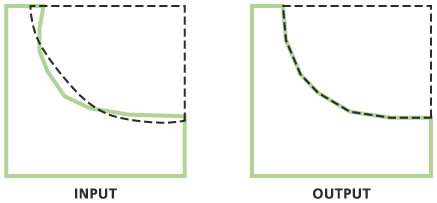
Integrate is used to maintain the integrity of shared feature boundaries by making features coincident if they fall within the specified x,y tolerance. Features that fall within the specified x,y tolerance are considered identical or coincident.
For example, suppose you specify an x,y tolerance of five units (such as feet or meters) and your data has a parcel boundary that should be shared with the adjacent parcel boundary but is four units away. After running this tool, the boundaries of the two parcels would be made coincident because they were within the x,y tolerance of five units.
Integrate performs the following processing tasks:
- Finds features that are within the given x,y tolerance.
- Inserts common coordinate vertices for features that fall within the given x,y tolerance and will add vertices where feature segments intersect.
Illustration

Usage
If there are any input features selected, this tool will execute only on those selected features.
This tool performs the same kind of work as a topology in that it moves features within an x,y tolerance and inserts vertices where features intersect. Consider using a topology to perform this sort of operation because a topology allows you to specify rules and conditions about how features relate to each other. For more information about using topologies, see Topology basics.
You would use Integrate rather than a topology when:
- You do not need to specify any rules about how features are moved—you simply want all features to coalesce within a specified tolerance.
- You want lines to have vertices wherever they intersect.
- You are working with non-geodatabase features such as shapefiles, or with features from different geodatabases (features in a topology must all come from the same feature dataset).
The value for XY Tolerance is critical—a tolerance that is too large may collapse and delete polygons or lines, or move vertices that should not be moved. To minimize error, the value you choose for x,y tolerance should be as small as possible.
-
Integrate accepts only simple feature classes as input (point, multipoint, line, or polygon). The input features cannot include annotation features, dimension features, network features, and so on.
To undo changes to the input features, use Integrate in an edit session.
When processing datasets that contain individual features with a very large number of vertices (e.g., hundreds of thousands to millions of vertices within a single feature), some geometric processing operations may run out of memory. For more details, see Geoprocessing with large datasets.
The output data element of this tool is a derived multivalue output. To use this tool's output(s) with another tool, use its input(s) directly and set its output as a precondition of the other tool. Learn more about setting a precondition.
The output data element of this tool is a derived multivalue output. To use this tool's output(s) with another tool, use its input(s) directly and set its output as a precondition of the other tool.
Syntax
Integrate_management (in_features, {cluster_tolerance})| Parameter | Explanation | Data Type |
in_features [[Feature Layer, Long],...] | The feature classes to be integrated. When the distance between features is small in comparison to the tolerance the vertices or points will be clustered (moved to be coincident). The feature class or layer with the lower rank will snap to the feature from the feature class or layer with the higher rank (with 1 being a higher rank than 2). Note that features in the feature class with a rank of 1 may move when a large x,y tolerance is used. | Value Table |
cluster_tolerance (Optional) | The distance that determines the range in which feature vertices are made coincident. To minimize undesired movement of vertices, the x,y tolerance should be fairly small. If no value is specified, the xy tolerance from the first dataset in the list of inputs will be used. | Linear unit |
Code sample
Integrate Example (Python Window)
The following Python window script demonstrates how to use the Integrate function in immediate mode.
import arcpy
from arcpy import env
env.workspace = "C:/data"
arcpy.CopyFeatures_management("Habitat_Analysis.gdb/vegtype", "C:/output/output.gdb/vegtype")
arcpy.Integrate_management("C:/output/output.gdb/vegtype", 0.01)
Integrate Example 2 (stand-alone script)
The following stand-alone script is a simple example of how to apply the Integrate function in a scripting environment.
# Name: Integrate_Example2.py
# Description: Run Integrate on a feature class

# Import system modules
import arcpy
from arcpy import env

# Set environment settings
env.workspace = "C:/data/Habitat_Analysis.gdb"

# Set local variables
inFeatures = "vegtype"
integrateFeatures = "C:/output/output.gdb/vegtype"
xyTolerance = "0.1 feet"

# Execute CopyFeature (since Integrate modifies the original data
#  this ensures the original is preserved)
arcpy.CopyFeatures_management(inFeatures, integrateFeatures)

# Execute Integrate
arcpy.Integrate_management(integrateFeatures, xyTolerance)
Environments
Licensing information
- ArcGIS for Desktop Basic: Yes
- ArcGIS for Desktop Standard: Yes
- ArcGIS for Desktop Advanced: Yes