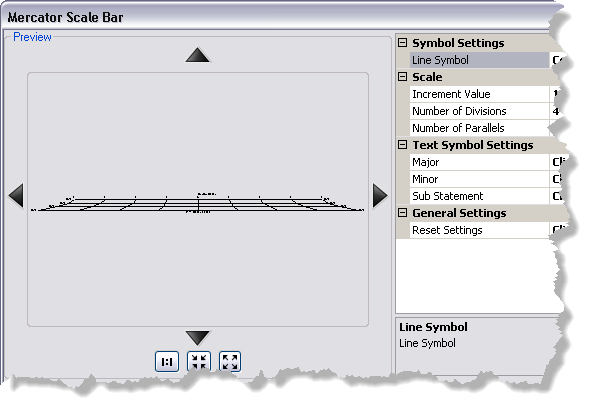
Before a Mercator scale bar has been added to the map layout, the appearance of the scale bar can be modified to ensure it meets a product specification or organizational standard. This includes the color of the scale bar, and the font and color used for the different pieces of text on the element.
The following symbol elements can be customized on the scale bar:
- Line Symbol—The line that represents the scale bar on the map.
- Number of Divisions—The number of columns that appear in the scale bar.
- Number of Parallels—The number of parallel lines that appear in the scale bar, from top to bottom.
- Major—Text that appears above the divisions and subdivisions in the scale bar and for the scale information below it.
- Minor—Text that appears at either end of the parallel lines on the scale bar.
- Sub Statement—Text that appears above the scale bar. By default, this text displays the unit of measure represented by the scale bar.
As changes are made to the different parts of the symbol, you can preview them on the Mercator Scale Bar dialog box. This provides a way for you to see how the scale bar will look on the chart layout once all of the changes are implemented.
When you modify the line symbol or a text element on the scale bar, there is a separate dialog box that appears so you can customize the color, size, and other aspects of the symbol's style. There are also preview windows in these dialog boxes so you can preview each change before you preview it on the Mercator scale bar itself.
- Start ArcMap.
-
On the main menu, click
Customize > Production > Production Properties.
The Production Properties dialog box appears.
- Click Aviation Properties in the list on the left side of the Production Properties dialog box.
-
In the Element Options section, click the cell next to Mercator Scale Bar, then click the ellipsis button (...) that appears.
The Mercator Scale Bar dialog box appears.

- To modify the line symbol, click the cell next to Line Symbol, click the ellipsis button (...) that appears, then change the color, width, or units for the line.
The updated line symbol appears in the Mercator Scale Bar dialog box.
- To change the number of units represented by each division, click the cell next to Division Value and type a new number in the cell.
The Division Value cell contains the number of units represented by each column on the scale bar.
- To change the number of units represented by each parallel, click the cell next to Increment Value and type a new number in the cell.
The Increment Value cell contains the number of degrees each parallel represents on the scale bar. The lowest value is 10 and appears at the top.
- To change the number of divisions on the scale bar, click the cell next to Number of Divisions and type a new number in the cell.
The Number of Divisions cell contains the number of columns that appear on the scale bar.
- To change the number of parallel lines on the scale bar, click the cell next to Number of Parallels and type a new number in the cell.
The Number of Parallels cell contains the number of parallel lines that appear on the scale bar.
- To modify the Major, Minor, or Sub Statement text symbols, do the following:
- Click the cell next to the symbol name and click the ellipsis (...) that appears.
The Editor dialog box appears.
- Modify the symbol properties as needed.
Properties that can be modified include the font, size, style, offset, angle, alignment, position, and masking.
- Click OK.
The Mercator Scale Bar dialog box appears.
- Click the cell next to the symbol name and click the ellipsis (...) that appears.
- To revert the Mercator scale bar to its default values, click the cell next to Reset Settings, click the drop-down arrow that appears, and choose True.
All the symbol settings for the Mercator scale bar return to the default values. Any symbol changes that have been made are undone.
- Klicken Sie auf OK.