In this exercise, you will become familiar with configuring schematic attributes. You will learn about how to do the following:
- Create attributes.
- Delete attributes.
- Configure an associated field attribute.
- Configure a query attribute.
- Configure a formatted attribute.
Edit the schematic dataset
- Open ArcCatalog.
- Browse to and select the schematics tutorial directory, C:\ArcGIS\ArcTutor\Schematics.
- Double-click the AdvancedSchematicDB geodatabase to expose the AdvancedSchematic schematic dataset that is inside.
- Right-click the AdvancedSchematic schematic dataset and choose
 Edit from the pop-up menu.
This starts the Schematic Dataset Editor application.
- Select the BrazilTemplate diagram template in the Schematic Editor tree if it is not already selected and expand it so you see all the schematic feature classes underneath.
Creating a schematic attribute
Attributes are used for many things with Schematics including symbology, labeling, and advanced configuration items for connectivity and relationships.
Before making the decision to create an attribute in the configuration tool, you must decide if it is actually needed. With Schematics, there are a couple of options available depending on the need and the data:
- If the attribute you need is only for symbology or labeling, and the table from which you need to retrieve the attribute can be joined by ArcMap, then in many cases it is better to set up a join on the schematic layer in ArcMap. A good reason for a join is that the end user immediately has access to all the joined table fields for use with symbology and labeling. If you don't do this, but you think the end user needs to access, for example, 10 of the table's fields, you will end up creating 10 attributes in configuration instead of 1 simple layer join. This means more flexibility for the end user and less work for the configuration. See Exercise 1 of this tutorial for more information on joins on schematic layers.
- If the attribute needs to be stored with the schematic record for some external needs, then you will want to configure attributes in the Schematic Dataset Editor.
- If the attributes are used by schematics for advanced reasons like connectivity, relationships, and so on, then the attributes must be defined in the Schematic Dataset Editor.
For more information and an example of using attributes to define connectivity, please review Exercise 6 of the Schematics basic configurations tutorial.
- Right-click the pug_PUG_gas_plants schematic feature class in the Schematic Dataset Editor tree and choose New Attribute from the pop-up menu.
A Properties tab for the new schematic attribute automatically displays on the right side of the Editor Window:
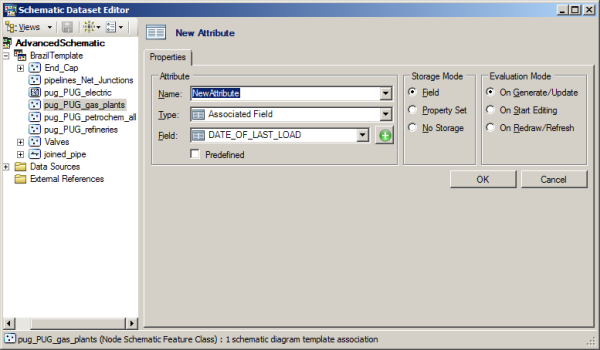
- Click the OK button (this locks down the type of attribute).
- Save (this actual creates the attribute in the system).
- Click OK.
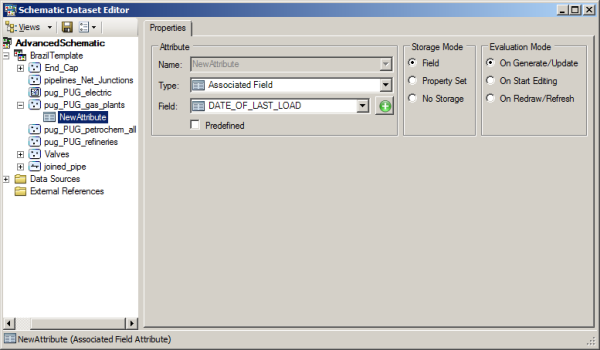
You should now see the NewAttribute entry in the Schematic Dataset Editor tree under pug_PUG_gas_plants.
Deleting an attribute
Notes about deleting an attribute
- If you have not clicked the OK button on the attribute properties tab, and you have not made any changes since creating the attribute, you can click another item in the tree view, and that attribute will be deleted.
- If you have not clicked the OK button but have made changes on the attribute properties tab, you can click the Cancel button on the tab to delete the attribute. If you click somewhere else in the tree view, you will be prompted about saving the attribute.
- If you have clicked the OK button but have not clicked the Save button
 since an attribute was created, then closing the schematic dataset editor without saving will delete the attribute.
 - Finally, if there is an attribute that has been saved (or at a minimum, the OK button was clicked), you can always just delete it as follows:
- Right-click the NewAttribute entry in the Schematic Dataset Editor tree and choose
 Delete from the pop-up menu.
Create and configure an Associated Field type attribute
When you are working with schematic feature classes that have an associated object class (automatically set when you imported the .mxd in exercise 1), then Associated Field attributes are the most common. This allows you to select a field from the GIS feature class and basically add it to the schematic feature class. Then, for labeling or symbology, instead of creating a join in ArcMap like you did in a previous exercise, you can simply point to this field of your schematic layer. So you will do this for the NAME field of the pug_PUG_gas_plants schematic feature class, which is associated with the pug_PUG_gas_plants GIS feature class.
- Right-click the pug_PUG_gas_plants schematic feature class in the tree view and choose New Attribute from the pop-up menu.
Associated Field is the default attribute type. This Type list is where you would pick different attribute types if needed. You will use that later in the exercise.
- Type GasPlantName in the Name field.
- When the Storage Mode option is set to Field (as is the default), that means that a new field will be added to the schematic feature class. That field will have the name entered in the Name field—in this case, GasPlantName. The other Storage Modes are useful for other internal items or for information needed for a developer creating algorithms but should not be used if the intention is for end-user labeling and symbology, because you need to have a physical field.
- Evaluation Mode—This is used to tell the system when to update the value that schematics is keeping track of. The default, On Generate\Update, means that this value is synchronized from the GIS feature to the schematic feature only during diagram generation or diagram update. If you choose On Start Editing, that will force the system to synchronize the value every time a user starts an edit session on the diagram. If you choose On Redraw/Refresh, it will cause the system to keep this synchronized all the time. Note that this On Redraw/Refresh should only be used in very specific cases, as it will have a performance impact on your diagram.
- Use the Field drop-down list to pick NAME from the list.
This list displays all the GIS feature class fields available for pug_PUG_gas_plants.
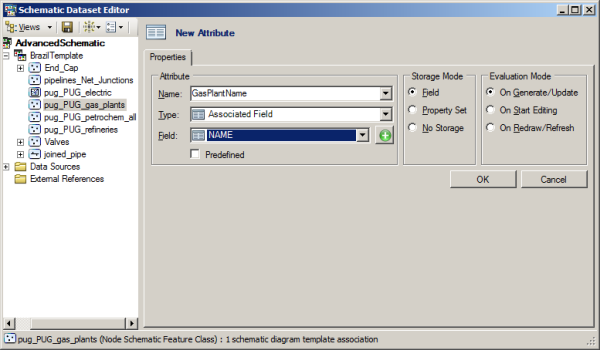
- Click OK to set this attribute.
- Create another Associated Field attribute to get the Rel_Electric field. You will use this in a minute as part of the definition for a Query attribute. Right-click the pug_PUG_gas_plants schematic feature class in the Schematic Dataset Editor tree and choose New Attribute from the pop-up menu.
- Type RelElecID in the Name field.
- Use the Field drop-down list to pick Rel_Electric from the list.
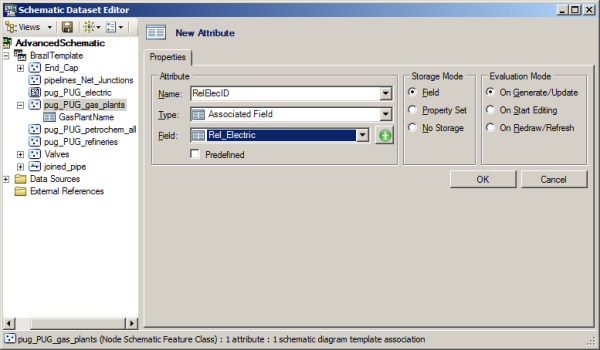
- Click OK.
Create and configure a Query type attribute
- Right-click the pug_PUG_gas_plants schematic feature class in the Schematic Dataset Editor tree and choose New Attribute from the pop-up menu.
- Type RelElecName in the Name field on the properties tab.
- Use the Type drop-down list to pick Query.
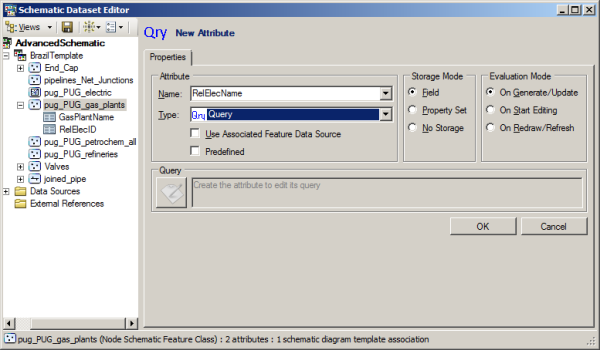
- Click OK to set this attribute.
In this version, the new Use Associated Feature Data Source has been added to the Query attribute type. If you are working with versioned data and you need to query another table based on the same version as each feature, then check this box. This will use the version that the related feature came from to then run the query. In previous versions that did not have this option, the query always ran against the Default version. If you are querying something in a different database, then do not check this box, as it will ignore the configuration and try to run the query using the same data source as the associated feature and won't be able to find the table you are trying to query. Since you are not in a versioned environment, there is no need to use this option. Now you need to configure the query.
- Click the Query/Identifier Editor button
 in the Query section of the Properties tab.
The Query/Identifier Editor dialog box opens.
- Use the Data Source drop-down list to pick Brazil.gdb, which is where the source data is located.
This fills in the list of tables available in that data source.
- Use the Tables list to scroll, then double-click the pug_PUG_electric entry.
This fills in a default query in the Query section.
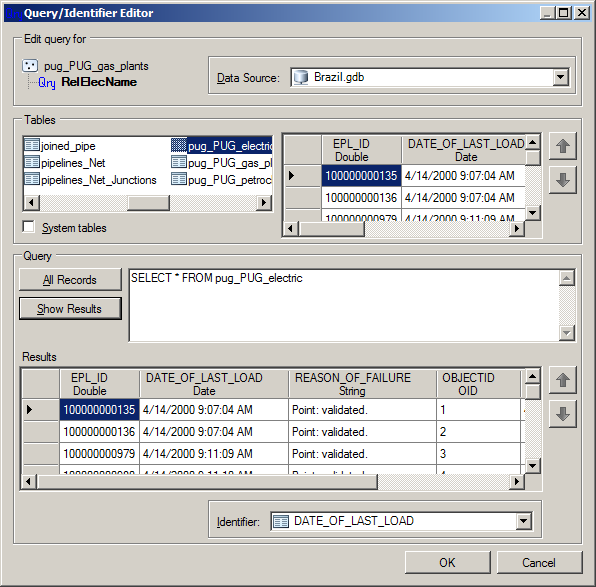
- Modify the query string by adding the following to the end of the existing string: where objectid = ?.
This will open up a new Parameters section.
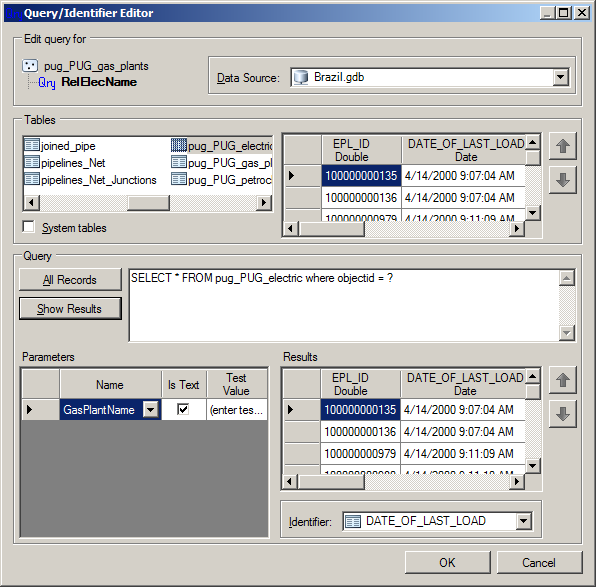
- Use the Name drop-down field in the Parameters section to choose RelElecID.
- Uncheck the Is Text check box, since this is a number.
- Type a test value of 1 in the Test Value field.
- Click the Show Results button in the Query section.
This should show one row for the CAMACARI electric station in the Results section. You will need to scroll over to the name field to verify.
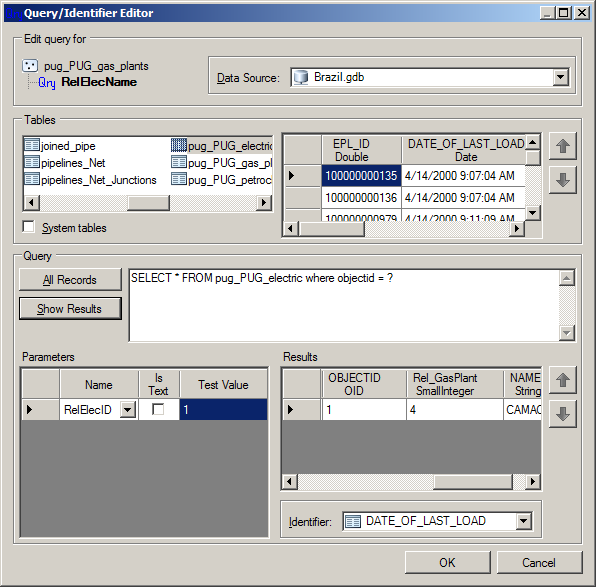
- Use the Identifier drop-down at the bottom of the form to choose NAME_.
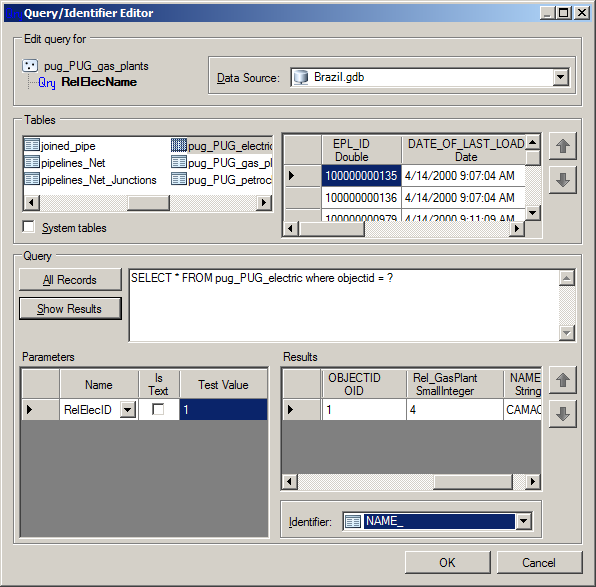
- Click OK to close the Query/Identifier Editor form.
Creating and configuring a Formatted Attribute
Formatted attributes let you combine multiple attributes and potentially add in text. You will combine two attributes for this example. You will put in the text so on a pug_PUG_gas_plant record, you will see something like Powered by electric plant number - electric plant name.
- Right-click the pug_PUG_gas_plants schematic feature class in the Schematic Dataset Editor tree and choose New Attribute from the pop-up menu.
- Type ElectricFormat in the Name field of the Properties tab.
- Pick Formatted from the Type drop-down list.
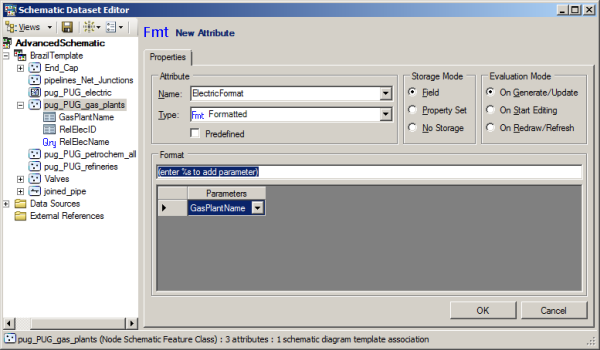
- In the format field, enter the following: Powered by %s - %s
%s is a placeholder that allows you to pass in one of your other attributes. In this case, you want the related electric ID and name.
- In the Parameters grid, use the top drop-down list to pick RelElecID.
- In the Parameters grid, use the bottom drop-down list to pick RelElecName.
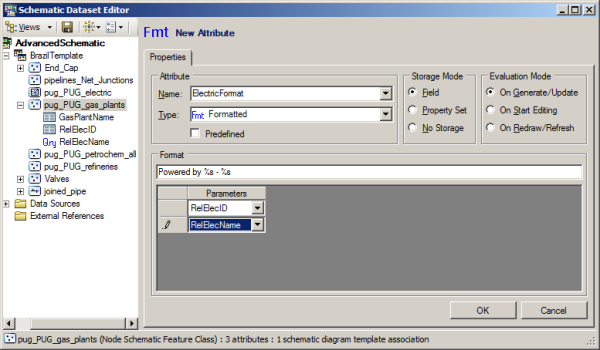
- Click OK to set this attribute.
- Click the Save button
 on the Schematic Dataset Editor toolbar.
- Close the Schematic Dataset Editor.
Testing the attribute changes
- Open the Brazil.mxd file using ArcMap.
This file is located in C:\ArcGIS\ArcTutor\Schematics\Schematics_Configuration\Mixed_Data.
- Use the ArcMap select tool to select everything in the current view.
- Click the Generate New Schematic Diagram button
 on the Schematic toolbar.
This opens the New Schematic Diagram dialog box.
- Click the browse button
 next to the Schematic Dataset or Folder drop-down list.
This opens the Select schematic dataset or schematic folder dialog box.
- Use this dialog box to browse to and select the AdvancedSchematic schematic dataset in the AdvancedSchematicDB geodatabase located at C:\ArcGIS\ArcTutor\Schematics.
- Click the Add button.
Since your configuration only has one diagram template (BrazilTemplate), it is automatically selected in the Schematic Diagram Template section.
- Type TestAttributes in the Schematic Diagram Name text box.
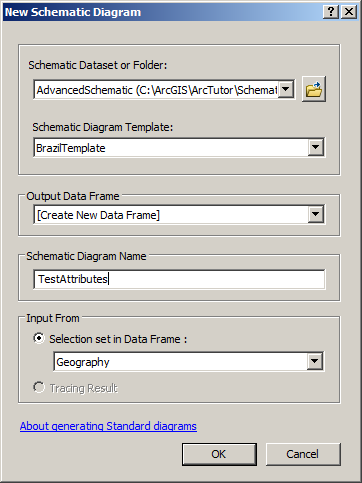
- Click OK.
You should see that the diagram has been laid out in a Hierarchical - Compact Tree layout, because that is what was set as the default for the diagram template. In the Schematic Editor toolbar, the Layout Task is also set to Hierarchical - Compact Tree.
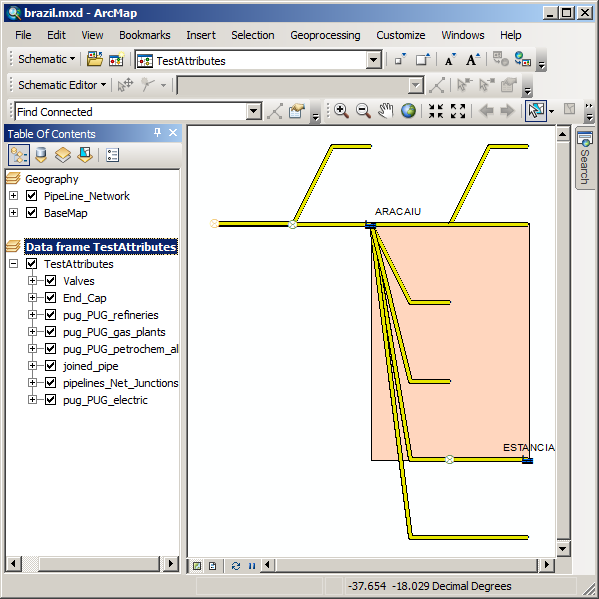
- Double-click the pug_PUG_gas_plants entry in the Table Of Contents that is found under the TestAttributes diagram layer.
This opens the Layer Properties window.
- Click the Fields tab.
- Scroll down the fields list to see the new attributes created at the bottom of this list.
Note that this is only because you specified that they would have a Storage Mode of Field.
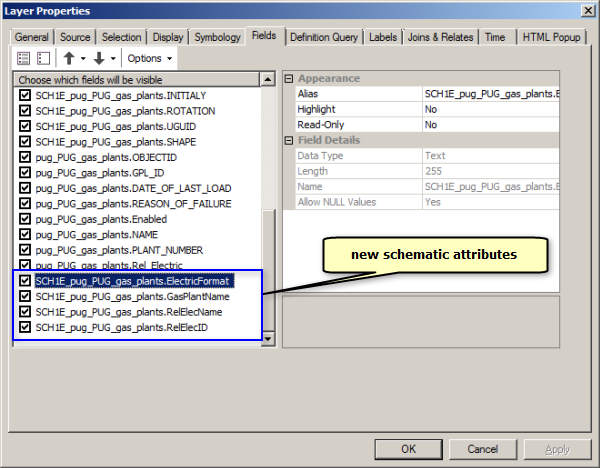
- Click the Labels tab.
- Check the check box for Label features in this layer if it is not already checked.
- Use the drop-down list for Label Field to choose the SCH1E_pug_PUG_gas_plants.ElectricFormat field.
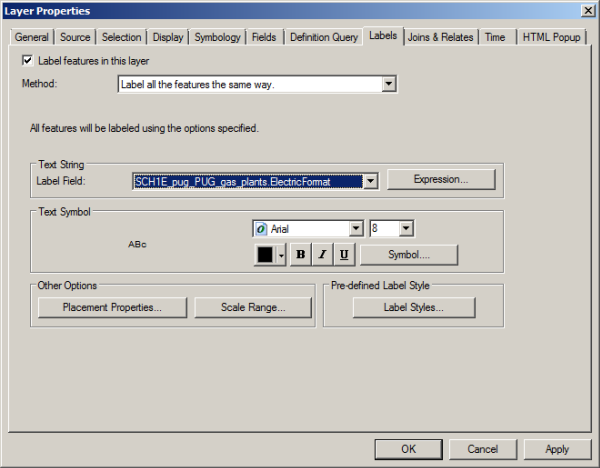
- Click OK.
You should now see the gas plants with a label of Powered by1 - CAMACARI. Remember that this was created because of three different attributes (one Associated field for the electric plant number, one Query attribute for the electric plant name, and one formatted attribute to put them together).
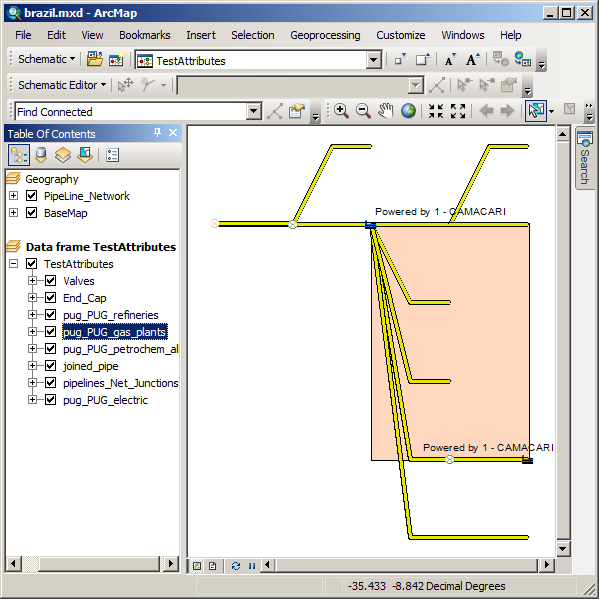
- Close ArcMap and ArcCatalog and click No to any save dialog boxes.