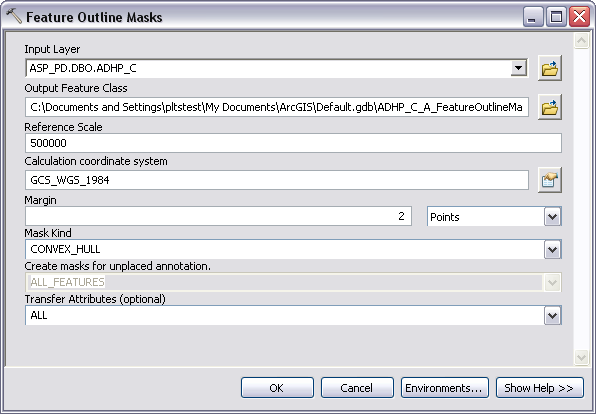
You need to have masking feature classes with the same schema as the masked feature class before the Batch Masking tool can be run. To ensure the proper schema configuration, the Feature Outline Masks geoprocessing tool should be used.
- Start ArcMap.
- Click the ArcToolbox button
 on the Standard toolbar.
The ArcToolbox window appears.
- Expand the tree view next to Cartography Tools > Masking Tools.
- Double-click the Feature Outline Masks tool.
The Feature Outline Masks dialog box appears.
- Click the Input layer drop-down arrow and choose the layer from the table of contents for which you want masks created.
This is usually a cartographic feature layer or an annotation layer.
- Click the browse button for the Output Feature Class parameter.
- Browse to your production database.
- Type the name of the new masking feature class you want to create in the Name text box.
For example, ADHP_C_A_M3.
- Click Save on the Output Feature Class dialog box.
- Type a reference scale for the masking feature class in the Reference Scale text box.
- Click Calculate coordinate system.
- Click Select.
- Browse to the coordinate system in which your data is projected.
- Click Add.
- Click OK.
- Type a margin in the Margin text box.
- Click the drop-down arrow for the margin units and choose the associated units.
- Leave Convex_Hull as the mask kind.
Convex_Hull is the recommended masking method for most features. It provides the most detailed mask with the least vertices. More vertices in the masking polygons can cause increased export and draw times.
- Click the Create masks for unplaced annotation drop-down arrow and choose ALL FEATURES.
Only placed annotation is created by the Create Feature-linked Annotation tool.
- Click the Transfer Attributes (optional) drop-down arrow and choose ALL.
This parameter is not optional for aviation masking feature classes.

- Click OK.
- Click Close on the geoprocessing log.
The new masking layer is added to the Table Of Contents window in ArcMap.
- Repeat the process for all the masking feature classes you need.