Available with Data Reviewer license.
When features are included in a network, such as roads, powerlines, pipelines, and so forth, the product specification may contain requirements for the way these features relate to points that connect them. This is referred to as valency. For instance, it may be required that all major intersections have four roads at a junction or that a T-fitting on a water main has three pipelines connected to it.
The Valency check allows you to specify the conditions to validate between line and point features in the data. The relationships can be defined for a point and line feature class or for two line feature classes. You can indicate that a point from the first feature class should be connected to three lines in the second feature class or identify two lines that are connected but have different sizes.
Some scenarios for using this check include the following:
- Identifying reducer fittings that are not connected to two pipes
- Identifying reducer fittings that are connected to two pipes with different diameters
- Identifying two adjacent lines with different sizes that are not connected to a reducer fitting
- Identifying two adjacent sewage lines that flow into the same manhole
Once you have defined the criteria for the check, you can configure the notes and a severity rating. The notes allow you to provide a more specific description for the feature that has been written to the Reviewer table and are copied to the Notes field in the Reviewer table. The severity rating allows you to indicate how important the results from a check are in terms of your quality assurance/quality-control processes. The lower the number, the greater the priority the check's results have.
- Start ArcMap.
- On the main menu, click Customize > Toolbars > Data Reviewer.
- Click the Select Data Check drop-down arrow on the Data Reviewer toolbar, click the plus sign (+) next to Advanced Checks, and then click Valency Check.
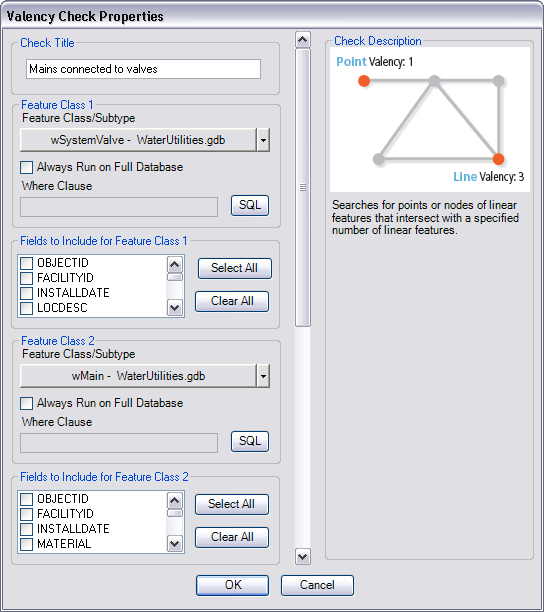
The Valency Check Properties dialog box appears.

- If necessary, type a unique name for the check in the Check Title text box.
- Click the Feature Class/Subtype drop-down arrow in the Feature Class 1 area and choose the feature class and subtype on which to run the check.
- If you want to use attributes to check for valency, check the check boxes next to the attributes you want to compare in the Fields to Include for Feature Class 1 area.
- To run the check on the entire feature class and save this setting, check the Always Run on Full Database check box.
- To run the check on specific features in a feature class, click SQL to construct an SQL query.
- If necessary, repeat steps 5–8 in the Feature Class 2 area.
- Choose a validation method for the check in the Validation Method area.
- If you want to check valency based on the number of lines connected to a point, choose the Valency at point location option.
- If you want to check for points that are missing where lines meet or intersect, choose the Valency at nonexistent point location option.
- Choose an option for defining the valency.
To find the number of lines connected to a point or number of lines that are connected
Choose the Operation option and proceed to step 12.
To use attributes to find the number of lines connected to a point or number of lines that are connected
Choose the Customize option and proceed to step 14.
- To define the number of lines that need to be connected to a point or included in a pattern, do the following:
- Click the Operation drop-down arrow and choose an option for defining the valid number of lines connected to a point.
- None—No operator is designated, so there is not a range or definite number of connections that can be found with the check.
- Less than—The number of lines that are connected to the point or the number of lines that are connected must be less than the number specified.
- Less than or equal—The number of lines that are connected to the point or the number of lines that are connected must be equal to or less than the number specified.
- Greater than—The number of lines that are connected to the point or the number of lines that are connected must be more than the number specified.
- Greater than or equal—The number of lines that are connected to the point or the number of lines that are connected must be equal to or more than the number specified.
- Equal to—The valid number of lines that can be connected to the point or the number of lines in a pattern must exactly match the number specified.
- In Between (Including Bounds)—The valid number of lines that can be connected to the point or the number of lines in a pattern is between or equal to the values specified in the Lower Bound and Upper Bound text boxes.
- In Between (Not Including Bounds)—The valid number of lines that can be connected to the point or the number of lines in a pattern is between the values specified in the Lower Bound and Upper Bound text boxes.
- Not Between (Including Bounds)—The valid number of lines that can be connected to the point or the number of lines in a pattern is not between or equal to the values specified in the Lower Bound and Upper Bound text boxes.
- Not Between (Not Including Bounds)—The valid number of lines that can be connected to the point or the number of lines in a pattern is not between the values specified in the Lower Bound and Upper Bound text boxes.
The operation text box appears. If you have chosen an operation with bounding values, the Lower Bound and Upper Bound text boxes appear.
- Type a value in the text box that appears.
- Click the Operation drop-down arrow and choose an option for defining the valid number of lines connected to a point.
- To create a query so you can compare attribute values, do the following:
- Click Table Query.
The Select Features Using a Query dialog box appears.
- Build a query that compares the attribute values before valency is validated.
- Click Verify to validate the query.
- Click OK to close the Select Features Using a Query dialog box.
- Click Table Query.
- If you want to check valency based on the direction in which features have been digitized, do the following:
- Check the Use flow (digitized) direction check box.
- Click the drop-down arrow next to the Use flow (digitized) direction check box and choose an option.
- Both—The check finds instances where all the lines that meet at a point have been digitized in an inward or outward direction; that is, the lines have all been digitized so they meet or move away from a central point.
- In—The check finds instances where all the lines have all been digitized in an inward direction; that is, the lines have all been digitized so the flow is toward the same point.
- Out—The check finds instances in which the lines have all been digitized in an outward direction; that is, the lines have all been digitized so the flow moves away from the same point.
- If you want to use the database tolerance while validating the valency, check the Use XY tolerance check box.
The tolerance for the check is based on the tolerance configured for the geodatabase that contains the data you are validating.
- If you want to compare values, do the following:
- Check the Use comparison rules check box.
- Click Define Rules.
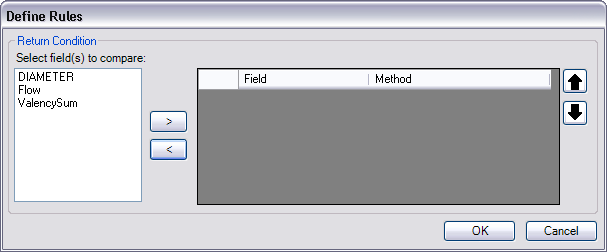
The Define Rules dialog box appears.

- Choose the field you want to compare in the Select field(s) to compare list.
- Click the Add button (>) to add it to the list on the right side of the dialog box.
- Click the Method drop-down arrow and choose an option for comparing the values.
- Specify values—Allows you to specify a pattern of values or specific values for the attribute
- All values are the same—Indicates that all the values for the field should be the same for all the lines that are connected to the point
- All values are not the same—Indicates that all the values for the field should not be the same for all the lines that are connected to the point
- Click OK.
The Valency Check Properties dialog box appears.
- If necessary, type descriptive text for the check results in the Notes text box in the Reviewer Remarks area.
- If necessary, click the Severity drop-down arrow and choose a value that indicates the priority of the check's results in the Reviewer Remarks area.
The severity indicates the importance of the check result. The values range from 1 to 5, with 1 being the highest priority and 5 being the lowest.
- Click OK.
- Click the Run Data Check button
 on the Data Reviewer toolbar.
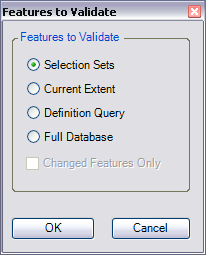
The Features to Validate dialog box appears.

- Choose an option in the Features to Validate area.
- Selection Set—The check is run on the features that are currently selected in the map.
- Current Extent—The check is run on the current map extent, which is controlled by the map scale.
- Definition Query—The check is run on the features that are displayed based on definition queries that have been created for the feature class.
- Full Database—The check is run on all the features in the feature class.
- To run the check only on features that have been edited in a versioned workspace, check the Changed Features Only check box.
- Click OK.
The check is run on the extent specified on the Features to Validate dialog box.
When the check finishes, a check results dialog box appears.
- Do one of the following:
- If you want to browse the results in the Browse Features window, choose the Browse Results option.
- If you have started a Reviewer session and want to record the results in the Reviewer table, choose the Write to Reviewer Table option.
- Click OK.