Available with Data Reviewer license.
The Sampling check generates a set of features from one or more layers that you can step through to visually inspect. The sample is generated from the feature classes you choose to include based on what is loaded in the map. You can also assign weights to the feature classes, which increases or decreases the number of features for the feature classes that are included in the sample. A value of 1 is the highest weight; 5 is the lowest.
The sample is calculated based on one of the following methods:
- A fixed number of features
- A percentage of all the features in the specified extent
- A number derived from a calculation based on the confidence level, margin of error, and acceptance level
- A polygon grid that is loaded in the map or from a geodatabase
Learn more about calculation methods for sampling
You can choose to run this check on any of the extents that are usually available with checks, such as the selection set, current extent, or the full database.
Once you have defined the criteria for the check, you can configure the notes and a severity rating. The notes allow you to provide a more specific description for the feature that has been written to the Reviewer table and are copied to the Notes field in the Reviewer table. The severity rating allows you to indicate how important the results from a check are in terms of your quality assurance/quality-control processes. The lower the number, the greater the priority the check's results have.
- Start ArcMap.
- Open a map document or load data in the map.
- On the main menu, click Customize > Toolbars > Data Reviewer.
- Start a Reviewer session in one of the following:
- Click the Select Data Check drop-down arrow on the Data Reviewer toolbar, click the plus sign next to Advanced Checks, then click Sampling Check.
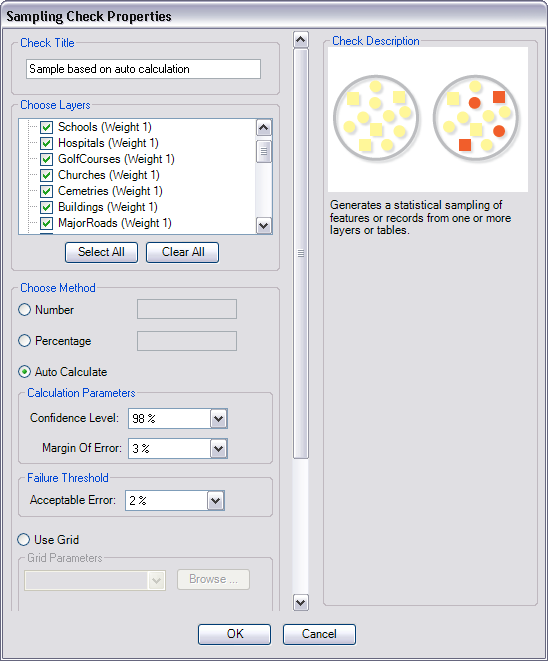
The Sampling Check Properties dialog box appears. All the visible layers that are currently loaded in the map appear in the Choose Layers list.

- If necessary, type a unique name for the check in the Check Title text box.
- Uncheck the check boxes next to the names of the layers you do not want to include in the sample.
By default, all the visible layers are included in the sample.
- To adjust the weight, or the significance of the layer in the sample, right-click the layer name in the Choose Layers list and choose a weight option.
- Weight 1 (highest)—The layer is going to have more features included in the sample than other layers with weight values of 2, 3, 4, or 5.
- Weight 2—The layer is going to have more features included in the sample than other layers with weight values of 3, 4, or 5.
- Weight 3—The layer is going to have more features included in the sample than other layers with weight values of 4 or 5.
- Weight 4—The layer is going to have more features included in the sample than other layers with a weight value of 5.
- Weight 5—The layer is going to have the fewest features included in the sample.
- Chose a method for generating the sample.
- Number—A specified number of features from the feature classes chosen in the Choose Layers list is included in the sample.
- Percentage—A specified percentage of the features from the feature classes chosen in the Choose Layers list are included in the sample.
- Auto Calculate—The number of features included in the sample is determined by the following:
- Confidence Level—The level of confidence that the sample size is statistically significant. The default value is 95%, but you can also choose 90%, 98%, or 99%
- Margin Of Error—The acceptable margin of error in the confidence level. The default value is 4%, but you can also choose other values that range from 1% to 10%.
- Acceptable Error—Indicates the acceptable error ratio. The default value is 2%, but you can also choose 1%, 5%, or 10%.
- Do one of the following to configure the calculation method:
To create the sample based on a specific number of features
Click the Number option, then type the number of features you want to include in the sample in the text box.
To create the sample based on a percentage
Click the Percentage option, then type the value that represents the percentage of all the features you want to include in the sample in the text box.
To create the sample based on automatic calculation
Click the Auto Calculate option, then click the Confidence Level drop-down arrow to choose the confidence level for the data, click the Margin Of Error drop-down arrow to choose the acceptable margin of error for the data, or click the Acceptable Error drop-down arrow and choose the acceptable level of error for the sample.
To create the sample using a polygon grid
Click the Use Grid option. Click the drop-down arrow in the Grid Parameters area to choose the polygon grid or click Browse to load one. Click the Unique ID Field drop-down arrow and choose the field that contains the field you want to use to identify the grid cell. Type the number of cells you want to use in the sample in the Number of grids to sample text box.
- If necessary, type descriptive text for the check results in the Notes text box in the Reviewer Remarks area.
- If necessary, click the Severity drop-down arrow and choose a value that indicates the priority of the check's results in the Reviewer Remarks area.
The severity indicates the importance of the check result. The values range from 1 to 5, with 1 being the highest priority and 5 being the lowest.
- Click the Run Data Check button
 on the Data Reviewer toolbar.
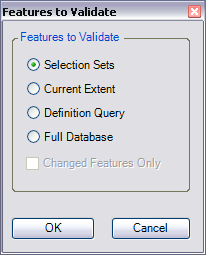
The Features to Validate dialog box appears.

- Choose an option in the Features to Validate area.
- Selection Set—The check is run on the features that are currently selected in the map.
- Current Extent—The check is run on the current map extent, which is controlled by the map scale.
- Definition Query—The check is run on the features that are displayed based on definition queries that have been created for the feature class.
- Full Database—The check is run on all the features in the feature class.
- To run the check only on features that have been edited in a versioned workspace, check the Changed Features Only check box.
- Click OK.
A progress window appears while the sample is being generated. The results dialog box appears once the check is finished running.
- Choose the Write to Reviewer Table option.
- Click OK.
The sampling check records are written to the Reviewer table.