Available with Network Analyst license.
Directions are turn-by-turn instructions on how to navigate a route. They can be created for any route that is generated from a network analysis as long as the network dataset supports them. The minimum requirements for a network dataset to support directions are as follows:
- A length attribute with length units
- At least one edge source
- At least one text field on the edge source
The directions generated when a route is computed are customizable at the network dataset level. This means that the street names used for reporting directions, shields, and boundary information are stored with the network dataset schema. These settings can be modified to customize the directions.
You can change these settings from the Network Directions Properties dialog box, which is accessed by clicking the Directions button in either the New Network Dataset wizard or the Directions tab of the Network Dataset Properties dialog box.
Network Directions Properties dialog box
General tab
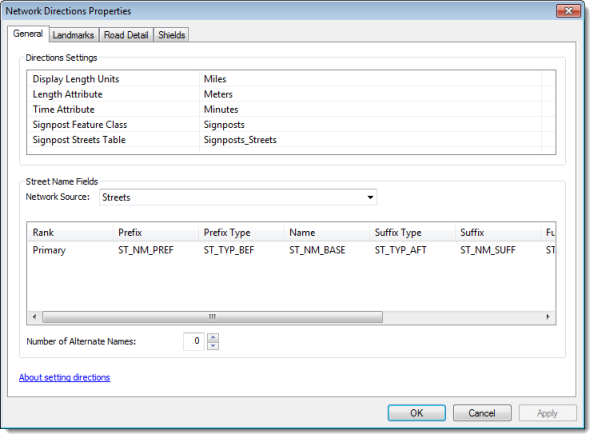
The units used to report directions and the fields used to identify streets can be modified on the General tab, which is shown in the graphic below.
Directions Settings frame
Display Length Units is where you choose the units used to report the length. For example, if miles are chosen, all directions generated for this network dataset would be reported in miles. The ArcGIS Network Analyst extension supports the following five length units: feet, kilometers, meters, miles, and yards.
Length Attribute is used to calculate the length of each segment of the route for which the directions are reported. Any cost attribute can be selected as the length attribute. ArcGIS automatically searches through the network attributes and tries to assign the relevant cost attribute.
Time Attribute is used to calculate the time taken to traverse each segment during the reporting of directions.
Signpost Feature Class and Signpost Streets Table provide the text of the highway signs that a driver would typically see when traveling along the route. This highway sign text usually includes the exit number, name of the road, and the destination where the road leads. This text can be incorporated into the directions text to facilitate navigation—for example, "Take ramp and go on US-59 N toward Springfield."
Learn more about the signpost feature class and streets table
Street Name Fields frame
Street name fields can be set up for each edge source in the network. These are the names that are used to report directions. For instance, the name of the street (First Ave) is obtained from this field to report directions, such as, "Turn left onto First Ave." The Name column displays a drop-down list of text fields for the source, from which a street name field can be chosen.
Some feature classes have directional modifiers (N or S) and street types (Ave, St, or Dr) in separate fields. In such cases, the entire street name resides in the three different fields.
Some feature classes have alternate names of streets listed in different fields. These can be set up by increasing the Number of Alternate Names value and setting up the Name field along with the optional Prefix and Suffix fields.
Landmarks tab
Landmarks are point features designed to represent clearly visible objects along the network. Turn-by-turn directions can reference landmarks to help whoever is navigating a route identify turns and verify the correct route is being followed.
Network Analyst notes landmarks in directions when landmark feature classes are configured on the network dataset, on the Landmarks tab, and a route passes within the search tolerance of a landmark feature. 
Landmarks are associated with specific edge sources. It's possible to have a landmark near two edge sources, but the landmark will only be referred to in directions when the route traverses the edge source related to the landmark. Use the Network Source property to choose an edge source.
Two kinds of landmark feature classes exist: turn landmarks and confirmation landmarks. Turn landmarks represent objects near junctions that help identify turns; for example, the purple wall in "Turn right at the purple wall." is a turn landmark. Confirmation landmarks are objects along edges used to reaffirm the navigator he or she is on course; for example, the A-frame building in "Pass by the A-frame building. It will be on your right." is a confirmation landmark. You set turn and confirmation landmarks in the respective frames: Turn Landmarks and Confirmation Landmarks.
Add a landmark feature class by clicking an Add Data button  on the right, and delete one using a Delete button
  . The tables in the Turn Landmarks and Confirmation Landmarks frames have the same fields. They are listed and described below.
| Field | Description |
|---|---|
Class | The point feature class added as a landmark source. |
Label | The text field in the landmark feature class that describes the landmark. This field might contain values like "Alan's Hardware Store" for driving directions or "the printer station" for walking directions, so that directives might appear as Turn right at Alan's Hardware Store, or Pass by the printer station. It will be on your left. |
Level | This field is used typically with walking directions to associate landmarks with a specific floor levels of buildings. |
Custom Tolerance | This Yes/No field lets you specify whether the landmark feature class should use a custom search radius or the default one, which is 50 feet. (The 50-foot default search radius could be changed through ArcObjects, so it is recommended you set a search tolerance for each landmarks source.) |
Tolerance | The size of the search radius. In general, when a route passes by a landmark within the search radius, it is reported in the directions. The units for this field are specified under Units. |
Units | The units of the Tolerance value that specify a search radius. In general, when a route passes by a landmark within the search radius, it is reported in the directions. |
Road Detail tab
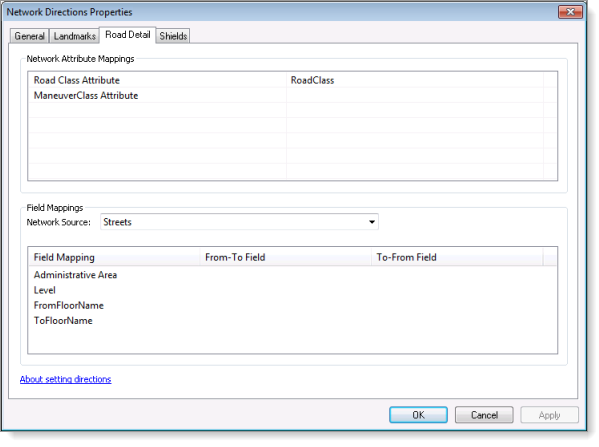
The Road Detail tab is split into two frames: Network Attribute Mappings and Field Mappings.
Network Attribute Mappings frame
Road Class Attribute provides specific directions for different types of roads. It is a descriptor attribute of type integer whose values are as follows:
| Road class value | Type of road class | Example directions text |
|---|---|---|
1 | Local roads | Turn left on Main St. |
2 | Highways | Go east on I-55. |
3 | Ramps | Take ramp and go on US-59 N. |
4 | Ferries | Take Lake Expy ferry. |
5 | Roundabouts | Take roundabout and proceed south on Main St. |
ManeuverClass Attribute identifies to the driving directions small connecting roads inside of or adjacent to the street intersection. It is a descriptor attribute of type integer whose values are shown in the following table:
| ManeuverClass value | ManeuverClass type | Description |
|---|---|---|
0 | Default | Default value assigned to streets outside of street intersections. |
1 | Intersection Internal | Street segments internal to an intersection of double-digitized roads. |
2 | Maneuver | Street segments forming a turning slip lane (often found where streets intersect at a sharp angle). |
Field Mappings frame
Some edge sources have an administrative area field that denotes what region each edge is in. For instance, a highway source could have a state field that denotes what state the highway segment is in. This is useful in generating directions such as "Enter California" when crossing the state line.
You can choose any text field from the selected source feature class in the From-To Field or To-From Field columns. While generating directions, any change in the value of the administrative area value is reported. This means that if a route starts in Nevada and continues south on I-15, when it reaches California, the Directions window will show the value Enter California.
Shields tab
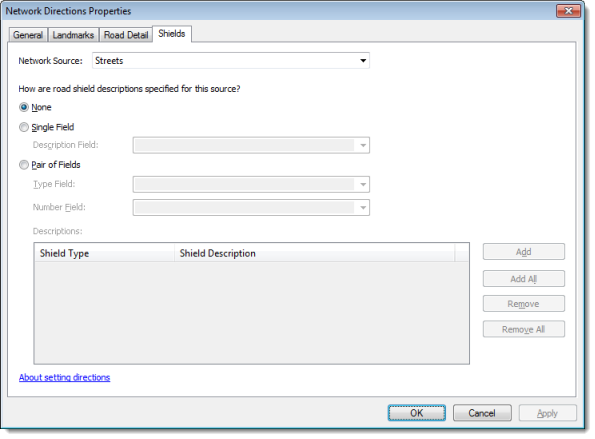
Shields are signs that display highway numbers. Some edge sources have shield information (for example, I-15, CA-72, or OH-10) that can be used to report directions. For instance, if you have a freeway source that has interstates and state highways, the road shield descriptions can be specified for this source. For example, the Santa Ana Freeway has a shield description of I-5. Both the street name field (which contains Santa Ana Freeway) and the road description field (I-5) can be used to report directions.
Some sources have road shield descriptions in one field (I-10 or CA-63). In such a case, choose Single Field and choose the field containing road shield descriptions.
A source can also have shield descriptions in two fields: one is the shield type (containing values such as I, CA, or TN) and the other is the number (5 or 43). Together, they give the complete road shield description. In such a case, choose Pair of Fields and set Type Field and Number Field.
If your data splits the type and number into a pair of fields, the shield type (I, CA, or TN) can be associated with shield descriptions (Interstate, California, or Tennessee). This would result in directions such as "Take Interstate 10 for 155 miles."
