Each LRS Network requires centerline features along with a table with route definitions. The centerline feature class and route table are connected via a centerline sequence table. The Load Routes tool populates these features and tables. In addition, the previously created LRS Network is related to the centerlines, routes, and calibration points through the NetworkID field in the centerline sequence table. These steps outline the process of loading data into the centerline feature class, centerline sequence, and route tables.
The source routes you will use during route loading should have at least one text field with the route ID. If your network has a concatenated route ID of more than one field, your source routes will still need a text field composed of all those fields concatenated together to complete data loading. Each route in your source routes should have a single route ID for each record. If your source routes have more than one record with the same route ID and from date, only one record for each route ID will be loaded. If your source routes have multipart features or physically gapped routes, they can still be loaded using the Load Routes tool as long as there is a single route ID for each record in the source routes, whether it is a single or multipart feature. Consider editing your source routes using geoprocessing tools, such as the Dissolve or Create Routes tools, to ensure there is a single record for each route ID before using the Load Routes tool.
For routes to be loaded and calibrated properly, source routes should not contain any curves. If your source routes contain curves, you can run the Densify geoprocessing tool on the source routes before route loading to ensure they will load and calibrate properly. For more information, see Densify.
- Start ArcMap.
- In the Catalog window, expand the ALRS in the target geodatabase.
- Right-click the LRS Network and click Load Routes.
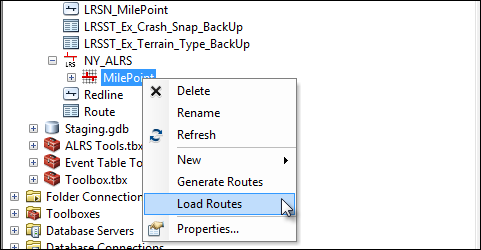
If you clicked Yes on the Do you want to load routes? dialog box after creating the LRS Network, the Load Routes dialog box appears.
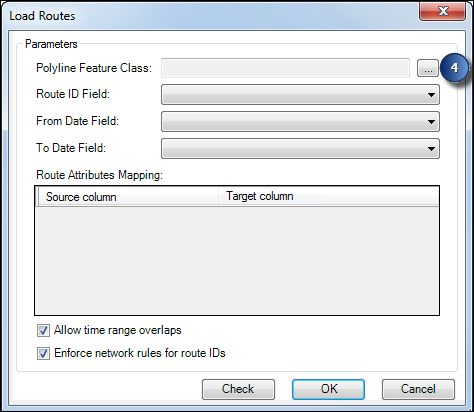
- Click the browse button next to Polyline Feature Class and choose your source polyline routes feature class.
- The source polyline routes feature class does not need to be in the same geodatabase as your ALRS.
- If you have a large source polyline routes feature class and your ALRS is in a multiuser geodatabase, the database may run out of memory during the route loading process. Contact your database administrator to increase the memory before loading large datasets.
- If your source routes have subtypes or coded value domains for fields in the route ID, they will be copied over to the LRS Network. For more information, see Coded value domains and subtypes.
- Click the Route ID Field drop-down arrow and choose the route ID that contains the routes from your polyline feature class.
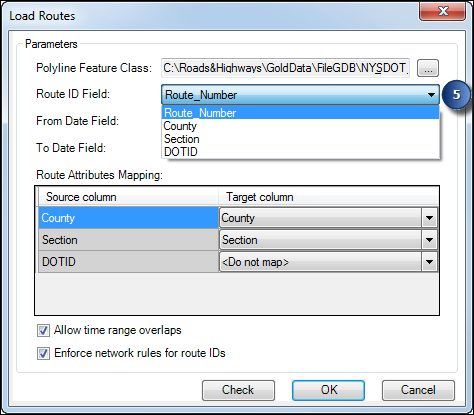
- All string fields within the selected polyline feature class will be available in the drop-down list.
- If you chose multiple fields to create your route ID during LRS Network creation, the concatenated network route ID must match the route ID you select from your source polyline feature class. If it does not match, your network will be empty.
- If your source data has multiple records with the same RouteID and From Date values, only one record for each route ID will be loaded. To ensure all records in the source data are loaded correctly, consider using the Dissolve geoprocessing tool to get a single route for each route ID.
- If your routes have temporality, do the following:
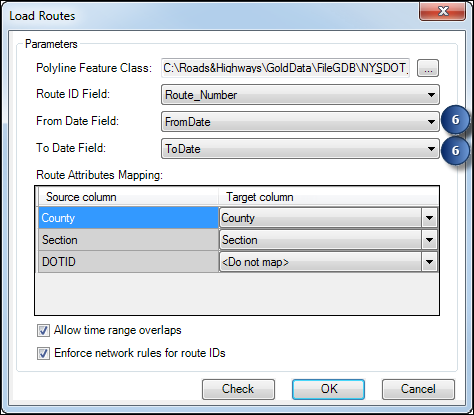
- Click the From Date Field drop-down arrow and select the field with the from date from the polyline feature class.
- Click the To Date Field drop-down arrow and select the field with the to date from the polyline feature class.
If your routes do not have temporality, leave this field blank and your routes will automatically be assigned a null value.
- Click the Target column drop-down arrow in the Route Attributes Mapping area, and choose an option to match the field in your polyline feature class with the field in the route table in the Route Attributes Mapping area of the dialog box.
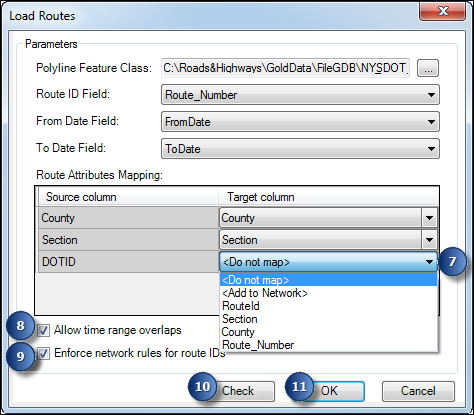
- If the column from your source data is already present in the route table, select that field using the Target column drop-down arrow.
- If you want to load the column from your source data to a different column in your route table, select that field in the Target column list. Only fields that are the same type and less than or equal to the length of the field in your source data will appear in the Target column list.
- If the column from your source data is not present in the route table and you want it to be created on the route table and have source data added, choose <Add to Network> in the Target column list.
- If you do not want the source data for a column to be added to the route table and network feature class, choose <Do not map> in the Target column list.
If your LRS Network has a concatenated route ID of multiple fields, each of those fields needs to be selected so the records are added to the route table and network feature class correctly. If you leave any of the fields composing the concatenated route ID empty, you will receive an error message and will not be able to proceed until you select all fields composing the route ID.
- If the source routes in your polyline feature class have temporality, you can optionally check the Allow time range overlaps check box to allow both routes with identical route IDs and overlapping time ranges to be loaded.
- If you unchecked the check box and your routes have duplicate route IDs and temporality, an error message will appear and the loading process will fail.
- If you checked the check box and your routes have duplicate route IDs and temporality, an error message will appear and only the first record for each route ID will be loaded.
- If you unchecked the check box and your routes have duplicate route IDs and partially overlapping temporality, an error message will appear and the loading process will fail.
- If you checked the check box and your routes have duplicate route IDs and partially overlapping temporality, an error message will appear, but all records will be loaded.
- If your data is production level and you want to ensure the route IDs of your source data match the padding and null settings for the network, check the Enforce network rules for route IDs check box. If any route IDs do not match the network settings, the data load will fail and a list of records that do not match the settings will be provided. If this route loading is in a non production environment and you want to ignore the network settings, uncheck the check box.
- To check for any duplicate route IDs in your source routes, click Check.
- If no duplicates are returned, proceed to the next step.
- If duplicates are returned, close the tool, edit your source routes to eliminate any duplicates, and then launch the Load Routes tool to load your routes.
- Click OK.
In addition to loading data into the centerline feature class, centerline sequence table, and route table, the Load Routes tool will rebuild indexes to improve performance when creating calibration points and events in your LRS Network. Depending on the size of your dataset, the route loading process could take more than an hour to complete.
A progress dialog box appears and shows the steps and progress of route loading.
- Once route loading is complete, click Done.
To calibrate the network, calibration points need to be created. At this point, your ALRS will have an uncalibrated LRS Network.
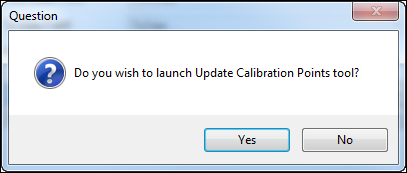
- Click Yes on the Do you wish to launch Update Calibration Points tool? dialog box to create or update calibration points.
If your ALRS is created within a multiuser geodatabase, you may want to run the Compress command, analyze datasets, and rebuild indexes on the geodatabase before you create or update calibration points to improve performance.