ArcGIS for Desktop

  • Documentation
  • Pricing
  • Support

  • My Profile
  • Help
  • Sign Out
ArcGIS for Desktop

ArcGIS Online

The mapping platform for your organization

ArcGIS for Desktop

A complete professional GIS

ArcGIS for Server

GIS in your enterprise

ArcGIS for Developers

Tools to build location-aware apps

ArcGIS Solutions

Free template maps and apps for your industry

ArcGIS Marketplace

Get apps and data for your organization

  • Documentation
  • Pricing
  • Support
Esri
  • Sign In
user
  • My Profile
  • Sign Out

Help

  • Home
  • Get Started
  • Map
  • Analyze
  • Manage Data
  • Tools
  • More...

Adding control points manually

Adding control points manually gives you the ability to snap to source and destination features in a map. You can also right-click and type the destination coordinates from the context menu.

  1. On the Georeferencing toolbar, click the Add Control Points button Add Control Points.
  2. Snap to and click the source CAD feature to create the from-point. You can undo the point by pressing ESC on the keyboard.
  3. Snap to and click its destination to create the to-point. This creates a link.
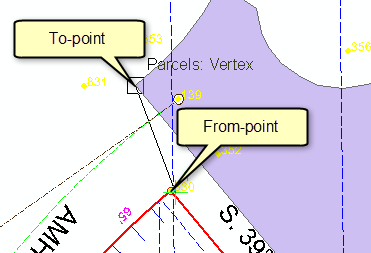
    Adding control points
  4. Repeat steps 2 and 3 to create a second link.
    • For optimum results, create links that are far apart.
    • If you know the coordinates for the to-point, you can right-click and choose Input X and Y or Input DMS of Lon and Lat from the context menu.

Related Topics

  • Managing links and control points
  • About georeferencing CAD datasets
  • Loading control points from a world file
Feedback on this topic?

ArcGIS for Desktop

  • Home
  • Documentation
  • Pricing
  • Support

ArcGIS Platform

  • ArcGIS Online
  • ArcGIS for Desktop
  • ArcGIS for Server
  • ArcGIS for Developers
  • ArcGIS Solutions
  • ArcGIS Marketplace

About Esri

  • About Us
  • Careers
  • Insiders Blog
  • User Conference
  • Developer Summit
Esri
© Copyright 2016 Environmental Systems Research Institute, Inc. | Privacy | Legal