Available with Standard or Advanced license.
To see how users with nonadministrative permissions can work with the geodatabase, you will log in as editor1, import a feature class from a shapefile, set up editor tracking on the new feature class, and grant editor permissions on the feature class to another user.
Log in as editor1
Since database servers authenticate users based on the current Windows login, log out of the computer and log back in as editor1.
- Log in to the computer as editor1.
On most Windows operating systems, you can use switch users to log in as editor1.
- Start ArcMap, open the Catalog window, and expand the Database Servers folder in the Catalog tree.
- You must add the database server, because editor1 has not added it to the Catalog yet. See the Adding a database server section of Exercise 1 for instructions.
Import data as editor1
Import the streets shapefile to the Osokopf geodatabase.
- Double-click the database server in the Catalog tree to connect to it.
- Right-click the Osokopf geodatabase, point to Import, and click Feature Class (single).
The Feature Class To Feature Class geoprocessing tool opens.
- Since editor1 has not yet created a folder connection to the tutorial data, create a new connection to the tutorial data under Folder Connections.
- Browse to the DatabaseServers tutorial directory in the Catalog window.
- Drag the osokopf_streets.shp file from the Catalog window to the Input Features text box.
- Type streets in the Output Feature Class text box.
- Right-click address_le in the Field Map list and click Rename.
- Type address_left and press the Enter key.
- Right-click address_ri in the Field Map list and click Rename.
- Type address_right and press the Enter key.
- Click OK to run the tool.
The progress of the tool appears at the bottom of ArcMap. When the feature class has been imported, a pop-up list appears in the lower right corner of your screen and the feature class is added to the map.
The Osokopf geodatabase now contains two feature datasets, parks and boundaries, owned by dbo, and the streets stand-alone feature class, owned by editor1.
Configure the streets feature class to track edits
To track feature creation and edits in a feature class, you must have fields in the feature class to store user names and dates edits were made. The streets feature class you imported does not currently contain fields for this, so you will add them.
Add date and text fields to the streets feature class
As the owner of the streets feature class, you can alter its schema, adding date and text fields to be used in editor tracking.
- Right-click the streets feature class in the Osokopf geodatabase and click Properties.
- Click the Fields tab.
- Click the next open field in the Field Name list.

- Type addfeats_user for the name of the new field.
- Choose Text from the Data Type drop-down list to make the addfeats_user field a text field.
- Change the properties of the new field.
- In the Field Properties, type Created By for the field alias.
- Type 32 for the Length.
The field properties should be set as follows:

- Click Apply to add the field.
- Add another field, addfeats_date.
- Set the Data Type to Date.
- Set the addfeats_date field's alias to Date Created.
- Click Apply to add the addfeats_date field to the table.
- Create two more fields and set their properties as follows:
editfeats_user
Data Type = Text
Alias = Edited By
Length = 32
editfeats_date
Data Type = Date
Alias = Date Edited
You now have four new fields. You will use those to track who edits the streets feature class and when those edits are made.
Enable editor tracking
Now that the required data fields exist, set up editor tracking.
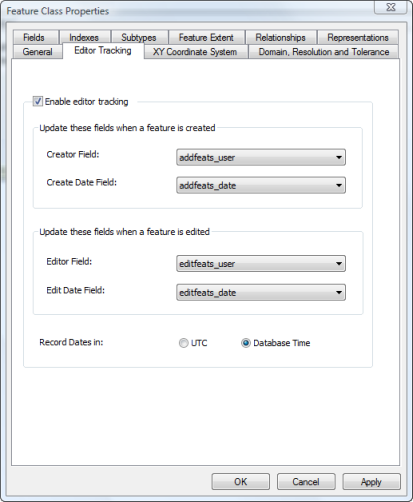
- Click the Editor Tracking tab.
- Check Enable editor tracking.
- Assign the fields to be updated:
Creator Field addfeats_user
Create Date Field addfeats_date
Editor Field editfeats_user
Edit Date Field editfeats_date
- Click Database Time for Record Dates in.
The Editor Tracking tab should look like this:
- Click OK to apply your changes and close the Feature Class Properties dialog box.
Grant permissions on the streets feature class
In Exercise 4, manager1 was granted administrator permissions on the Osokopf geodatabase. Therefore, manager1 has read/write permissions on the streets feature class.
Editor2 does not have any geodatabase-wide permissions, so assign read/write permissions to editor2 on the streets feature class.
- Right-click the streets feature class, point to Manage, and click Privileges.
- Choose editor2 from the Database Server Users list.
- Click Read/Write.
- Click OK to apply your changes and close the Permissions dialog box.
You logged in as a user with read/write permissions in the geodatabase, imported a feature class, and configured the feature class to keep track of edits.