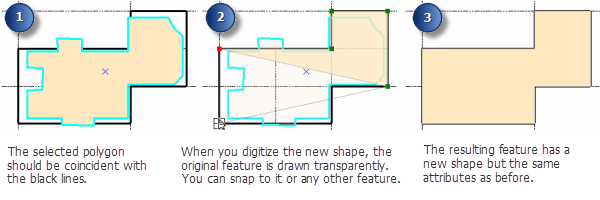
The Replace Geometry tool allows you to create an entirely new shape for a feature. One of the most common workflows for Replace Geometry is when you have features that should align with adjacent features. In some cases, a feature's shape is significantly different from that of other features with which it should share a boundary. In these instances, particularly when the feature is deemed to be less accurate than the surrounding ones, it is often easiest to recapture the geometry of the feature rather than modify its existing shape.
To use Replace Geometry, you need to select a point, line, or polygon. When you click the Replace Geometry tool, the original feature is still selected but is displayed transparently so you can see its current location. You can then completely replace the shape of the existing feature with a new shape. To sketch its new shape, you can snap to or trace along other features, including the original geometry for the feature you are modifying. All the feature's attributes are maintained; its shape is simply updated.

You can also use the Replace Geometry tool to create valid geometry for a feature that currently has null geometry. For example, you might encounter this when geocoding a list of addresses and you have unmatched records in an attribute table without a corresponding location on the map. To use Replace Geometry this way, select one row at a time in the attribute table containing null geometry, then click the map to create the feature.
- Click the Edit tool
 on the Editor toolbar.
- Click the feature with the geometry you want to replace.
- Click the Replace Geometry tool
 on the Advanced Editing toolbar.
 - Click the map to define the feature's new shape.
- To create a point, click the map where the feature should be placed.
- To create a line or polygon, click the map to create a sketch of the feature's shape. You can change the segment construction method using the Editor toolbar or Feature Construction toolbar palette. For example, if you want to trace an existing feature, click Trace
 and click the edge. Finish the sketch when you are done.