Creating a cul-de-sac
There are several ways to create a cul-de-sac line, which is the end of a dead-end street or alley that widens to provide a circular turnaround for vehicles.
If you have an ArcGIS for Desktop Standard or ArcGIS for Desktop Advanced license and are working with precise measurements, such as with survey plans or data with COGO attributes, use the Cul-de-sac command on the COGO toolbar to create the feature.
Otherwise, you can use the regular editing tools, switching between them, to construct a cul-de-sac shape. For example, you can draw the straight segment, switch to a tool that allows you to create an arc, then switch back to create the remaining straight segment.
Creating a cul-de-sac using COGO tools (ArcGIS for Desktop Standard and ArcGIS for Desktop Advanced)
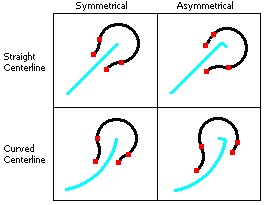
The Cul-de-sac command on the COGO toolbar creates a symmetrical or asymmetrical cul-de-sac from a street centerline. A cul-de-sac is the end of a dead-end street or alley that widens to provide a circular turnaround for vehicles.

A cul-de-sac consists of two or three circular line features, depending on your input values. The main circular feature is centered on the end of the selected centerline with a radius that you specify. Two other minor circular features (known as return or reverse curves) are created at the intersection between the main circular feature and lines parallel to the centerline. These fillet curves have a (return) radius that you specify.

You can create a cul-de-sac from either a straight or curved centerline. Sometimes a cul-de-sac is designed with the main circular feature being offset 90° from the end of the centerline. This is an asymmetrical cul-de-sac.

- Click the Edit tool
 on the Editor toolbar.
- Click the lines you want to use for a centerline. You must select lines that form a single continuous shape. In other words, you cannot use multiple lines or multipart features that have gaps or are disjointed.
- Click Cul-de-sac
 on the COGO toolbar.
- Choose the target in which the new feature will be created.
- If you have feature templates for the layers in your map, click the Template button and click the template to use to create the new feature. You can also double-click the preview of the template to choose a different template.
- If you do not have feature templates, click the layer in which to create the feature.
- Click Start Point of Line if you want to add the cul-de-sac features at the first vertex, or click End Point of Line if you want to add the cul-de-sac features at the last vertex.
- If you want to create an asymmetrical cul-de-sac, check Create offset cul-de-sac.
- Type a radius, return radius, and street width.
- Click OK. Two or three line features are created using the properties of the feature template you chose. Any COGO fields are populated.
Creating a cul-de-sac using regular editing tools
You can create a cul-de-sac using the regular editing tools with any ArcGIS license.
- Click a line feature template in the Create Features window.
- Click the Straight Segment construction method
 on the Editor toolbar.
- Draw a straight line segment, but do not finish the sketch.
- Click Arc
 on the Feature Construction or Editor toolbar and create an arc segment. Do not finish the sketch.
- Change back to the Straight Segment method, draw the remaining segment, then finish the sketch.