Available with Standard or Advanced license.
This topic applies to ArcGIS for Desktop Standard and ArcGIS for Desktop Advanced only.
This workflow describes the steps for making ad hoc updates to the locations of parcel boundaries and corner points.
The workflow uses the sample dataset downloaded with the Tax Parcel Editing map on the ArcGIS Solutions website. To use the automated workflows on the sample data, enable the parcel fabric in the ParcelEditing feature dataset with the Local Government Information Model and drag the parcel fabric into an empty map document.
Ad hoc updates of the locations of parcel boundaries and points are done when there is a need to change the spatial positions of parcels because of misalignments with other data. Parcel boundaries that have been digitized or imported from inaccurate CAD files often need to be updated to align with more accurate data such as high-resolution imagery.
When parcels in the parcel fabric have correct dimensions, that is, COGO dimensions that match the record of survey, a parcel fabric adjustment can be used together with control points to adjust and derive highly accurate locations of parcel corner points.
However, when dimensions are unreliable, you can, in the interim, make ad hoc positional updates to parcel boundaries and corner points instead of reentering dimensions and running a least-squares adjustment.
The workflow consists of the components shown in the diagram below:

Search for parcels
- Open the TaxParcelEditingMap document located in the MapsandGeodatabase folder or drag the parcel fabric (enabled with the Local Government Information Model) in the ParcelEditing feature dataset into an empty map document.
- On the Table Of Contents window, make the layers that contain the parcels you want to update selectable. For example, if you want to update the boundaries and points of lot parcels, tax parcels, and encumbrance parcels, you would make the Lots and Units, Tax Parcels, and Encumbrances layer selectable.
In the sample dataset, make both the Tax Parcels layer and the Lots and Units layer selectable.
- Search for the parcels you want to update. In the sample dataset in the TaxParcelEditingMap document, search for parcel 1921201004.
For the workflow using the sample data, the visibility of the Historic Parcels layer has been turned off.
Select parcels
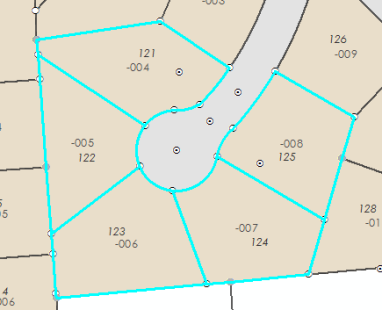
You will be updating the boundary locations of parcel 19-21-201-004 and its adjacent parcels:
- Start an edit session and use the Select Parcel Features tool
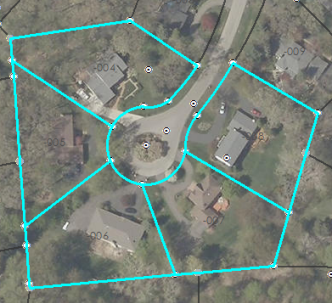
 located on the Parcel Editing toolbar to select parcel 19-21-201-004 and surrounding parcels as shown in the graphic below.
You may need to zoom out for parcels to be visible.
Move parcel boundaries and points
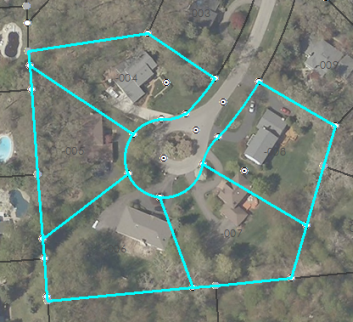
In the workflow, the boundaries and corner points of the selected parcels will be updated and aligned with high-resolution imagery. Currently, the boundary lines are misaligned with the high-resolution imagery as shown in the graphic below. For visual simplicity, the visibility of Lots and Units layer has been turned off.
- Click the Transform Parcels tool
 on the Parcel Editor toolbar to display the Transform Parcels toolbar.
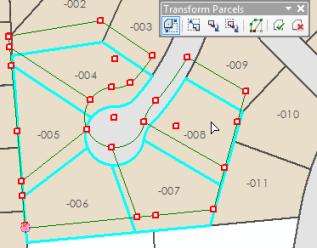
 - Use the Move Parcels, Scale Parcels, Rotate Parcels, and Scale/Rotate Parcels tools on the Transform Parcels toolbar to align parcel boundaries with the underlying imagery.
If you are using the sample dataset and don't have the sample dataset imagery added to the map, you can estimate how much to move, scale, and rotate the selected parcels.
- Click Commit Transformation
 on the Transform Parcels to save the parcel transformation.
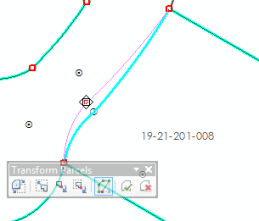
 Choose whether to create new center points or keep original center points for curved boundaries. For the workflow, click Yes on the Save Transformation dialog box.
- If necessary, use the Move parcel point tool
 to move individual parcel points.
 - Click Commit Transformation to save changes to parcel point locations.
Annotate parcels
Annotation does not need to be updated for positional updates to parcels. If the annotation is feature linked, it will move to the new location of the updated boundaries. If necessary, use the Edit Annotation tool to edit and change the placement of the generated annotation.
To re-create annotation for selected parcels, click the Annotate Parcel Courses tool  on the Parcel Editor toolbar.
Attribute parcels
Since new parcels were not created in the workflow, entering new attribute information is not necessary. You can edit existing attributes by selecting the parcels and opening the Attributes window. You can also edit parcel attributes on the Parcel Details dialog box under the Properties tab.