Available with Advanced license.
This exercise covers a hypothetical map production workflow. Geoprocessing tools are used for the automation of tasks that would normally be performed manually. You will use geoprocessing tools to add representations to selected feature classes, set the type of line caps for road features, add control points to roads and rivers to control their dash patterns, align buildings to roads, create bridges and tunnels, and determine where features are graphically too close to each other. This exercise uses geoprocessing tools found in the Cartography toolbox.
Using geoprocessing tools for representations
- Start ArcCatalog and navigate to the Exercise_5 folder.
- You need to create layer files for some feature classes to use the geoprocessing tools: Right-click each feature class and click Create Layer. Accept the default name and location for the layer file.
- BuildingP (in the TopographicMap feature dataset)
- HydroL (in the Hydrography feature dataset)
- RoadL (in the TopographicMap feature dataset)
- RailroadL (in the TopographicMap feature dataset)
- You need to create layer files for some feature classes to use the geoprocessing tools: Right-click each feature class and click Create Layer. Accept the default name and location for the layer file.
- Click Geoprocessing > Environments to establish some settings to assist in your use of geoprocessing tools. These settings control how your data is processed and the location where the results are saved.
- Expand the Cartography section.
- Choose Same as Input for the Cartographic Coordinate System parameter.
- Type 24000 for the Reference Scale parameter.
- Expand the Workspace section.
- To populate Current Workspace, navigate to the location where you stored Exercise_5 and choose the TopographicMap feature dataset inside the Representations_5 geodatabase. This is used as the default location for the output from geoprocessing tools.
- Click OK to close the Environment Settings dialog box.
Geoprocessing tools for symbology enhancement
First, you will use the Calculate Line Caps geoprocessing tool to change the line caps on some roads.
- Click Geoprocessing > Search for tools to find and open the Calculate Line Caps tool.
- Choose RoadL layer.lyr for the Input Features With Representations parameter.
- Choose BUTT for the Cap Type parameter.
- Choose TRUE_DANGLE for the Dangle Option parameter.
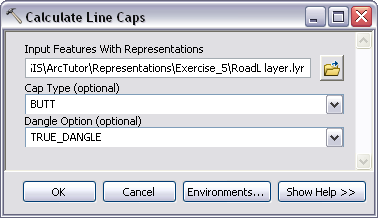
- Click OK to run the tool.
Next, you will add representation control points to the roads and rivers layers. Representation control points enhance the symbology of your features when a linear feature makes a sharp turn by forcing representation symbology to behave a specific way at these points. They are used in conjunction with geometric effects and marker placement styles that have a repeating pattern, like dashes for example.
You will use the Set Representation Control Point By Angle geoprocessing tool twice: first on RoadL, then on HydroL.
- Click Geoprocessing > Search for tools to find and open the Set Representation Control Point By Angle tool.
- Choose RoadL layer.lyr for the Input Features With Representations parameter.
- Type 135 for the Maximum Angle parameter.
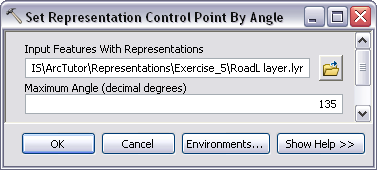
- Click OK to run the tool.
- Run the Set Representation Control Point By Angle tool again on the HydroL layer using the same Maximum Angle parameter value of 135.
- Next, you will align all the buildings on your map to nearby roads. The Align Marker To Stroke Or Fill tool selects point feature representations within a certain distance of line or fill feature representations and rotate the points to the angle of the lines. You will run this tool twice: first with the BuildingP layer against the RoadL layer, then the BuildingP layer against the HydroL layer.
- Click Geoprocessing > Search for tools to find and open the Align Marker To Stroke Or Fill tool.
- Choose BuildingP layer.lyr for the Input Features With Marker Representations parameter and RoadL layer.lyr for the Input Features With Stroke Or Fill Representations parameter.
- Type 5 for Search Distance. Make sure Points are set as the unit of measurement and PERPENDICULAR is set for the optional Marker Orientation parameter.
- Click OK to run the tool.
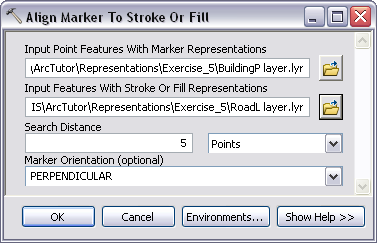
- Repeat the previous step using the HydroL layer.lyr to align the features of BuildingP Layer.lyr.
Geoprocessing tools for complex features
You will create symbology for a situation in which you have information about the location for bridges and tunnels but no data. You know from some fields in your feature classes that you have roads crossing over rivers as well as roads and railroads crossing above and below each other. This information tells you that at those locations where two features intersect each other, one feature crosses above the other. For your maps, you want to use this information to create bridge and tunnel symbology.
The Create Overpass geoprocessing tool performs this complicated operation. There are a significant number of parameters on this tool, and care must be taken when entering values for all parameters. This tool will help you symbolize features in a way that clearly indicates one feature is crossing over the other. This is done using masks to hide one feature and a new linear feature class for the bridge or tunnel symbol.
- Open the Create Overpass tool.
- Choose RoadL layer.lyr for Input Above Features With Representations and HydroL layer.lyr for Input Below Features With Representations.
- Type 2 for Margin Along and type 1 for Margin Across, then choose Points for both from the drop-down lists for the unit of measurement.
- Next, you will specify the mask feature class (Output Overpass Feature Class) and mask relationship class (Output Mask Relationship Class). Type Over_FC and Over_RC for the names of the new feature class and relationship class.
- Click the SQL button
 to open the Query Builder dialog box.
- You can choose to enter a SQL expression to refine your selection. Without a SQL expression, the tool will process every feature in your feature class. For example, you may want to place a bridge at every location where a road crosses a river, or your data might not have an attribute field on which to make a refinement selection to make the tool process on a smaller set of data. In this exercise, a field indicates where a crossing occurs. On the Query Builder dialog box, enter the query as follows: "BridgeCategory" = 1.
- Click OK to close the Query Builder dialog box.
- Type Bridge_FC for the Output Decoration Feature Class.
- Choose ANGLED for the Wing Type.
- Type 1 and choose Points for the Wing Tick Length parameter.
Your dialog box should look like the one below.
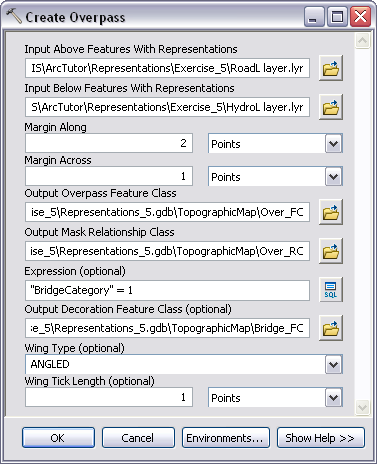
- Click OK to run the tool.
When the tool is complete, you will have created two new feature classes and a relationship class to use in your map to display bridges. The mask will be linked to RoadL with the relationship class.
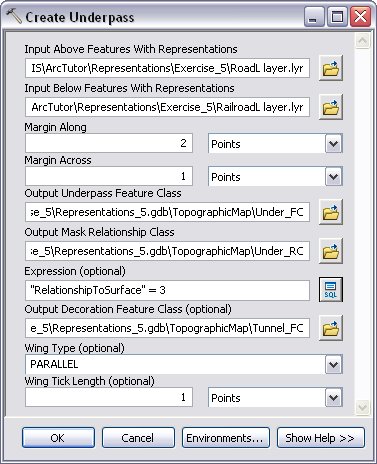
- Now you will create some underpasses at the locations where you know that railroads pass underneath roads. The process will be nearly identical to Overpass with a few minor differences, which will be pointed out as you proceed through this section. Open the Create Underpass tool.
- Choose RoadL layer.lyr for Input Above Features With Representations and RailroadL layer.lyr for Input Below Features With Representations.
- Type 2 for Margin Along and type 1 for Margin Across, then choose Points in both cases for the unit of measurement.
- Type Under_FC and Under_RC for the Output Underpass Feature Class and the Output Mask Relationship Class.
- For the Expression parameter enter "RelationshipToSurface" = 3.
- Type Tunnel_FC for the Output Decoration Feature Class parameter.
- Choose PARALLEL for the Wing Type.
- Type 1 for the Wing Tick Length and choose Points for the unit of measurement.
Now that you have populated all the parameter values, your dialog box should look like the following:
- Click OK to run the tool.
Geoprocessing tools for finding graphic conflicts
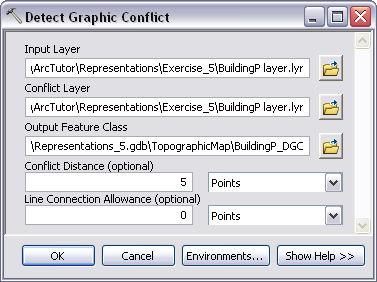
Now that you have run a series of geoprocessing tools on your data, the final step is to find out where your symbolized data is overlapping. The Detect Graphic Conflict tool creates a polygon feature class that you can use to visually locate incidents of overlap. You will use this tool to identify the areas where buildings graphically overlap other buildings.
- Use BuildingP layer.lyr for both the Input Layer and Conflict Layer parameters.
The Output Feature Class parameter will automatically populate.
- In the Output Feature Class, navigate to your data location instead and type BuildingP_DGC as the feature class name.
- Type 5 for the Conflict Distance parameter and choose Points from the drop-down list.
- Type 0 for the Line Connection Allowance parameter and choose Points from the drop-down list.
Your dialog box should look like this:
- Click OK to run the tool.
Once complete, you will have a polygon feature class that will indicate where symbolized building features are closer than 5 points to each other at the reference scale set in the geoprocessing environments at the beginning of this exercise. Using a Conflict Distance of 0 in this tool will find features whose symbols graphically overlap at the reference scale.
- Exit ArcCatalog.
Establishing the masking relationships
- Start ArcMap.
- Open Exercise_5.mxd.
- Add the following feature classes from the TopographicMap feature dataset to the map:
- Over_FC
- Under_FC
- Bridge_FC
- Tunnel_FC
- BuildingP_DGC
- For both Bridge_FC and Tunnel_FC, set the symbology to a1-point wide solid black line.
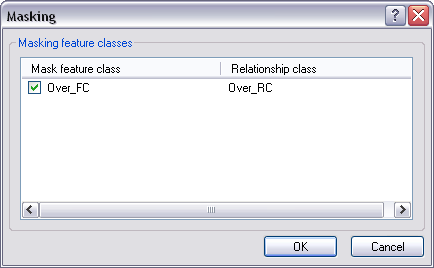
- Open the Layer Properties dialog box for the HydroL_Rep layer.
- On the Symbology tab, click the Layer Options button
 , then click Masking.
- Click the check box for Over_FC.
- Click OK to close the Masking dialog box and the Layer Properties dialog box.
- Click RailroadL_Rep and open the Layer Properties dialog box.
- Click the Layer Options button
 , then click Masking.
- Click the check box for Under_FC.
- Click OK to close the Masking dialog box and the Layer Properties dialog box.
- Turn off the Over_FC and Under_FC layers in the table of contents window.
Viewing the results in ArcMap
When you started exercise 1, your map looked like the one below.
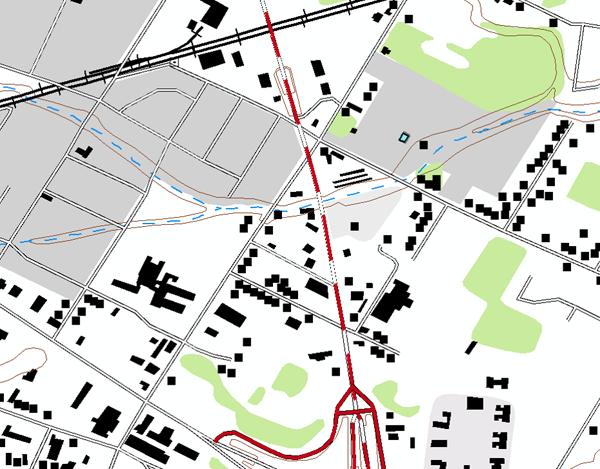
There were no bridges, the buildings were not aligned to the roads, and the dash pattern symbology on the roads was not well developed.
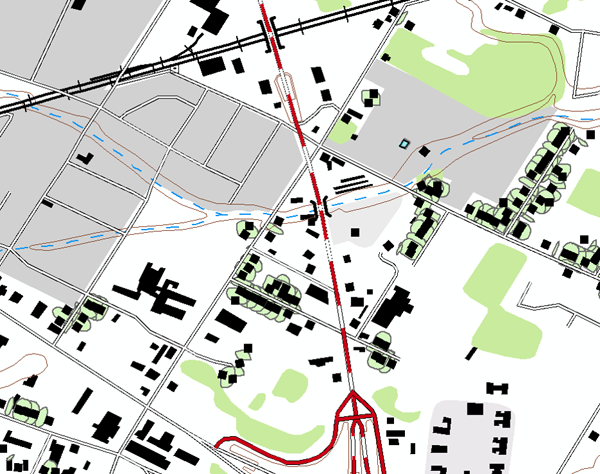
Now that you have run some geoprocessing tools, your map looks like the following:
- Click Bookmarks > 5) Geoprocessing Results.
Notice that the dash pattern on the roads has been adjusted, the result of using the Set Representation Control Point By Angle geoprocessing tool. The point buildings are now aligned to the roads, the result of the Align Marker To Stroke Or Fill geoprocessing tool. Bridge and tunnel symbology has been added where the road crosses the river and the railroad, and this masks out the river and railroad symbology—all the result of the Create Overpass geoprocessing tool. Finally, the polygons from BuildingP_DGC indicate the areas where point buildings are graphically too close.
Congratulations, you’ve completed Exercise 5.
Things created and accomplished in this exercise:
- Using the Calculate Line Caps geoprocessing tool
- Using the Set Representation Control Point By Angle geoprocessing tool
- Using the Align Marker To Stroke Or Fill geoprocessing tool
- Using the Create Overpass geoprocessing tool
- Using the Create Underpass geoprocessing tool
- Using the Detect Graphic Conflict tool
- Using feature-level masking in ArcMap
Related Topics
- Introduction to the cartographic representations tutorial
- Exercise 1: Learning the fundamentals of representations
- Exercise 2: Interacting with representation properties
- Exercise 3: Performing edits with representations
- Exercise 4: Working with free representations
- An overview of the Cartography toolbox
- Masking feature representations