Available with Network Analyst license.
Folder | ShortestRoute |
Purpose | Shows the quickest route for a given time of day between points on a street network and generates driving directions in a text or HTML file |
Services | ShortestRouteService (geoprocessing service) |
Geoprocessing tasks | Calculate Shortest Route |
Inputs |
|
Outputs |
|
Data | Uses a street network dataset for the San Francisco area provided in the ToolData folder |
Extensions | |
Of note |
|
Corresponding folder
The data for this tutorial can be downloaded from ArcGIS.com. Extract the data to C:\arcgis\ArcTutor. The model and some corresponding data are located in C:\arcgis\ArcTutor\GP Service Examples\Network Analyst\ShortestRoute. The network dataset that is referenced by the network analysis layer in the model is stored in the SanFrancisco geodatabase found in C:\arcgis\ArcTutor\GP Service Examples\Network Analyst\ShortestRoute.
About this example
ShortestRouteService, created in this example, shows you how to publish geoprocessing tasks that calculate the shortest route on a street network between user-specified points and generate a file containing the driving directions.
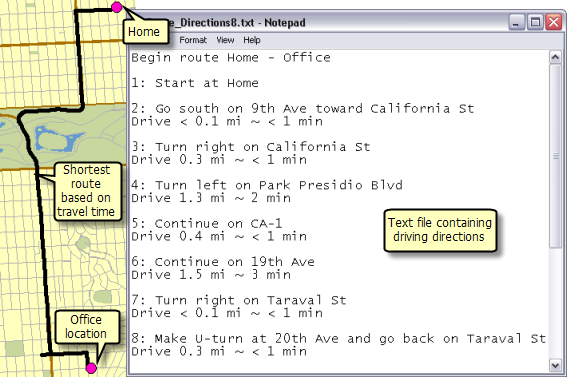
The San Francisco network dataset used in this example is configured with historical traffic data, which makes it possible to find the quickest driving route for a given day of the week and time of day. This means you can find the best route from point A to B at 8:00 a.m., 10:00 a.m., 10:25 p.m., and so on. The route shape may vary or the expected route duration may change, but in any case, the quickest route for the given start time is calculated.
Data
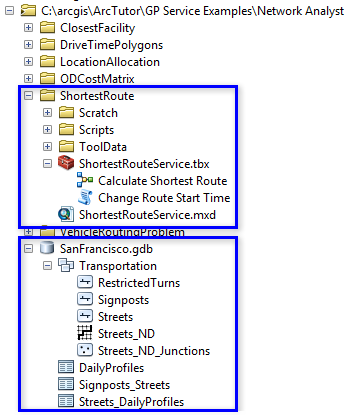
The network dataset for this example comes from C:\arcgis\ArcTutor\GP Service Examples\Network Analyst\SanFrancisco.gdb. The map document, toolbox, and other supplementary data are stored in C:\arcgis\ArcTutor\GP Service Examples\Network Analyst\ShortestRoute.
Network dataset
The Network Analyst folder contains a file geodatabase, SanFrancisco.gdb. Within the Transportation feature dataset is a network dataset, Streets_ND. This network dataset models the street network for the San Francisco area. It provides several network attributes, including TravelTime, which indicates the time it takes to travel each street segment in minutes, and Meters, which indicates the length of each street segment.
Toolbox and map document
The toolbox for the geoprocessing service is ShortestRouteService.tbx.
The map document, ShortestRouteService.mxd, is included to remove secondary steps from this workflow topic, such as adding layers or fitting map extents around the study area.
ShortestRouteService contains a script tool and a model. The script tool, Change Route Start Time, is part of the model, Calculate Shortest Route.
Model
Model overview
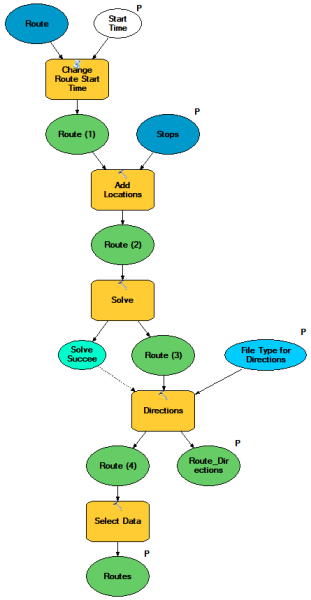
The Calculate Shortest Route model is illustrated below.
There are three input parameters: Start Time, which is optional and represents the time of departure from the first stop; Input Stops, which represents the user-digitized points to route to; and File Type for Directions, which specifies whether to output directions in HTML or text format.
The model uses a script tool to set the route start time of an existing network analysis layer, adds stops to the route analysis layer, finds the best route, and outputs the route shape and driving directions. The resultant route visits the stops in the order they are digitized.
Using an existing network analysis layer
A network analysis layer is not created in the Calculate Shortest Route model; rather, the model assumes that a layer already exists. With this design, the model and any geoprocessing tasks published from it reuse one network analysis layer instead of creating one for each solve. This avoids a lot of unnecessary processing.
The model references a script tool, Change Route Start Time, which uses Python and the Network Analyst module (arcpy.na) to access the existing route network analysis layer and change its route start time property to the date and time that the user inputs. More specifically, the script passes the network analysis layer into arcpy.na.GetSolverProperties, which returns a RouteSolverProperties object. From this object, the timeOfDay property of the network analysis layer is set.
Although not recommended, you could avoid adding the script tool by starting the model with the Make Route Layer tool and exposing the tool's Start Time parameter as a model parameter. However, a new network analysis layer would be created for each client request when the model is published as a task on a server. A lot of extra processing would occur on your servers using this approach. The script tool and the Network Analyst module allow you to edit the properties of an existing network analysis layer so that only one layer is ever created and used by the service.
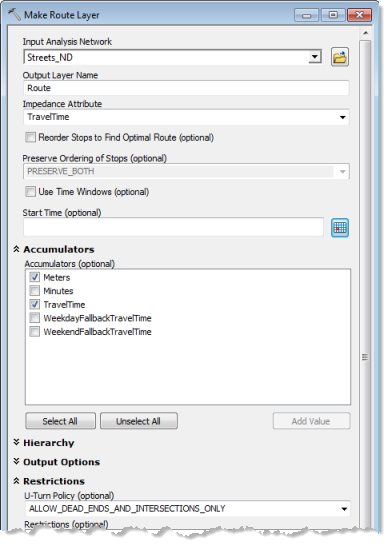
The route layer used as an input variable in the Calculate Shortest Route model was created by first adding the Streets_ND network dataset to the ShortestRouteService.mxd and then using the Make Route Layer tool. For this example, the following tool parameters were set when the route layer was made. Default values were used for the parameters not mentioned in this table.
Parameter | Value |
Input Analysis Network | Streets_ND |
Output Layer Name | Route |
Impedance Attribute | TravelTime |
Start Time | |
Accumulators | Meters; TravelTime |
U-turn Policy | ALLOW_DEAD_ENDS_AND_INTERSECTIONS_ONLY |
Model processes
The Change Route Start Time script tool lets you take advantage of the network dataset's dynamic travel times by setting a start time for the route. If you don't set a time and date, the solver finds the best route based on a network cost attribute that was generated from generic travel times. Setting a time and date, however, the solver uses a cost attribute based on historical travel times, which tends to produce better routes.
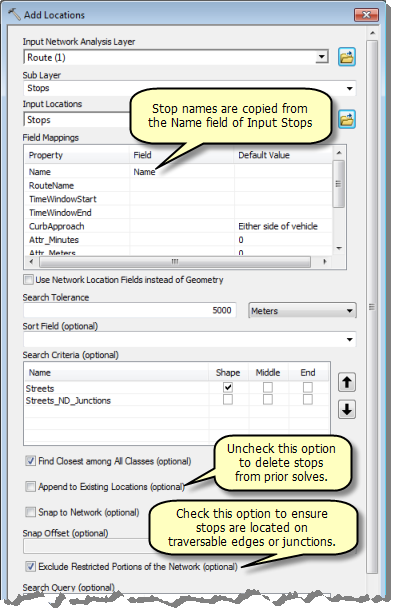
The Add Locations tool adds user-digitized points as stops to the route layer. The Input Locations parameter for the tool is specified through a model parameter, Input Stops. This parameter is a feature set data type. The schema and symbology for the feature set are derived from the InputStops.lyr file found within the ToolData folder.
The schema for the Input Stops feature set contains a text field, Name. This field can be used to provide stop names while generating driving directions by mapping the Name property to the name field in Field mappings, as illustrated below. If the value for the name field is not specified by the user, default values of Location 1, Location 2, and so on, are used for stop names.
Since the same route layer is used for each model run, any existing stops need to be removed before adding the new stops. To delete existing stops, the Append to existing locations option, illustrated below, is unchecked.
Exclude Restricted Portions of the Network is checked so that when stops are added, they don't locate on edges that cannot be traversed. This prevents failures at solve time.
The Solve tool calculates the shortest route based on the TravelTime network attribute, the Start Time setting, and other options specified in the route layer. The calculated route is written to the Routes sublayer in the output route layer.
Network analysis layers (such as a route layer) are not supported output parameter data types for ArcGIS Server clients. So the Select Data tool is used to get the Routes sublayer from the route analysis layer.
The Directions tool generates the driving directions and outputs them to a text, XML, or HTML file, depending on which the user chooses. However, the XML option is removed from the list when running the resultant task from ArcGIS for Server. This option is removed by unchecking XML in Service Editor, under File Type for Directions, when publishing the service. The SolveSucceeded variable derived from the Solve tool is used as a precondition for the Directions tool. This means that the directions file is generated only if the Solve tool can find a route between input points.
Item description
By documenting the item description of the geoprocessing model, you are also documenting the resulting service and its parameters because the publishing wizard copies the text to the item description of the service. Describing, or documenting, the service is required and helps users understand how to successfully interact with the service and find shortest routes. The model and script tool for this example are documented; you can inspect the documentation by right-clicking the geoprocessing model in the Table Of Contents window and choosing Item Description.
Publishing
The geoprocessing service is published as described in the steps below.
- Open ShortestRouteService.mxd. The default location for the tutorial data is C:\arcgis\ArcTutor\GP Service Examples\Network Analyst\ShortestRoute.
- Run the Calculate Shortest Route geoprocessing model.
- In the Catalog window, expand ShortestRouteService.tbx and double-click the Calculate Shortest Route model.
- On the Calculate Shortest Route tool dialog box, click the symbol next to Stops and click on the map to add stops.
- Click OK to generate a route and driving directions.
- Open the Results window by clicking Geoprocessing > Results.
- In the Results window, expand Current Session.
- Right-click CalculateShortestRoute (which is followed by the time and date that the model ran) and choose Share As > Geoprocessing Service.
- On the Share as Service dialog box, click Next.
- Choose an ArcGIS Server connection with publisher capabilities from the drop-down list or make a connection using the button to the right of the drop-down list.
- Click Next.
- Choose to publish the service to the root folder or specify a different folder and click Continue.
The Service Editor dialog box appears. The text from the geoprocessing model's and script tool's item descriptions is copied to describe the service. It is displayed for editing in the Item Description section of the dialog box as well as in the sections immediately above it (Route_Directions, Start Time, and so on).
- Because a route analysis in this study area is a quick process, make the service synchronous by clicking the Parameters tab and checking Synchronous. If you are publishing a service for solving location-allocation or OD cost matrix problems, set this property to Asynchronous and consider increasing the value for The maximum time a client can use a service, which is under the Pooling tab.
- Change Message Level to Warning so that any error or warning messages are returned when running the task.
- Remove XML as an option for driving directions file format by clicking File Type for Directions and unchecking XML.
- Click Analyze
 to see any warning or error messages in the Publisher window.
Unless you have set up a data store, you receive a warning that data will be copied to the server.
Right-click any other error messages in the Publisher window for help on how to address them.
- Click Publish
 on the Service Editor dialog box.
A dialog box may appear immediately to inform you that Streets_ND will be copied to the server. If so, click OK. After the service publishes successfully, the Succeeded dialog box appears.
- Click OK.
Using
- Open a blank map document and add the Streets feature class from the tutorial data (C:/arcgis/ArcTutor/GP Service Examples/Network Analyst/SanFrancisco/Transportation/Streets). Optionally, add a basemap layer from ArcGIS Online and remove the Streets feature layer.
- Create a user connection to ArcGIS Server from the Catalog window if one does not exist already.
- Expand the user connection and expand the CalculateShortestRoute service.
- Open the Calculate Shortest Route task by double-clicking it.
- Add at least two points to create stop locations. Optionally, specify names for each stop in the attributes table for the layer that appears in the table of contents: CalculateShortestRoute::Stops.
- Specify a date and time for when the route will depart from the first stop. Choose whether to output driving directions in text or HTML format. Click OK to run the task.
ArcGIS for Server receives the request, solves the analysis, and returns a layer named Routes and stores the driving directions file in your temp directory. You can access the driving directions through the Results window: expand Current Session > CalculateShortestRoute and double-click Route Directions: RouteDirections. (You can right-click Route Directions: RouteDirections and choose Copy Location to find where the file is stored on your computer.)