ArcGIS Desktop

  • Documentation
  • Support

  • My Profile
  • Help
  • Sign Out
ArcGIS Desktop

ArcGIS Online

The mapping platform for your organization

ArcGIS Desktop

A complete professional GIS

ArcGIS Enterprise

GIS in your enterprise

ArcGIS for Developers

Tools to build location-aware apps

ArcGIS Solutions

Free template maps and apps for your industry

ArcGIS Marketplace

Get apps and data for your organization

  • Documentation
  • Support
Esri
  • Sign In
user
  • My Profile
  • Sign Out

ArcMap

  • Home
  • Get Started
  • Map
  • Analyze
  • Manage Data
  • Tools
  • Extensions

Creating a real-time connection to Tracking Server

Before you can add real-time tracking services to your map, you need to first follow this procedure to create a connection to a Tracking Server.

  1. Click the Add Data button on the Standard toolbar to open the Add Data dialog box.
  2. Click Tracking Connections in the Look in drop-down menu.
    The Add Data dialog box provides an option to add a Tracking Server connection
  3. Double-click Add Tracking Server.

    The Add Tracking Server option can also be found under Tracking Connections in the Catalog tree in ArcCatalog or in the Catalog window in ArcMap.

  4. The Add Tracking Server dialog box opens. Type the name of the machine that hosts your Tracking Server in the Server Name text box.
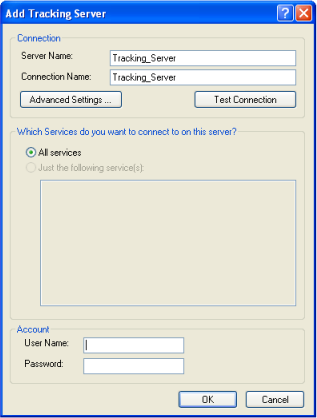
    The Add Tracking Server dialog box
  5. Type the name that you want for your Tracking Server connection in the Connection Name text box.
  6. If the machine hosting your Tracking Server requires authentication, type your user name and password in the Account panel at the bottom of the Add Tracking Server dialog box.
  7. Click Test Connection to verify that your connection succeeded.

    If the connection succeeded, the Just the following service(s) button in the Which Services do you want to connect to on this server? panel is enabled.

    Tip:
    If an error appears when you click Test Connection, make sure you have the right name for the machine where the Tracking Server resides. Alternatively, you can try typing the machine's Internet Protocol (IP) address to establish the connection.

  8. In the Which Services do you want to connect to on this server? panel, choose which services you want to connect to from the Tracking Server. Click the All services button to connect to all available services or click the Just the following service(s) button and check the check boxes next to the names of the services you want to connect to.

    Tip:

    Using the Just the following service(s) option is useful when you have many services set up and available but only want to access a few.

  9. After selecting the services you want, click OK to create the Tracking Server connection.

    The new Tracking Server connection you created now appears in the Tracking Connections folder in the Add Data dialog box. The Tracking Server connection appears with the connection name you specified earlier.

You can now add real-time tracking services from your Tracking Server connection to your map as tracking layers.

Tip:

The Tracking Server connection you established can also be accessed under Tracking Connections in the Catalog tree in ArcCatalog or in the Catalog window in ArcMap.

Dive-in:

The advanced settings for a Tracking Server connection are typically never changed. If you are an advanced user and you need to change these settings, refer to the appropriate steps in setting the properties for a Tracking Server connection.

Related topics

  • Setting the properties for a Tracking Server connection
  • Adding a real-time tracking service to a map
  • Tracking Services Monitor

ArcGIS Desktop

  • Home
  • Documentation
  • Support

ArcGIS Platform

  • ArcGIS Online
  • ArcGIS Desktop
  • ArcGIS Enterprise
  • ArcGIS for Developers
  • ArcGIS Solutions
  • ArcGIS Marketplace

About Esri

  • About Us
  • Careers
  • Insiders Blog
  • User Conference
  • Developer Summit
Esri
Tell us what you think.
© Copyright 2016 Environmental Systems Research Institute, Inc. | Privacy | Legal