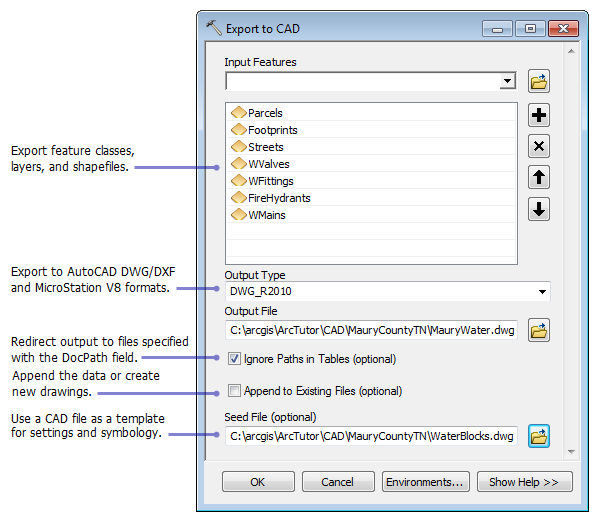
For many organizations, design projects in CAD begin with base data generated from a GIS. Using the Export To CAD tool, you can export feature classes and shapefiles to AutoCAD and MicroStation formats. You can run the tool out of the box with the default parameters or you can customize the output to conform to specific CAD standards.
You can open the tool in the following ways:
- In a map document, right-click the layer in the table of contents and click Data > Export to CAD from the context menu.
- In a Catalog window, right-click the dataset or feature class and click Export > To CAD from the context menu.
- In a Search window, type Export To CAD and click the Tools filter.
- Navigate to the To CAD toolset in the Conversion toolbox.

Name the drawing at runtime
To name the CAD drawing when you run the tool, type the full path and file name in the Output File text box and check the Ignore Paths in Tables check box. This exports all the input features to one CAD drawing and overrides any paths that may defined by the input features with the DocPath field.
Separate features with the DocPath field
Uncheck the Ignore Paths in Tables check box if the input features have been modified to include the DocPath field in their respective tables. This exports the input futures to the path and file names specified in each row of the feature class table. When this setting is unchecked, the file name specified in the Output File text box is ignored.
Overwrite existing CAD files
To overwrite existing CAD file, uncheck the Append to Existing Files check box.
Add a seed file
If you need the CAD drawing to contain specific settings or other native base data, you can add a seed (CAD template) file as a secondary input. The results are similar to appending the input features to a copy of the seed file. Any format specified by the Output Type setting is ignored.
AutoCAD drawings
AutoCAD formats do not require seed files to generate output. If you choose to use one, you can use .dwg or .dwt file types interchangeably.
MicroStation drawings
All MicroStation V8 drawings require a seed file. By default, the Export To CAD tool selects a sample 2D seed file with units set to meters. If the input features contain three-dimensional data, you must use a 3D seed file. You can browse and choose from other seed files in the ArcToolbox templates folder (example: C:\Program Files\ArcGIS\Desktop10.4\ArcToolbox\Templates).
About MicroStation seed files
MicroStation seed files contain critical information about the drawing's global origin, working units, and the 2D (design plane) or 3D (cube) coordinate space. Any spatial data that falls outside the defined coordinate boundary is not exported to the drawing file. Many organizations that require a specific global origin, provide DGN files as downloadable files from their website.
The global origin setting defines the location of the x, y, and z origin coordinates 0,0,0 relative to the file's coordinate space. For V8 DGN files, the default location is the exact center of the 2D design plane or 3D design cube. For V7 DGN files, the default location is the lower-left or bottom-left corner of the coordinate space.