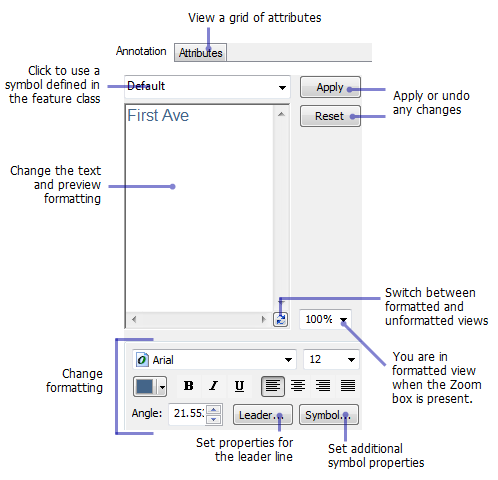
You can use the Attributes window to modify the appearance of your annotation. You can work with annotation in the Attributes window in one of two views: formatted and unformatted. Formatted view contains a menu that allows you to apply quick formatting, such as bolding, italicizing, and underlining text. If the zoom box is present in the lower right corner of the Attributes window, you are working in formatted view. Both views allow you to update text formatting by clicking buttons that change the font, color, alignment, size of the text, and so on. You may need to resize the Attributes window to see the formatting buttons, which are at the bottom of the window.
You can use text formatting tags to control the formatting of annotation. Tags can be entered when annotation is being created, or by using the Attributes window once the feature has been added to the map.

- Click the Edit tool
 or the Edit Annotation tool
  on the Editor toolbar and select the annotation.
- Click the Attributes button
 on the Editor toolbar.
- Click the Annotation tab.
- If you have defined more than one annotation symbol for the annotation feature class, you can choose a new annotation symbol from the drop-down list.
- To change the symbology interactively, select the text you want to modify.
- Click the formatting buttons at the bottom, or right-click and choose the formatting you want to apply.
- If you want to enter text formatting tags, switch to unformatted view by clicking the arrow button and type the tags you want to apply to your text.
- To change the annotation symbology for more than one feature at a time, select all the annotation features you want to change, click the annotation layer name in the list of selected features, then set the new symbology.
- Click Apply.