Available with Spatial Analyst license.
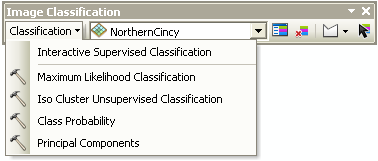
The Image Classification toolbar provides a user-friendly environment for creating training samples and signature files for supervised classification. It also serves as a centralized location for performing both supervised classification and unsupervised classification. An ArcGIS Spatial Analyst license is required to use the tools on this toolbar.
The image below shows the toolbar:

The toolbar contains interactive tools for creating training samples and signature files. Some commonly used classification tools from the Multivariate toolset of the Spatial Analyst toolbox are also exposed through this toolbar.
Functions of the tools and buttons
The table below shows tools and buttons available on the toolbar:
| Training Sample Manager | Opens Training Sample Manager. |
| Clear Training Samples | Removes all training samples and begins a new supervised classification session. |
| Training Sample Drawing Tools | Draws new training samples in the display. There are three ways to create training samples: as polygons, as rectangles, and as circles. |
| Select Training Sample | Selects training samples in the display. |
Commands in the Classification drop-down list
The table below shows the classification commands that are accessible from the Classification drop-down list.
| Interactive Supervised Classification | N/A | Automatically classifies the selected image layer using training samples from Training Sample Manager (without using a signature file) with a quick preview of the result. There must be at least two training samples present for this option to be available. |
 Maximum Likelihood Classification Maximum Likelihood Classification | Opens the geoprocessing tool that performs supervised classification on an input image using a signature file. | |
 Iso Cluster Unsupervised Classification Iso Cluster Unsupervised Classification | Opens the geoprocessing tool that performs unsupervised classification on an input image. | |
 Class Probability Class Probability | Class Probability tool | Opens the geoprocessing tool that performs class probability analysis on an input image using a signature file. |
 Principal Components Principal Components | Principal Components tool | Opens the geoprocessing tool that performs principal component analysis on an input image. |
Tools for creating training samples
In the training sample drawing tools, the drop-down list provides three ways to draw the samples, as polygons, rectangles, or circles.
| Draw Polygon | Draws a training sample with a polygon shape. Click on each vertex of the polygon, and double-click when done. |
| Draw Rectangle | Draws a training sample with a rectangle shape. Click and hold the mouse button to drag out the rectangle shape for the training sample area. Release the mouse button when done. |
| Draw Circle | Draws a training sample with a circle shape. Click and hold the mouse button to specify the center of the circle, and drag out the radius of the training sample area. Release the mouse button when done. |
| Select Segment | Use a segmented image to create training sites. Double-click on a segment to add it to the training sample manager. Zoom to a 1:1 view for best results. Because segments are drawn at screen resolution, if you are zoomed out beyond 1:1, your training sites may overlap other unintended features. |


