Prerequisite:
The custom VB layer action provided by Tracking Analyst is available if you install and license the ArcGIS Desktop VBA Resources for Developers software that is included in your ArcGIS Desktop media package. Installation and licensing information is available in the ArcGIS Desktop Installation Guide. Once installed, refer to the ArcGIS Desktop VBA Resources for Developers help system for instructions on using the Visual Basic Editor to create macros for ArcGIS Desktop.
Before following this procedure, you must have created a VB macro for use with this action using the Visual Basic Editor.
The custom VB layer action is different than the other layer actions because it can only be applied to real-time tracking layers. It is also different than service actions because it is defined for a tracking layer rather than a tracking service. VB actions are applied to real-time events as they are added to the tracking layer, but they are not applied to events already existing in the layer prior to triggering the action.
Learn more about custom VB actions for real-time tracking layers
- Using Visual Basic Editor, create the VB macro that you want to use on your real-time tracking layer.
- Right-click the tracking layer you want to apply the action to in the Table of Contents window and clickProperties on the context menu. The Layer Properties dialog box appears.
Alternatively, you can double-click the tracking layer in the Table of Contents.
- Click the Actions tab on the Layer Properties form.
- Click the New Action button.

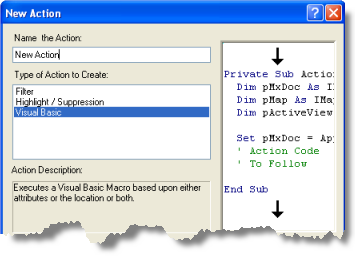
- ChooseVisual Basic on the Type of Action to Create panel. The Visual Basic option will only be listed if you are working with a real-time tracking layer.

- Click in the text box and type a name for the action, then click OK to launch the action parameters form.
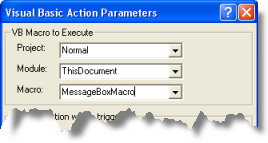
- On the Visual Basic Action Parameters dialog box, click the Project drop-down arrow and choose either Project or Normal.

- Click the Module drop-down arrow and choose the module that contains your macro.
- Click the Macro drop-down arrow and choose the name of the macro you want to use.
If you created a VB macro ahead of time and saved it in this module, it appears in the list.
- Set the trigger for your action. Click the button in the How the action will be triggered panel to the desired option below and follow further instructions to set your trigger:
Always
The action will always be triggered.
Attribute Query
The action will be triggered based on attribute criteria. Learn how to set an attribute trigger.
Location Query
The action will be triggered based on location criteria. Learn how to set a location trigger.
Attribute AND Location Query
The action will be triggered based on a combination of attribute and location criteria.
- When you have finished setting the trigger for the action, click OK to create the action.
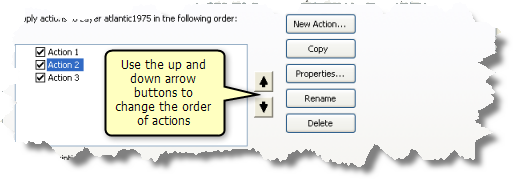
- The new action appears in the list of layer actions. If other layer actions appear in the list, you can use the UP and DOWN ARROW buttons to put them in the order in which you want to them to be applied to the tracking layer. You can also enable or disable a layer action in the list by checking or unchecking its check box.

- Click Apply or OK on the Layer Properties dialog box to apply all the changes.
A macro saved in the Normal folder affects all documents opened in ArcMap. A macro located in the Project folder only affects the current map document.
The default module name in Visual Basic Editor is ThisDocument.