Available with Data Reviewer license.
In this exercise, you'll learn how to create and use a Reviewer session. You'll create a Reviewer workspace, and add a record to the Reviewer table. You'll then finish the quality control cycle by correcting and verifying the record.
Exercise 1a: Starting and configuring a Reviewer session
For this portion of the exercise, you'll use the Reviewer Session Manager to create a Reviewer workspace. During the exercise, the Reviewer Session Manager creates the Reviewer schema, which includes the Reviewer tables and the Reviewer feature dataset, in an empty geodatabase.
A Reviewer session is a way to organize the records in the Reviewer table. A unique session can be created for each person performing the review or for each area being reviewed.
- Start ArcMap.
- Open the Reviewer.mxd file.
The Reviewer.mxd file is located in the Data Reviewer directory where the ArcGIS Desktop tutorial data is installed.
- On the main menu, click Customize > Toolbars > Data Reviewer.
The Data Reviewer toolbar appears as an undocked toolbar.
- Click the Reviewer Session Manager button
 on the Data Reviewer toolbar.
 The Reviewer Session Manager dialog box appears.
- Click Browse in the Reviewer Workspace area.
The Reviewer Workspace dialog box appears.
- Choose Reviewer.gdb and click Add.
The Reviewer.gdb workspace is located in the Data Reviewer directory where the ArcGIS Desktop tutorial data is installed.
Reviewer.gdb appears in the Reviewer Workspace area on the Reviewer Session Manager dialog box.
The User Name value is automatically populated with your Windows login name.
- When the Data Reviewer message appears, click Yes to open the Enable Data Reviewer geoprocessing tool.
The Enable Data Reviewer dialog box appears with the Workspace value automatically populated.
- Click OK to enable the Reviewer.gdb geodatabase to store Reviewer results.
- When the Enable Data Reviewer geoprocessing tool completes the operation, click Close.
- On the Reviewer Session Manager dialog box, in the Session area, click New.
- Type Exercise 1 in the Name text box.
- Click Start Session.
The button name changes to End Session.
- Click Close.
The Reviewer Session Manager dialog box closes, and the Reviewer tools use the current session when writing to the Reviewer table.
Exercise 1b: Committing records to the Reviewer table
The first stage in the data review cycle is to find issues with your data. Once an issue is identified, the feature is committed to the Reviewer table with a description of the issue.
- On the main menu, click Bookmarks > Commit Record to zoom to the Commit Record bookmark.
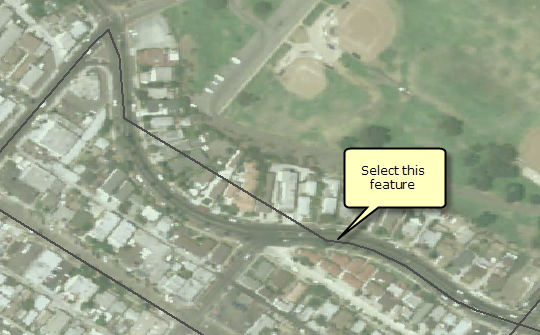
Near the center of the screen, you will see a road that is straight, even though the image shows that the road curves.
- Select the feature from the MajorRoads feature class.
- Click the Commit to Reviewer Table button
 on the Data Reviewer toolbar.
 The Commit to Reviewer Table dialog box appears.
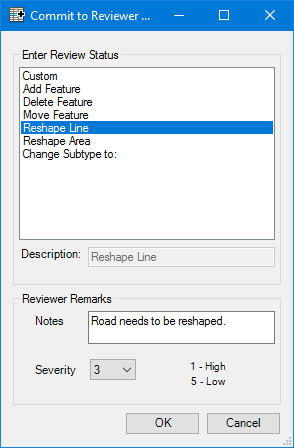
- Choose Reshape Line from the Enter Reviewer Status list.
- Provide additional information such as Road needs to be reshaped in the Notes text box.
- Click the Severity drop-down arrow and change the value to 3.
- Click OK.
The Commit to Reviewer Table dialog box closes. A record is written to the Reviewer table.
- If the Reviewer Table window is not visible in ArcMap, click the Reviewer Table button
 on the Data Reviewer toolbar.
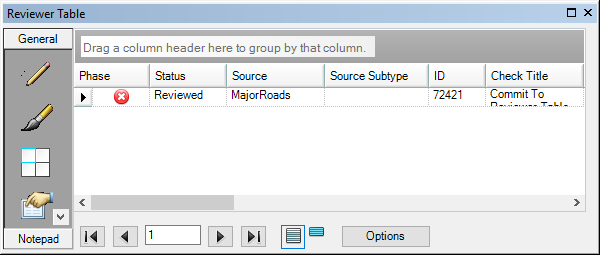
 The Reviewer Table window appears. Ensure that the Reviewer table is docked at the bottom of ArcMap, and adjust the height so you can see the record.
- Double-click the record.
The feature associated with the record is selected, and the extent is zoomed to the extent of the feature.
- Scroll the Reviewer table to the right to see the values for the record.
Notice that the status you chose from the list appears in the Status field. The ObjectId of the feature appears in the ID field, and the name of the feature class appears in the Source field. Also notice that the session user name is populated in the Created By field.
Exercise 1c: Correcting and verifying records in the Reviewer table
Once an issue is identified in the data, the issue needs to be fixed. The final step in the review cycle is to verify that the identified issue has been correctly fixed.
Often, the person who identifies an error may not be the same person who corrects it. The status of the issue can be tracked in fields in the Reviewer table record.
- On the main menu, click Customize > Toolbars > Editor.
The Editor toolbar appears as an undocked toolbar.
- Click the Editor menu on the Editor toolbar and click Start Editing.
- Double-click the Reviewer table record.
This selects and zooms to the road feature you committed.
- Click the Reshape Feature tool
 on the Editor toolbar.
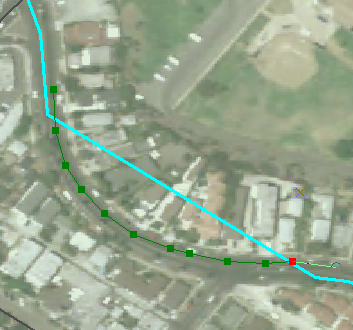
 - Create an edit sketch that intersects the selected feature twice and follows the road in the image.
- Double-click or press F2 to finish the sketch.
The feature is reshaped.
- Click the Stop Editing button
 on the Production Editing toolbar.
 - Click Yes on the Save dialog box.
Now that the issue has been fixed in the data, the status of the Reviewer table record also needs to be updated.
- Ensure that the Reviewer table record is selected.
- Right-click the record and click Enter Correction Status.
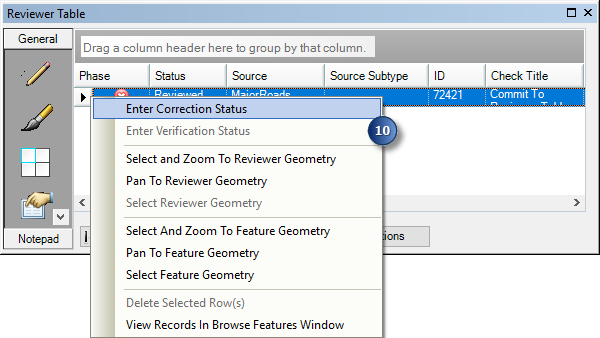
The Update Results dialog box appears.
- Click the Update Status drop-down arrow and choose Resolved.
- Click the Correction Notes drop-down arrow and choose Per Guidance.
- Uncheck the Automatically verify result check box.
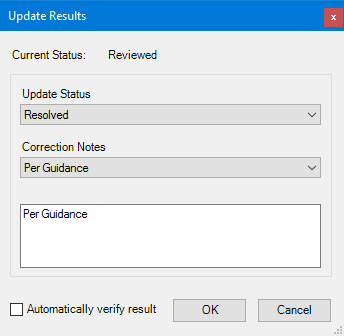
- Click OK.
The Reviewer table record is updated.
- Scroll the Reviewer Table until you see the Corrected On, Correction Notes, and Corrected By fields.
They are now populated with your user name, the current date and time, and the values you specified on the Update Results dialog box.
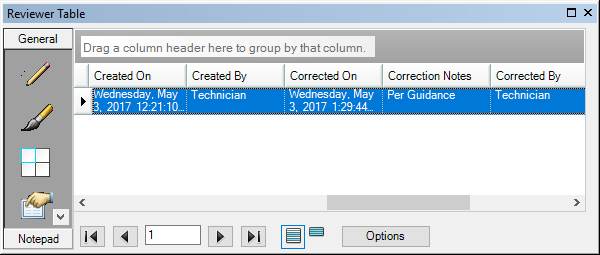
Now that the Reviewer result has been corrected, the next stage is to verify that the issue has been corrected properly. Depending on the way you choose to implement the quality control workflow, this action may be performed by someone who did not fix the error. For more information about Reviewer result life cycle management, see Result management of the quality review process.
- Right-click the record and click Enter Verification Status.
The Update Results dialog box appears.
- Click the Update Status drop-down arrow and choose Acceptable.
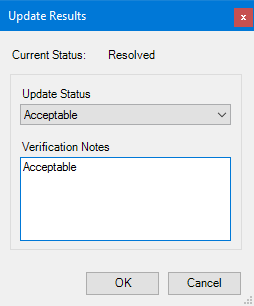
- Type Acceptable in the Verification Notes text box.
- Click OK.
The Reviewer table record is updated.
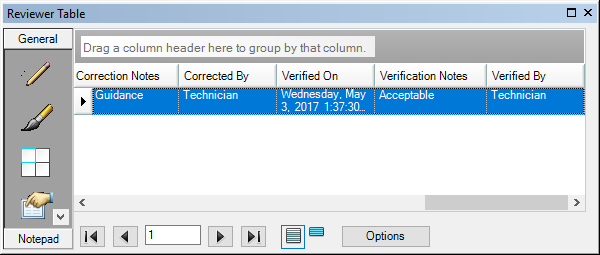
- Scroll the Reviewer Table until you see the Verified On, Verification Notes, and Verified By fields.
They are now populated with your user name, the current date and time, and the value you specified on the Update Results dialog box.
Exercise 1d: Ending a Reviewer session
The Reviewer Session Manager allows you to end a Reviewer session. This allows you to change to a different Reviewer session while remaining in ArcMap. If you do not end the Reviewer session, it will automatically end when you close ArcMap.
- Click the Reviewer Session Manager button
 on theData Reviewer toolbar.
The Reviewer Session Manager dialog box appears.
- Click End Session.
The Reviewer session ends, and the button name changes to Start Session.
- Click Close.
The Reviewer Session Manager dialog box closes.
In this exercise, you started and ended a Reviewer session and took a single Reviewer table record through the data validation life cycle. You can now learn about checks and batch jobs in Exercise 2: Working with batch jobs.