Available with Data Reviewer license.
Geoprocessing models can be scheduled to run on a regular basis using the Windows Task Scheduler. Similar to running a batch job using the Reviewer Batch Validate tool, the Task Scheduler runs batch jobs and writes the results to the Reviewer table in a specified Reviewer session. Batch jobs can be scheduled to run once at a specific date and time or to run repeatedly at regular intervals.
In this exercise, you will create a model, export it as a script, and use it to create a Windows task that will run the batch job on a daily basis and write the results to a new Reviewer session.
Exercise 3a: Creating a geoprocessing model
The Create Reviewer Session and Execute Reviewer Batch Job geoprocessing tools can be combined in a model. This allows you to model the process so it can be validated before it is converted to a script that will be run as a Windows scheduled task.
- Ensure that ArcMap is open and the Reviewer.mxd file has been loaded.
- Click the ModelBuilder button
 on the Standard toolbar.
The Model window appears.
- In the Catalog window, expand Toolboxes > System Toolboxes > Data Reviewer Tools.
- Drag the Create Reviewer Session and Execute Batch Job geoprocessing tools to the Model window.
- Double-click the Create Reviewer Session tool.
The Create Reviewer Session dialog box appears.
- Click the browse button next to the Reviewer Workspace text box.
The Reviewer Workspace dialog box appears.
- Browse to the Reviewer.gdb file and click Add.
The Reviewer.gdb Reviewer workspace is located in the Data Reviewer directory where the ArcGIS Desktop tutorial data was installed.
- Type Exercise 3 in the Session Name text box.
- Click OK to close the Create Reviewer Session dialog box.
The Create Reviewer Session geoprocessing tool's color in the Model window changes to yellow, indicating that tool is ready to run. The Create Reviewer Session tool is not ready to run in the model.
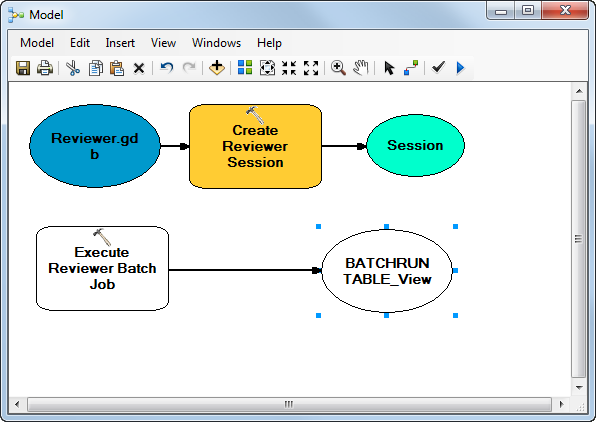
- Double-click the Execute Reviewer Batch Job tool.
- Click the Reviewer Workspace drop-down arrow and choose Reviewer.gdb.
- Click the Session drop-down arrow and choose Session.
The session name is incomplete because it has not been created yet. You will fix this later in the exercise.
- Click the browse button next to the Batch Job File text box.
The Open dialog box appears.
- Browse to the batch job you created in Exercise 2c and click Open.
- Click the browse button next to the Production Workspace (optional) text box.
The Open dialog box appears.
- Choose California.gdb and click Add.
The California.gdb Reviewer workspace is located in the Data Reviewer directory where the ArcGIS Desktop tutorial data was installed.
- Click OK.
The Execute Reviewer Batch Job geoprocessing tool's color in the Model window changes to yellow, indicating that tool is ready to run. The Execute Reviewer Batch Job tool is now ready to run in the model.
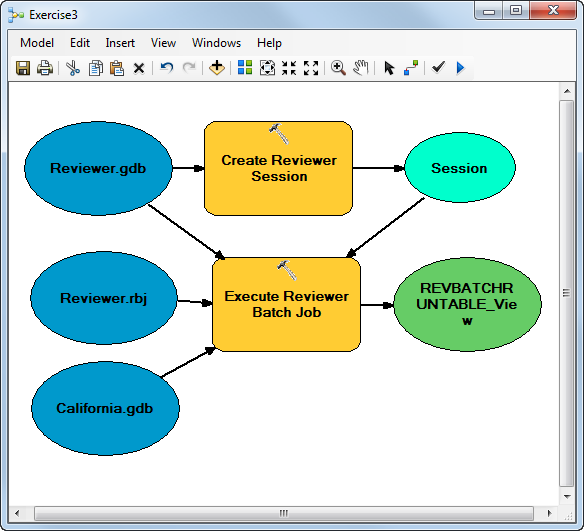
- Click the Model menu and click Validate Entire Model.
If no messages are displayed, the model is valid.
Exercise 3b: Exporting the model to a script
After the tools are ready to run in a model and the model has been validated, it can be exported to a Python script. In this part of the exercise, you are going to export the model you created to a script that will be used to create a Windows scheduled task.
- Click the Model menu and click Export > To Python Script.
The Save As dialog box appears.
- Browse to the Data Reviewer directory located in the directory the ArcGIS Desktop tutorial data was installed and type a name for the script in the File name text box, such as Exercise 3.
- Click Save.
- Close the Model window.
- Click No on the Save Model message.
Exercise 3c: Updating the model parameters
To successfully run, the script needs to be modified to include the Reviewer session name.
- Browse to the Exercise 3.py file you created in the previous section.
- Right-click the Exercise 3.py file and click Edit with IDLE.
The Python file opens in the IDLE window.
- Under # Local variables, delete Session = " ".
- Under # Process: Create Reviewer Session, type Session = .
- Under import arcpy, type arcpy.CheckOutExtension("DataReviewer").
- At the end of the script, type arcpy.CheckInExtension("DataReviewer").
The final script will resemble the following.
# -*- coding: utf-8 -*- # --------------------------------------------------------------------------- # Exercise 3.py # Created on: 2017-09-19 10:05:48.00000 # (generated by ArcGIS/ModelBuilder) # Description: # --------------------------------------------------------------------------- # Import arcpy module import arcpy arcpy.CheckOutExtension("DataReviewer") # Local variables: Reviewer_gdb = "C:\\arcgis\\ArcTutor\\Data Reviewer\\Reviewer.gdb" Reviewer_rbj = "C:\\arcgis\\ArcTutor\\Data Reviewer\\Reviewer.rbj" California_gdb = "C:\\arcgis\\ArcTutor\\Data Reviewer\\California.gdb" REVBATCHRUNTABLE_View = "REVBATCHRUNTABLE_View" # Process: Create Reviewer Session Session = arcpy.CreateReviewerSession_Reviewer(Reviewer_gdb, "Exercise 3", "", "NONE", "STORE_GEOMETRY", "Admin", "") # Process: Execute Reviewer Batch Job arcpy.ExecuteReviewerBatchJob_Reviewer(Reviewer_gdb, Session, Reviewer_rbj, California_gdb, "", "ALL_FEATURES", "") arcpy.CheckInExtension("DataReviewer") - Click File > Save to save the changes.
- Close the Python editor.
Exercise 3d: Create a Windows scheduled task
The Task Scheduler in Microsoft Windows allows you to schedule a script or application to run at regular intervals. In this exercise, you are going to use the Python script from Exercise 3c to create a scheduled task.
- Start the Task Scheduler by doing one of the following.
- Windows 7: Click the Start menu, type Task Scheduler in the search bar, and press Enter.
- Windows 8 and Windows 10: Open the Control Panel and click System and Security. Under Administrative Tools, click Schedule tasks.
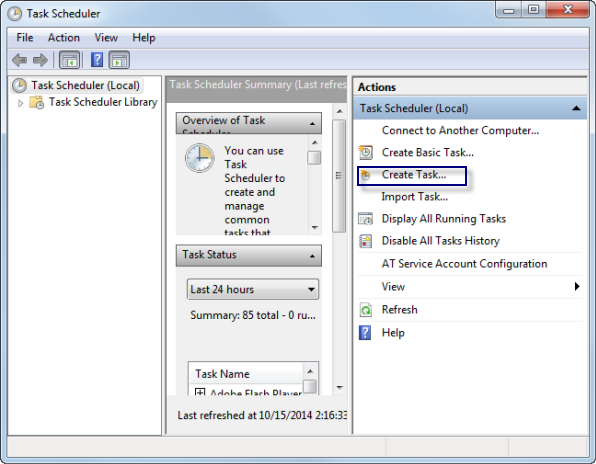
The Task Scheduler window appears.
- Click Create Task.
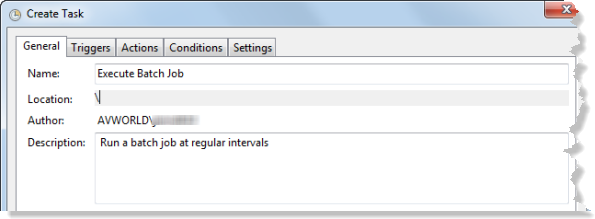
- Click the General tab.
- Type Execute Batch Job in the Name text box.
- Type Run a batch job at regular intervals in the Description text box.
- Click the Triggers tab.
- Click New.
The New Trigger dialog box appears.
- In the Settings area, choose Daily.
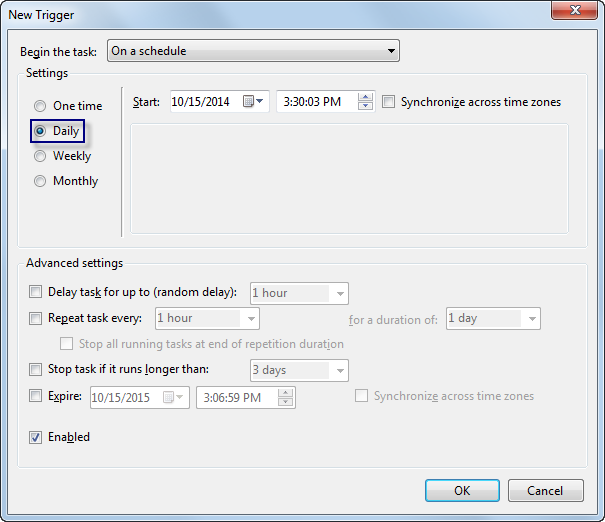
- Set the current date and time for Start using the calendar drop-down arrow and time.
- Click OK.
- Click the Actions tab.
- Click New.
The New Action dialog box appears.
- Click Browse next to the Program/script field.
The Open dialog box appears.
- Browse to the script created in Exercise 3c and click Open.
The New Action dialog box appears with the path to the script.
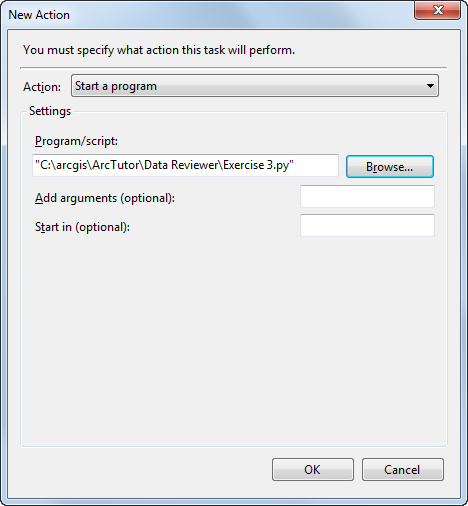
- Click OK to close the New Action dialog box.
- Click OK to close the Create Task dialog box.
- In the Task Scheduler window, click the Task Scheduler Library node and verify that the Execute Batch Job task appears in the list in the center.
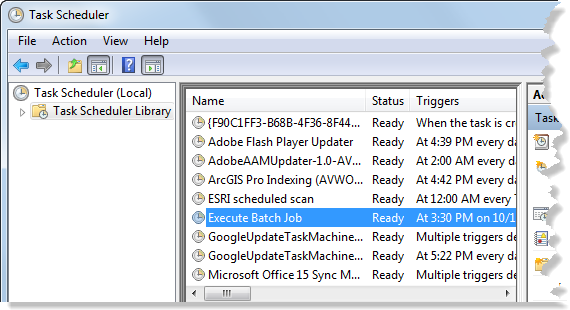
In this exercise you created a model and exported it as a Python script. After that, you customized the script and set it up to run as a scheduled task using the Task Scheduler.