Track Manager is a dockable window that allows you to view and interact with the tracks and tracking features contained in your map. Track Manager contains a Tracks panel, which allows you to view a list of tracks, highlight tracks, zoom to tracks, and perform other track-based operations on any set of tracks you define. The Features panel allows you to view the details of individual features contained within the tracks.
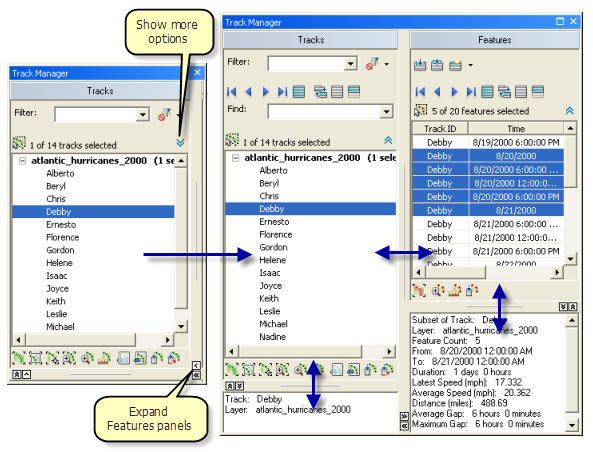
The image below shows Track Manager in two different ways. If you only need to analyze tracks, you can keep Track Manager in its basic default configuration. If you want to analyze tracking features and use more advanced functionality, Track Manager can be expanded.

The track list
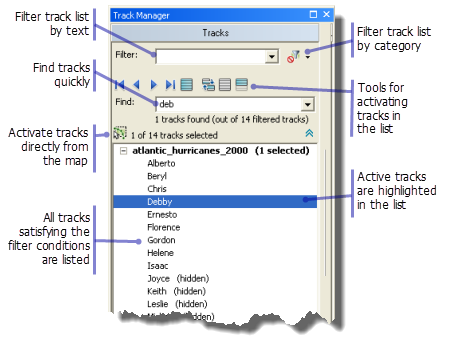
The track list is a list of the tracks contained in the tracking layers in your map, organized by tracking layer. Before you can perform operations on tracks or view their details, you must activate one or more tracks. Tracks can be activated by simply clicking on them in the track list, or by utilizing the filtering and searching options described below. Arrow buttons are provided to quickly iterate through your list of tracks, and the arrow keys on your keyboard can also be used. SHIFT and CTRL keyboard shortcuts can also be utilized to perform more advanced forms of track activation. The Grab Tracks From Map tool is also provided for activating tracks directly from the map.

Filtering and searching the track list
By default, Track Manager displays a list of all the tracks contained in your map. If you have a lot of tracks in your map, it can be difficult to find the ones you are interested in. This is why Track Manager provides options for filtering and finding tracks.
The filter text box at the top of the Tracks panel can be used to quickly filter the entire track list. Only tracks whose Track ID contains the string in the text box are listed. The track list immediately updates every time the contents of the text box are changed. The track list can also be filtered by applying a category filter. By default, no category filter is applied. Using a category filter, you can restrict the track list to show only visible tracks, only hidden tracks, or only purged tracks. For example, if you want to stop purging a specific set of tracks, you may choose to view only purged tracks to find the ones you're looking for more easily.
Tracks can be activated using the arrow buttons above the Find text box. Specific tracks can be found more quickly using the Find text box. When you type something into the Find text box, the arrow buttons (and the select all button) will only activate tracks whose Track ID contains the string in the Find text box. This allows you to quickly find the tracks you're looking for without filtering the entire list.
The features list
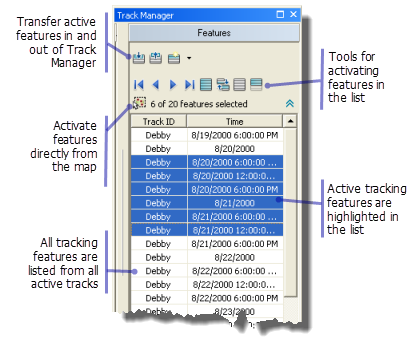
The features list displays all the individual tracking features for the current set of active tracks. If no tracks are active, then no features are listed. If one track is active, then all the features for that track are listed, and you can use the arrow buttons to step through the features one-by-one and observe their attributes. This provides analytical functionality similar to the Step tool, but with more power. The features list allows you to view features from multiple tracks at once, and rather than sorting the features by time, you can sort them by other fields depending on the type of analysis you need.

As with tracks, features must be activated before you can perform operations on them. Features can be activated by clicking on them in the features list, using the arrow buttons, using the arrow keys on your keyboard, or by using the Grab Tracking Features From Map tool. As with tracks, SHIFT and CTRL keyboard shortcuts are provided for more advanced activation.
Learn more about transferring selection sets in and out of Track ManagerPerforming operations on active tracks and features
Rows of buttons are provided in Track Manager that allow you to perform operations on the current set of active tracks and features. Some of these buttons perform a simple one-time function. For example, you can click a button to zoom to the extent of all currently active tracks, or you can click a button to purge the currently active set of tracking features. Other operations remain turned on and continue to be applied to the current set of active tracks or features, even as the set changes. These are referred to as modes.

Learn more about Track Manager modes
Because many Tracking Analyst applications involve large amounts of data, Track Manager also provides tools for data reduction at the track level.
Viewing track and feature information
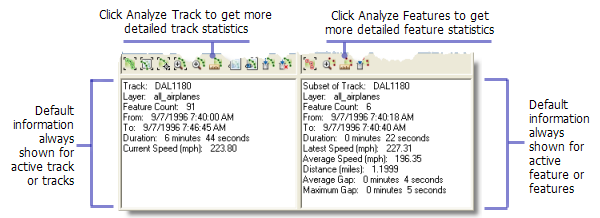
Track Manager provides two information panels for viewing detailed track and feature information in a text format. When a single track is activated, detailed information about the track is automatically calculated and provided in the Track Information panel. This is useful because it allows you to iterate through your tracks one-by-one and quickly identify and analyze them based on this information. If two or more tracks are activated, summary information about the group of tracks is provided.
In a similar way, detailed information is provided in the Feature Information panel when a single feature is selected. For features, a complete listing of their attributes is provided, as well as autocalculated statistics such as speed, course, and distance from the previous feature. This makes it easy to iterate through the features in a track and observe how key attributes and statistics are changing.

More advanced statistics can be displayed in each of the panels (for the set of active tracks or set of selected features) by using the Analyze Track and Analyze Features buttons. The Analyze Track button will generate a more comprehensive set of statistics for all active tracks. The Analyze Features button calculates statistics at a subtrack level for the portions of tracks spanned by the active features.