Available with Standard or Advanced license.
To create a mosaic dataset that can take advantage of the Viewpoint mosaicking method, you need to have multiple raster datasets that overlap a particular area of interest, taken at multiple points of view. In this case, there are eight overlapping raster datasets in the area of interest.
This exercise does not rely on any previous exercises.
Start ArcMap
- Start ArcMap.
- Click Cancel on the ArcMap - Getting Started window.
This window may not open if you've previously opted not to show it.
Create a file geodatabase
If you have already created the ImageGDB in another exercise, you can skip this section of steps.
- Click the Catalog button
 on the Standard toolbar.
This opens the Catalog window.
- In the Location text box, type C:\arcgis\ArcTutor\Raster and press ENTER.
This location is added to the Catalog tree under the Folders Connection heading.
If your tutorial data was installed in a different location, alter the path according to your installation location.
- Right-click the Raster folder and click New > Folder.
- Name the folder Exercises.
- Right-click the Exercises folder and click New > File Geodatabase.
- Rename the new file geodatabase ImageGDB.
Set the default geodatabase
Each map document has a default geodatabase, which is the home location for the spatial content of your map. This location is used for adding datasets and saving resulting datasets created by various editing and geoprocessing operations.
- Right-click the ImageGDB geodatabase in the Catalog window and click Make Default Geodatabase.
Create a new mosaic dataset
- Right-click the ImageGDB in the Catalog window, point to New, then click Mosaic Dataset.
This opens the Create Mosaic Dataset tool.
- Type Viewpoint for the Mosaic Dataset Name.
- Click the Coordinate System browse button
 .
.
- Expand Projected Coordinate Systems > National Grids > Germany, select Germany Zone 4.prj, and click OK.
- Click OK on the Create Mosaic Dataset tool window.
The progress bar displays the status of the running tool.
Once the process is complete, a pop-up message will appear.
The Viewpoint mosaic dataset is created in the geodatabase and added to the ArcMap table of contents. This is an empty mosaic dataset. You will be adding raster datasets to it in the next steps.
When the mosaic dataset is added to the table of contents, it is added as a group layer. The top level has the name of the mosaic dataset—Viewpoint. There are also empty Boundary, Footprint, and Image layers.
Add rasters to the mosaic dataset
- Click the Catalog tab to expand the window.
- Click the Default Geodatabase button
 and make sure the geodatabase is expanded so you can see the contents.
- Navigate to C:\arcgis\ArcTutor\Raster\Data.
- Drag the Amberg_tif folder onto the Viewpoint mosaic dataset.
This opens the Add Rasters To Mosaic Dataset tool dialog box.
- Verify that the Raster Type list shows Raster Dataset.
- Verify that the Input shows Workspace and the Source lists the path to the folder you just dropped onto the mosaic dataset (C:\arcgis\ArcTutor\Raster\Data\Amberg_tif).
- Check Update Overviews.
- Click OK to run the tool.
While the tool is running the mosaic dataset cannot be edited; therefore, lock symbols appear over its layers in the table of contents.
The progress bar displays the status of the running tool. Once the process is complete, a pop-up message will appear.
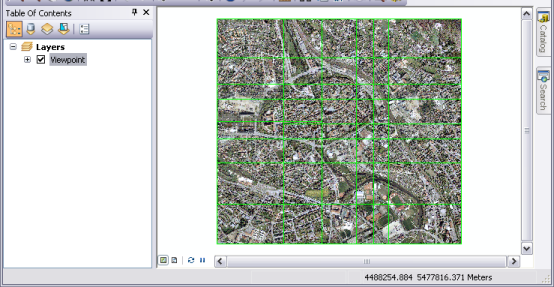
The raster datasets are added to the mosaic dataset. The footprints are created for each raster dataset, and the boundary is generated for the entire mosaic dataset. The overviews are then generated for the entire mosaic dataset.
- You may need to click the Full Extent button
 to view the mosaic dataset.
Set the mosaic methods
- Right-click the mosaic dataset in the table of contents and click Remove.
When editing default properties, such as the mosaic methods, the properties are not automatically updated for the mosaic dataset that is displayed. Therefore, you've removed it and will add it to the display after the properties have been modified.
- In the Catalog window, right-click the Viewpoint mosaic dataset and click Properties.
- Click the Defaults tab.
- Click the Allowed Mosaic Methods ellipse button
 .
.
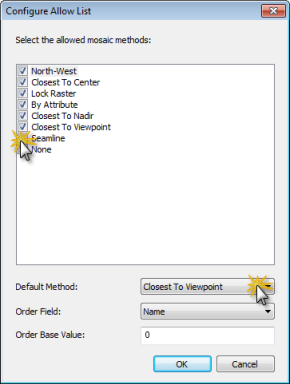
This opens the Configure Allow List dialog box.
- Uncheck Seamline.
- Verify that Closest To Viewpoint is checked.
This is the mosaic method that will be used to view the multiple viewpoints in your mosaic dataset.
- Click the Default Method drop-down arrow and click Closest To Viewpoint.
By setting this as the default, the user of the mosaic dataset does not have to change the properties so they can use the Closest To Viewpoint mosaic method.
- Click OK to close the Configure Allow List.
- Click OK to close the Mosaic Dataset Properties dialog box.
- Drag and drop the Viewpoint mosaic dataset from the Catalog window into the display.
Add the Viewpoint tool
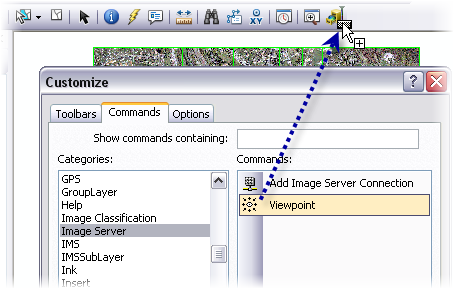
- Click Customize on the main menu and click Customize Mode.
- Click the Commands tab.
- Scroll through the Categories list and click Image Server.
- Drag the Viewpoint button and drop it onto a toolbar.
- Click Close on the Customize dialog box.
Explore the different view points
- Click the Viewpoint button
 you added.
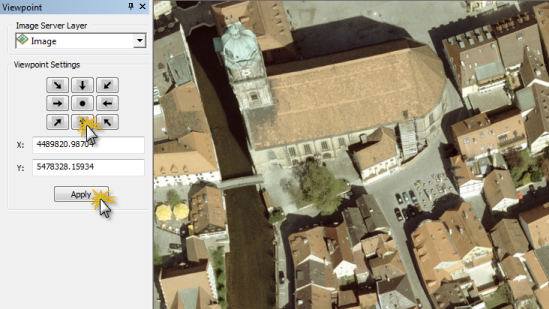
This opens the dockable Viewpoint window. You can move this window around your display to an appropriate location.
- Zoom in to an area in the mosaicked image that appears to have lots of overlapping raster datasets. You will need to zoom in to a scale of approximately 1:1100.
- Click one of the arrow buttons on the Viewpoint window and click Apply.
- Continue clicking the arrow buttons and Apply to see the different viewpoints.
You may want to pan around the image to test this functionality in different areas using different overlapping images.
This building is near the center of the image. In this example you can view both long sides of this building.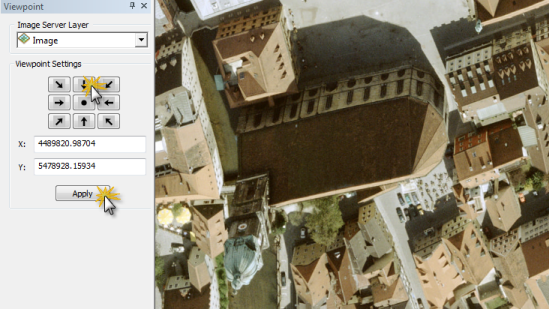
You have now learned how to create a mosaic dataset to use the Closest To Viewpoint mosaic method and how to modify the properties of a mosaic dataset to use the Closest To Viewpoint mosaic method. You have also learned how to access the Viewpoint window.