Available with Network Analyst license.
In this exercise, you will find the quickest route to visit a set of stops in a predetermined order.
Preparing your display
- If you have Exercise03.mxd open in ArcMap, skip to step 6.
- Start ArcMap.
- On the ArcMap - Getting Started dialog box, click Existing Maps > Browse for more.
The Open ArcMap Document dialog box appears.
- Browse to C:\ArcGIS\ArcTutor\Network Analyst\Tutorial.
This is the default installation location for the tutorial data.
- Double-click Exercise03.mxd.
The map document opens in ArcMap.
- Enable the ArcGIS Network Analyst extension.
- Click Customize > Extensions.
The Extensions dialog box opens.
- Check Network Analyst.
- Click Close.
- Click Customize > Extensions.
- Click Customize > Toolbars > Network Analyst.
The Network Analyst toolbar is added to ArcMap.

- On the Network Analyst toolbar, click the Network Analyst window button
 .
.
The dockable Network Analyst window opens.

If the Network Analyst toolbar is not displayed, you need to add it.
If the Network Analyst window is not displayed, you need to add it.
You can dock or undock the Network Analyst window.
Creating a route analysis layer
- Click Network Analyst on the Network Analyst toolbar and click New Route.

The route analysis layer is added to the Network Analyst window. The network analysis classes (Stops, Routes, Point Barriers, Line Barriers, and Polygon Barriers) are empty.
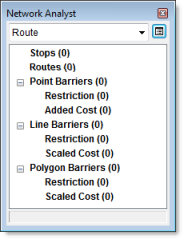
The analysis layer is also added to the Table Of Contents window.
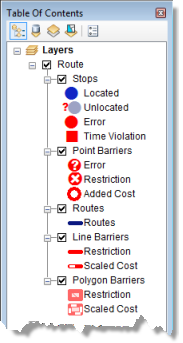
Adding a stop
Next, you will add the stops to be visited by a route.
- In the Network Analyst window, click Stops (0).
Stops is selected, which means it is the active network analysis class.
- On the Network Analyst toolbar, click the Create Network Location Tool
 .
.
By clicking on the map with the Create Network Location Tool, you can add network analysis objects to the active network analysis class.
- Click anywhere on the street network to define a new stop location.

Network Analyst calculates the nearest network location and symbolizes the stop with the Located symbol. The stop remains selected until another stop is placed or you clear the selection.
The located stop also displays the number 1. All stops have a unique number, which represents the order in which the stop will be visited by the route. Also notice that the Stops class in the Network Analyst window now lists one stop.

- Add two more stops anywhere on or near the streets.
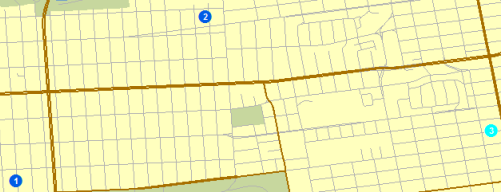
The new stops are numbered 2 and 3.
- To move a stop, follow these substeps:
- Click the Select/Move Network Locations Tool
 on the Network Analyst toolbar.
- Click a stop to select it.
- Click the stop again and drag it to a new location.

- Click the Select/Move Network Locations Tool
The first stop is treated as the origin, and the last as the destination. 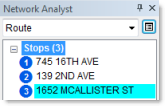
The sequence of the stops can be changed by clicking a stop in the Network Analyst window and dragging it to another position in the list.
If a stop is not located on the network, it appears with an unlocated symbol. (However, using the default settings, you would need to place a stop more than 5 kilometers from the nearest street segment for it to not locate.) 
You can move an unlocated stop closer to the network to locate it. If a stop is located on the network but in the wrong location, you can move the stop to the correct position.
Setting up the parameters for the analysis
Next, you will specify that your route will be calculated based on travel time (minutes), that U-turns are allowed anywhere, and that one-way and turn restrictions must be followed.
- Click the Analysis Layer Properties button on the Network Analyst window.

The Layer Properties dialog box opens.
- Click the Analysis Settings tab.
- Make sure that Impedance is set to TravelTime (Minutes).
- Check Use Start Time, enter a specific time and date or day of the week.
- For Time of Day, enter the time you want to leave the first stop.
- Click either Day of Week or Specific Date.
If you choose Day of Week, specify any day between Sunday and Saturday; optionally, choose Today to use your system's current day setting.
If you choose Specific Date, either type a date in the text box or click the down-arrow to open a calendar that allows you to choose a date.
- Leave Use Time Windows unchecked.
You can specify time windows for stops and have Network Analyst try to find a route that honors those time ranges in which a stop should be visited.
- Leave Reorder Stops To Find Optimal Route unchecked.
By leaving this property unchecked, Network Analyst discovers the best route given the stop sequence you specify. This is commonly known as the traveling salesman problem (TSP). If checked, it finds the best route and best sequence to visit the stops.
- Click the U-Turns at Junctions drop-down arrow and choose Allowed.
- Click the Output Shape Type drop-down arrow and choose True Shape with Measures.
- Make sure that the Use Hierarchy and Ignore Invalid Locations boxes are checked.
- In the Restrictions frame, make sure that RestrictedTurns and Oneway are checked.
- In the Directions frame, make sure that Distance Units is set to Miles, Use Time Attribute is checked, and the time attribute is set to TravelTime (Minutes).
- Click OK.
This network dataset has historical traffic data associated with the TravelTime (Minutes) attribute. If you choose to enter a start time by checking Use Start Time and filling out the three fields below it, Network Analyst will find the quickest route based on that time of day and historical traffic speeds. Alternatively, it will find the quickest route based on a function of street lengths and speed limits.
The Analysis Settings tab should look like the following graphic; however, your Use Start Time properties may be different: 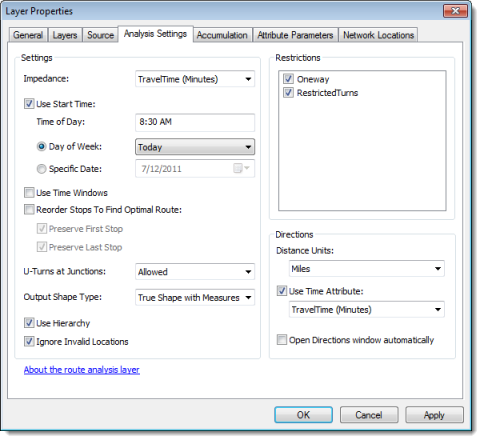
Computing the best route
- Click the Solve button
 on the Network Analyst toolbar.
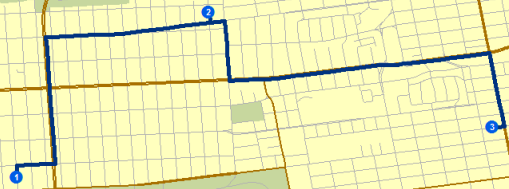
A route feature appears in the map display and in the Network Analyst window under the Routes class.
- Click the Directions Window button
 on the Network Analyst toolbar.
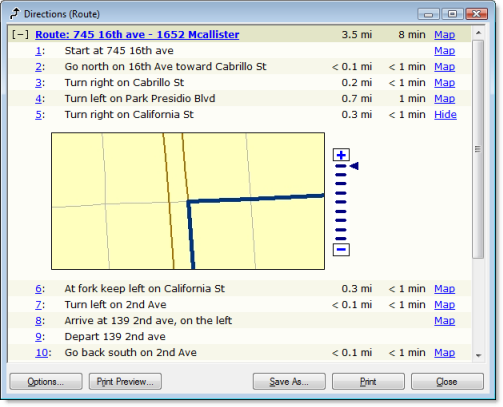
The Directions dialog box opens.
- On the rightmost column of the Directions dialog box, click one of the links named Map.
An inset map of the maneuver is displayed.
- Click Close.
 , which is on the Network Analyst toolbar.
Adding a barrier
In this section, you will add a barrier on the route to represent a roadblock, and you will find an alternate route to your destination.
- Click Windows > Magnifier.
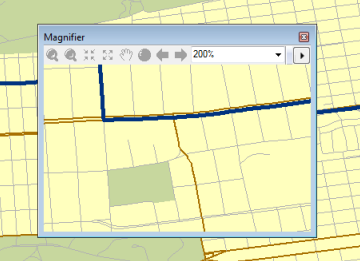
The Magnifier window opens.
- Click the title bar of the Magnifier window and drag the window to reposition it over the route.
- In the Network Analyst window under Point Barriers (0), click Restriction (0) .
- Click the Create Network Location Tool
 on the Network Analyst toolbar.
- In the Magnifier window, click anywhere on the route to place one or more barriers.
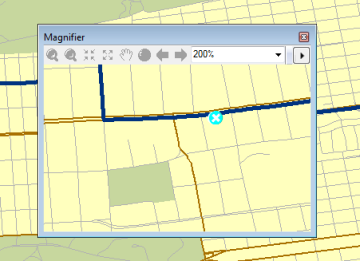
- Click the Solve button
 on the Network Analyst toolbar.
A new, alternative route is computed that avoids the barrier.
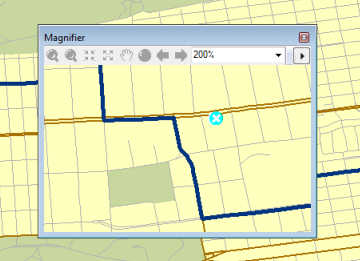
- Close the Magnifier window.
Saving the route
The route analysis layer is currently stored in memory, so if you exit ArcMap without saving, the analysis is lost. However, if you save the map document, the analysis layer is saved with it. You can also export data. One option is to export the entire analysis layer to an LYR file. The analysis properties and objects are stored within the LYR file. Another option is to save the sublayers of the analysis as feature classes using the Export Data command. The next set of steps show how to export the Routes sublayer to a feature class.
- On the Network Analyst window, right-click Routes (1) and click Export Data.
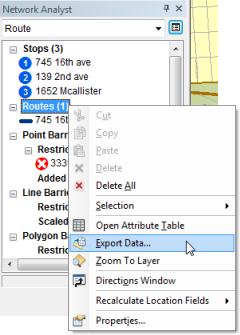
The Export Data dialog box opens.
- In the Output feature class text box, type or browse to a location to save the results in, such as C:\ArcGIS\ArcTutor\Network Analyst\Tutorial\SanFrancisco.gdb\Exercise3_Route.
- Click OK.
The route's feature is saved to the specified workspace.
- Click No when prompted to add the exported data to the map as a layer.
- If you don't plan to work on any other exercise, exit ArcMap. Click No to discard any changes.
- If you plan to work on another exercise, follow the substeps below.
- Click File > New.
The New Document dialog box opens.
- Click OK.
- Click No when prompted to save changes.
- Click File > New.