Available with Network Analyst license.
- Preparing your display
- Creating the vehicle routing problem analysis layer
- Adding orders
- Adding depots
- Adding Routes
- Setting up the properties for the vehicle routing problem analysis
- Run the process to determine the best route assignment and order sequence
- Determine turn-by-turn directions for the routes
- Make changes to the existing solution to solve a different scenario
- Deleting an existing route from a solution
- Adding route renewals
- Modifying routes to include overtime
- Adding breaks
- Determining the solution
- Adding route seed points
- Determine the solution
In this exercise, you will find the best routes for a fleet of vehicles, operated by a distribution company, to deliver goods from a distribution center to a set of 25 grocery stores. Each store has a specific quantity of demand for the goods, and each truck has a limited capacity for carrying the goods. The main objective is to assign trucks in the fleet a subset of the stores to service and to sequence the deliveries in a way that minimizes the overall transportation costs.
This can be achieved by solving a vehicle routing problem (VRP). Once the delivery sequence is determined, you will generate the turn-by-turn directions for the resulting routes, which can be electronically distributed or printed and given to the drivers to make the deliveries.
Preparing your display
- If you have Exercise07.mxd open in ArcMap, skip to step 6.
- Start ArcMap.
- On the ArcMap - Getting Started dialog box, click Existing Maps > Browse for more.
The Open ArcMap Document dialog box appears.
- Browse to C:\ArcGIS\ArcTutor\Network Analyst\Tutorial.
This is the default installation location for the tutorial data.
- Double-click Exercise07.mxd.
The map document opens in ArcMap.
- Enable the ArcGIS Network Analyst extension.
- Click Customize > Extensions.
The Extensions dialog box opens.
- Check Network Analyst.
- Click Close.
- Click Customize > Extensions.
- Click Customize > Toolbars > Network Analyst.
The Network Analyst toolbar is added to ArcMap.

- On the Network Analyst toolbar, click the Network Analyst window button
 .
.
The dockable Network Analyst window opens.

If the Network Analyst toolbar is not displayed, you need to add it.
If the Network Analyst window is not displayed, you need to add it.
You can dock or undock the Network Analyst window.
Creating the vehicle routing problem analysis layer
- Click Network Analyst on the Network Analyst toolbar and click New Vehicle Routing Problem.

The vehicle routing problem analysis layer is added to the Network Analyst window. The network analysis classes (Orders, Depots, Routes, Depot Visits, Breaks, Route Zones, Route Seed Points, Route Renewals, Specialties, Order Pairs, Point Barriers, Line Barriers, and Polygon Barriers) are empty.

The analysis layer is also added to the Table Of Contents window.

Adding orders
You will add the grocery store locations to the Orders network analysis class. You can think of orders as orders to be filled, since each grocery store has requested goods to be delivered to it from the distribution center. Members of the Orders class will eventually become stops along the vehicles' routes.
The grocery store locations are already added as a feature layer, Stores, in the map document. The attributes of Stores contain information about the total weight of goods (in pounds) required at each store, the time window during which the delivery has to be made, and the service time (in minutes) incurred while visiting a particular store. The service time is the time required to unload the goods.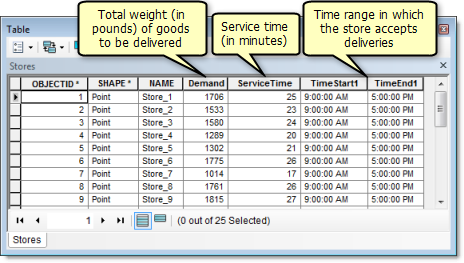
You will add these point features of stores as orders in the analysis layer.
- In the Network Analyst window, right-click Orders (0) and choose Load Locations.
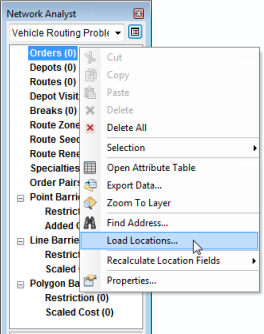
The Load Locations dialog box opens.
- Select Stores from the Load Locations drop-down list.
- In the Location Analysis Properties section, make sure that the Name property is automatically matched to the NAME field, and the ServiceTime property is matched to the ServiceTime field.
ArcGIS Network Analyst extension tries to match location analysis properties automatically for a newly created vehicle routing problem layer based on a configuration file (located in the ArcGIS installation directory within [...]\NetworkAnalyst\NetworkConfiguration\NASolverConfiguration.xml).
- Set the Field value of TimeWindowStart1 to TimeStart1.
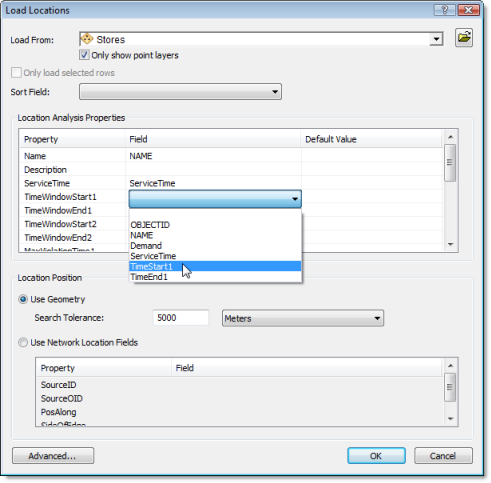
- Set the Field value of TimeWindowEnd1 to TimeEnd1.
- Set the Field value of DeliveryQuantities to Demand.
- Type 0 under Default Value for the MaxViolationTime1 property.
Setting this property to zero specifies that the time window should not be violated.
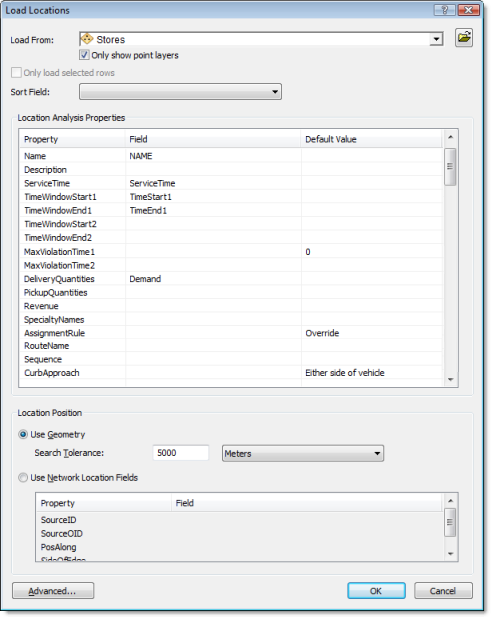
- Click OK.
Twenty-five stores are listed in the Network Analyst window under Orders and are displayed as orders on the map.
The Location Analysis Properties section on the Load Locations dialog box lets you specify which attributes of the Stores feature class contain the values that ArcGIS Network Analyst extension will use to help solve this vehicle routing problem.
Adding depots
The goods are delivered from a single distribution center whose location is shown in the DistributionCenter feature layer in ArcMap. The distribution center operates between 8:00 a.m. and 5:00 p.m. You will add this point feature to the Depots network analysis class.
- In the Network Analyst window, right-click Depots (0) and choose Load Locations.
The Load Locations dialog box opens.
- Select DistributionCenter from the Load Locations drop-down list.
- In the Location Analysis Properties section, make sure that the Name property is automatically matched to the NAME field.
- Type 8 AM under Default Value for the TimeWindowStart1 property.
- Type 5 PM under Default Value for the TimeWindowEnd1 property.
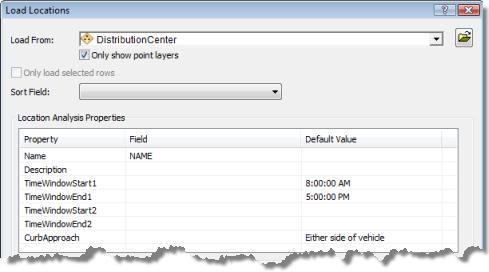
- Click OK.
One distribution center is listed in the Network Analyst window under Depots and displayed as a depot on the map.
Adding Routes
The distribution center has three trucks, each with a maximum capacity to carry 15,000 pounds of goods. You will add three routes (one for each vehicle) and set the properties for the routes based on the center's operational procedures.
- In the Network Analyst window, right-click Routes (0) and choose Add Item.
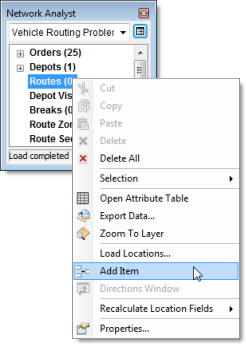
A new route, Item 1, is added under the Routes class in the Network Analyst window, and the Properties window for the route opens.
- In the Properties window, specify the attributes for the route as shown in the table below. The description column of the table explains the use of particular values. Leave default values for attributes not in the table.
Attribute Value Description Name
Truck_1
Name of the vehicle.
StartDepotName
San Francisco
The truck starts at the distribution center.
EndDepotName
San Francisco
The truck returns to the distribution center at the end of the route.
StartDepotServiceTime
60
Time (in this case, minutes) required to fully load the truck with goods.
EarliestStartTime
8 AM
The truck can start operation as soon as the distribution center opens at 8:00 a.m.
LatestStartTime
8 AM
The truck must start operation as soon as possible.
Capacities
15000
The truck can carry a maximum of 15,000 pounds of goods.
CostPerUnitTime
0.20
The truck driver is paid 12 dollars per hour, so the wage is: $12.00/60 minutes = $0.20 per minute.
CostPerUnitDistance
1.5
The average dollar amount spent per mile on fuel consumption, truck depreciation, and maintenance.
MaxOrderCount
10
The maximum number of stores that can be serviced by a truck.
MaxTotalTime
360
Due to workday constraints, drivers can't have a work shift of more than six hours (360 minutes).
MaxTotalTravelTime
120
To satisfy the workday constraints and still be able to serve a reasonable number of stores—while taking into account the service time needed at a store—the truck should not spend more than two hours (120 minutes) driving on the streets.
MaxTotalDistance
80
To balance daily fuel and maintenance costs among the fleet, any one truck should not travel more than 80 miles on its route.
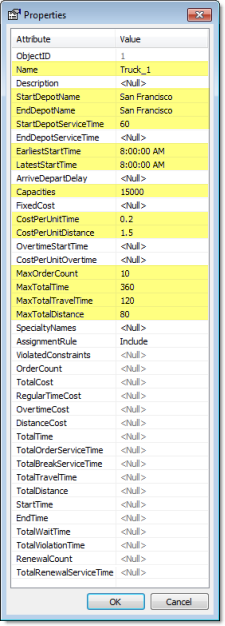
- Click OK.
A new route, Truck_1, is added to the routes class in the Network Analyst window.
- Right-click the Truck_1 route object in the Network Analyst window and choose Copy.
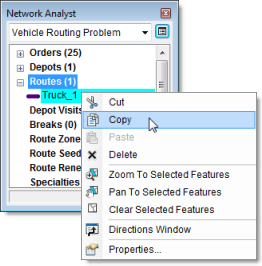
- Right-click the Route (1) class in the Network Analyst window and choose Paste.
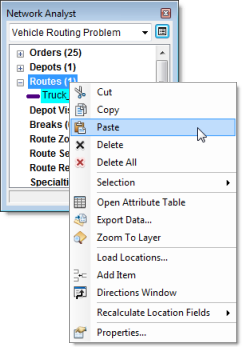
The Routes class contains two identical route objects.
- Repeat the previous step to create a third route object.
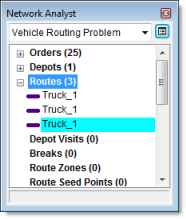
- Double-click the second Truck_1 object in the list.
The Properties window opens.
- Click the Name property and type Truck_2.
- Press ENTER twice.
The route is given a unique name, and the window closes.
- Use the same procedure to change the name of the last route to Truck_3.
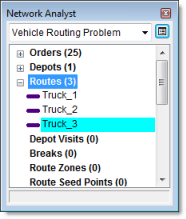
Since the three trucks at the distribution center are the same, you can make two copies of the first truck you entered and rename them.
Setting up the properties for the vehicle routing problem analysis
- Click the Analysis Layer Properties button on the Network Analyst window.

The Layer Properties dialog box opens.
- Click the Analysis Settings tab.
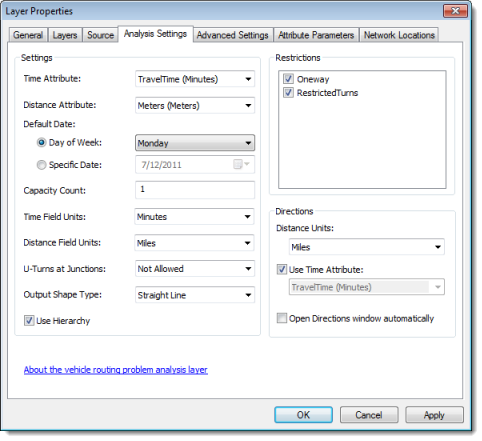
- Make sure that the Time Attribute drop-down list is set to TravelTime (Minutes).
The VRP solver will use this attribute to calculate time-based costs between orders and the depot.
- Click the Distance Attribute drop-down list and choose Meters.
This attribute is used to determine travel distances between orders and the depot for constraint purposes and creating directions; however, the VRP solver's objective is to minimize time costs.
- Set the Default Date to Day of Week. Choose Monday in the Day of Week drop-down list.
- Make sure that Capacity Count is set to 1.
This setting indicates that the goods being delivered have only one measurement. In this case, that measurement is weight (pounds). If the capacities were specified in terms of two measurements, such as weight and volume, then the capacity count would be set to 2.
- Make sure that Minutes is selected for Time Field Units.
This specifies that all time-based attributes, such as ServiceTime and MaxViolationTime1 for Orders and MaxTotalTime, MaxTotalTravelTime, and CostPerUnitTime for Route, are in minutes.
- Make sure that Distance Field Units is set to Miles.
This specifies that all distance-based attributes, such as MaxTotalDistance and CostPerUnitDistance for Routes, are in miles.
- Since it is difficult for these delivery trucks to make U-turns, set U-Turns at Junctions to Not Allowed.
- Select Straight Line in the Output Shape Type drop-down list.
You could select either the True Shape with Measures or True Shape option if you wanted the routes to follow the streets. Note that this option only affects the display of the routes, not the results determined by the VRP solver.
- Make sure that Use Hierarchy is checked.
- In the Restrictions frame, make sure that RestrictedTurns and Oneway are checked.
- Leave the options that are in the Directions frame set to their default values.
- Click OK.
Run the process to determine the best route assignment and order sequence
- Click the Solve button
 on the Network Analyst toolbar.
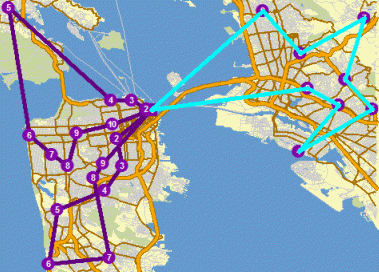
The VRP solver calculates the three routes required to service the orders and draws lines connecting the orders. Each route begins and ends at the distribution center and serves a set of orders along the way.
If you receive any error messages, make sure that the value of the Capacities attribute for the routes is set to 15000 instead of 15,000 and each route has a unique name.
Determine turn-by-turn directions for the routes
- Right-click Routes (3) in the Network Analyst window and click Selection > Clear Selected Features.
- Click the Directions Window button
 on the Network Analyst toolbar.
The Directions dialog box opens.
- Optionally, you can export the Vehicle Routing Problem layer as a layer file (<filename>.lyr) by right-clicking Vehicle Routing Problem in the Table Of Contents window and choosing Save As Layer File. This saves the analysis on disk so that you can add it to a different map document and reuse it later.
- If you want to continue on to the following advanced sections of this tutorial exercise, close the Directions window. Otherwise, exit ArcMap and do not save any changes to Exercise 07.mxd.
Make changes to the existing solution to solve a different scenario
The vehicle routing problem solution obtained earlier worked well for the company. After a few weeks, however, the driver assigned to Truck_2 went on vacation. So now the distribution company has to service the same stores but with just two trucks. To accommodate the extra workload, the company decided to pay overtime to the other two drivers and provide them with one paid break during the day. The distribution company also acquired two additional satellite distribution centers. These centers can be used by the trucks to renew their truckload while making their deliveries instead of returning to the main distribution center for renewal. You will modify the solution obtained from the previous step to accommodate these changes.
Deleting an existing route from a solution
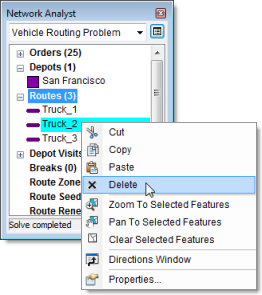
- In the Network Analyst window, right-click the Truck_2 object in the Routes class and click Delete.
Adding route renewals
The two satellite distribution centers that the company acquired are at 800 Brush Street and 100 Old County Road, and they can act as renewal locations for the trucks. The trucks can refill their cargo by visiting these renewal locations and thus save time by not returning to the starting depots. You will add the renewal locations to the Depots network analysis class by geocoding their addresses. The routes that can renew at a renewal location and the service time for the renewal are specified in the Route Renewals network analysis class.
- In the Network Analyst window, right-click Depots (1) and choose Find Address.
The Find dialog box opens.
- Choose SanFranciscoLocator from the Choose a locator drop-down list.
- In the Full Address box, type 800 Brush St.
- Click Find.
The SanFranciscoLocator, which is an address locator that was already added to the Exercise07.mxd, finds the address and shows the result at the bottom of the Find dialog box.
- Right-click the result on the Find dialog box and choose Add as Network Analysis Object.
The located address is added as a depot in the Network Analyst window and the map display.
- In the Full Address box of the Find dialog box, type 100 Old County Rd.
- Click Find.
- Right-click the new result at the bottom of the Find dialog box and choose Add as Network Analysis Object.
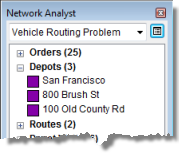
A third depot is added to the Depots network analysis class.
- Close the Find dialog box.
- In the Network Analyst window, right-click Route Renewals (0) and click Add Item.
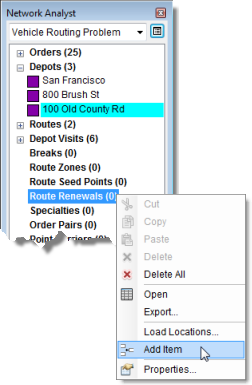
A new route renewal object, Item1, is added under the Route Renewals class in the Network Analyst window, and the Properties window for Item1 opens.
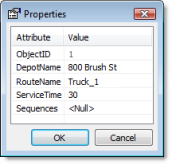
- In the Properties window, specify the attributes for the route renewal as shown below.
Attribute Value Description DepotName
800 Brush St
The truck can use this depot location for renewal.
RouteName
Truck_1
Name of the vehicle.
ServiceTime
30
Time in minutes required to load the truck.
- Click OK.
A new route renewal object, 800 Brush St, is listed within the Truck_1 item in the Network Analyst window.
- Follow the last three steps to add three more route renewal objects such that each truck (Truck_1 and Truck_3) can reload at both the renewal locations (800 Brush St, 100 Old County Rd).
The Network Analyst window should now have two route renewal objects listed within the Truck_1 and Truck_3 items, respectively.
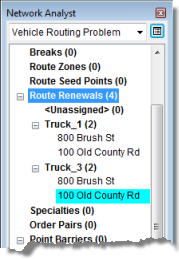
Since both trucks are allowed to renew their loads at the 800 Brush Street and 100 Old County Road locations, you will associate each truck with the two renewal locations. The VRP solver will figure out the best renewal location for the trucks, if and when they need to reload.
Modifying routes to include overtime
To accommodate the extra workload, the company wants to remove the maximum time, maximum travel time, and maximum distance constraints for the routes. Since the drivers have to work longer than before, they are provided with overtime pay at the rate of $18 per hour after completing six hours of work. In this step, you will make these changes to the routes.
- In the Network Analyst window, under the Routes network analysis class, double-click Truck_1.
The Properties window opens.
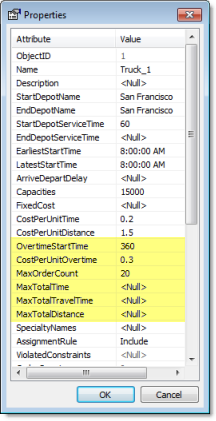
- Make changes to the attributes of Truck_1 so they match the values in the table below.
Attribute Value Description OvertimeStartTime
360
The driver is paid overtime if he or she works for more than six hours (360 minutes).
CostPerUnitOvertime
0.3
The truck driver is paid $18 per hour for the overtime. So the wage in dollars per minute is: $18.00/60 minutes = $0.30 per minute.
MaxOrderCount
20
Since the driver is paid overtime, he or she is expected to service more stores.
MaxTotalTime
<Null>
There are no restrictions on the total duration of the work shift for the driver.
MaxTotalTravelTime
<Null>
There are no restrictions on the time spent driving on the streets.
MaxTotalDistance
<Null>
There are no restrictions on the total distance traveled by a truck.
- Click OK.
- Repeat the last three steps for Truck_3.
Adding breaks
Since the drivers have to work longer, they will require one half hour break during their work shift. In this step, you will specify the breaks for each route.
- In the Network Analyst window, right-click Breaks (0) and choose Add Item.
The Properties window opens.
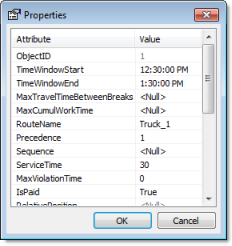
- Specify the attribute values for the new break as shown in the table below.
Attribute Value Description TimeWindowStart
12:30 PM
The break has to start sometime after 12:30 p.m.
TimeWindowEnd
1:30 PM
The break has to start sometime before 1:30 p.m.
RouteName
Truck_1
The name of the route to which this break applies.
ServiceTime
30
The break duration in minutes.
MaxViolationTime
0
The break has to start between 12:30 p.m. and 1:30 p.m. The zero value indicates that the break can't start after 1:30 p.m. (that is, the break time-window is rigid).
IsPaid
True
It is a paid break, so the cost is included in the total cost of the route.
- Click OK.
- Repeat the last three steps, entering Truck_3 for the RouteName property.
The Network Analyst window now has two objects listed under the Breaks class: Truck_1 and Truck_3.
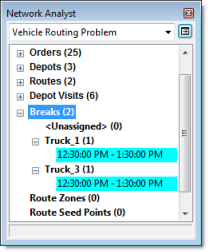
Determining the solution
- Click the Solve button
 on the Network Analyst toolbar.
The VRP solver calculates the two routes that can be used to service the orders and draws straight lines connecting the orders. Each route begins and ends at the distribution center, serves a set of orders along the way, visits a renewal location to load the truck again, continues to service the remaining orders, and finally returns to the distribution center.
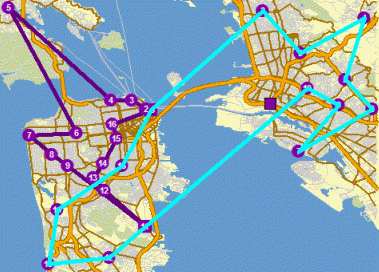
This solution meets all the constraints specified by the distribution company. However, after giving the route itinerary to the two drivers, the company discovered that the driver of Truck_1 prefers driving in the San Francisco area and the driver of Truck_3 prefers driving in the East Bay area. The company would like to determine a new solution in which the routes tend to service the orders that are in the areas their drivers prefer. In the next steps, you will add route seed points to incorporate these driver preferences.
Adding route seed points
In this step, you will add route seed points for Truck_1 and Truck_3 by geocoding addresses. Note that the route seed points can also be imported from an existing point feature class or can be created interactively by using the Create Network Location tool  .
.
- In the Network Analyst window, right-click Route Seed Points (0) and choose Find Address.
The Find dialog box opens.
- In the Full Address text box, type 3000 Vicente Ave.
- Click Find.
The SanFranciscoLocator finds the address and shows the result at the bottom of the dialog box.
- Right-click the result and choose Add as Network Analysis Object.
The location of the address is added as a route seed point. It is shown in the Network Analyst window and the map display.
- Close the Find dialog box.
- In the Network Analyst window, double-click the new route seed point, 3000 Vicente Ave.
The Properties dialog box opens.
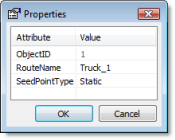
- Specify the attribute values for the route seed point as shown in the table below.
Attribute Value Description RouteName
Truck_1
The name of the route to which this seed point applies.
SeedPointType
Static
This makes it more likely that the orders near the specified seed point will be assigned to Truck_1.
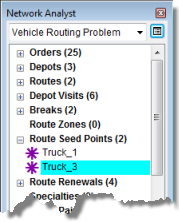
- Repeat steps 1–5 in this section to add another route seed point at 2500 McGee Ave.
- Repeat steps 6 and 7 to change the RouteName attribute of the second seed point to Truck_3.
Determine the solution
- Click the Solve button
 on the Network Analyst toolbar.
The VRP solver calculates the two routes that can be used to service the orders and draws straight lines connecting the orders. The route for Truck_1 includes orders in San Francisco only, and Truck_3 visits all the orders in the East Bay area, as well as a few in other parts of the city.
- Exit ArcMap without saving any changes.