Using annotation is one option in ArcGIS for storing text to place on your maps. Annotation can be used to describe particular features or add general information to the map. With annotation, the position, text string, and display properties are all stored together and are all individually editable. Annotation provides flexibility in the appearance and placement of your text because you can select individual pieces of text and edit them.
When you are working with geodatabase annotation—that is, an annotation feature class stored in a geodatabase—you can use the ArcMap editing environment within an edit session to create and edit annotation features.
Before you can create annotation features using these tools in ArcMap, you need to create an annotation feature class in your geodatabase. Once you have an annotation feature class, some of the tasks you can complete include creating annotation features using various construction methods and modifying where your annotation is placed and how it looks. In addition, you can use keyboard shortcuts to make editing annotation features quicker and more efficient.
Annotation stored in a map document is edited in ArcMap, but an edit session is not required and you will use a different set of tools—those on the Draw toolbar. The tools on the Editor toolbar cannot be used with map document annotation.
Creating new annotation
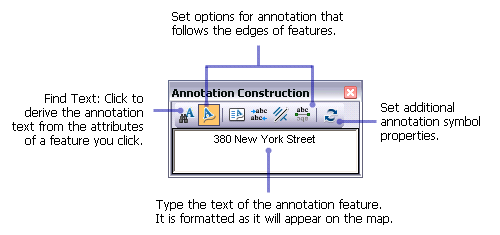
The Create Features window and the Editor toolbar provide the tools you need to create new annotation features. The Create Features window allows you to choose the construction method for your new annotation—horizontal, curved, leader line, and so on. Once you choose the tool to use, the Annotation Construction window appears, so you can enter the text of the new annotation, control how the text is placed, and override the default annotation properties as defined by the feature template. The text is shown in the Annotation Construction window with the same formatting and sizing as the new feature will have when it is placed on the map (the reference scale is not used in the window).

The default construction tool is one of the properties of a feature template. When you choose a template on the Create Features window, the default construction tool is activated. For example, if you are creating annotation that identifies the names of roads or rivers, you might want to make the default construction tool be the Follow Feature Annotation tool, which is used to create annotation that follows along the shapes of polygons or lines. To set the properties of a feature template, double-click it in the Create Features window.
When you are creating annotation, you can change the symbol properties for the annotation. If you find that you are making many changes to the symbology, you should consider using or creating a new symbol rather than modifying the symbol extensively.
Editing annotation
You can use the editing tools in ArcMap to edit both standard annotation and feature-linked annotation. Some of the editing tasks you can complete include resizing, moving, rotating, and applying various follow feature options to your annotation.
You can use the editing tools, including the Edit Annotation tool, to change how your annotation looks. You modify annotation appearance with the Edit Annotation tool and the Attributes window. You can select an annotation feature and right-click it with the Edit Annotation tool to access a menu containing many annotation editing functions.
Shortcuts you can use when constructing annotation
The following keyboard shortcuts are available when constructing annotation:
| Keyboard shortcut | Editing function |
|---|---|
E | Toggle between construction, Edit, and Edit Annotation tools. |
F6 | Absolute x,y. |
A | Activate the Text box on the Annotation Construction window, so you can change the text for constructing new annotation. |
CTRL+W | Find Text: Populate the text box on the Annotation Construction window with a string based on the label expression of the layer containing the topmost visible feature at the pointer's location. With feature-linked annotation, the text is derived only from a feature in the origin feature class. If there are multiple features underneath the pointer, press the N key to cycle through the possible text strings. |
O | Open Follow Feature Options dialog box when creating new annotation in follow feature mode. |
L | Flip selected annotation features 180 degrees when creating new annotation in follow feature mode. |
P | Toggle annotation placement angle between parallel and perpendicular when creating new annotation in follow feature mode. |
TAB | Toggle annotation placement between left side and right side when creating new annotation in follow feature mode. |
Shortcuts you can use when editing annotation
The following keyboard shortcuts are available when you are editing annotation:
| Keyboard shortcut | Editing function |
|---|---|
CTRL | Move the selection anchor. |
SHIFT | Add to/Remove from the selection. |
N | Select next annotation. |
R | Enter/Exit rotate mode. |
F | Enter/Exit follow feature mode. |
L | Flip annotation. |
O | Set follow feature options. |
P | Toggle annotation placement angle between parallel and perpendicular when in follow feature mode. |
TAB | Switch to the other side of line while in follow feature mode. |
E | Toggle between construction, Edit, and Edit Annotation tools. |