The Block Adjustment window provides an interface for editing control points and performing quality control for the block adjustment computation. It allows you to edit tie points and ground control points (GCP) and provides access to the image block adjustment geoprocessing tools.
The minimum required inputs for the window are a mosaic dataset and the associated control point table. Other optional inputs include the solution table, solution point table, overlap polygon, and point coverage table, which are useful for identifying areas that need control points or finding and removing bad control points.
Access the Block Adjustment window
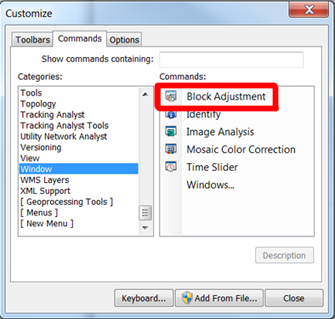
The Block Adjustment window is not shown in ArcMap by default. You will need to add the button to a toolbar so you can access it when you need it.
- Click the Customize menu and click Customize Mode.
- Click the Commands tab.
- Scroll to the bottom of the Categories list and choose Windows.
- Under Commands, drag the Block Adjustment icon to any toolbar. Click Close to dismiss the Customize window.
- Click the Block Adjustment icon
 to open the Block Adjustment window.
Block Adjustment user interface
The Block Adjustment window is composed of many parts: the Images, Overlaps, and Control Points tables; the geographic tiles of each of the highlighted controls points; and a set of tools on a toolbar.
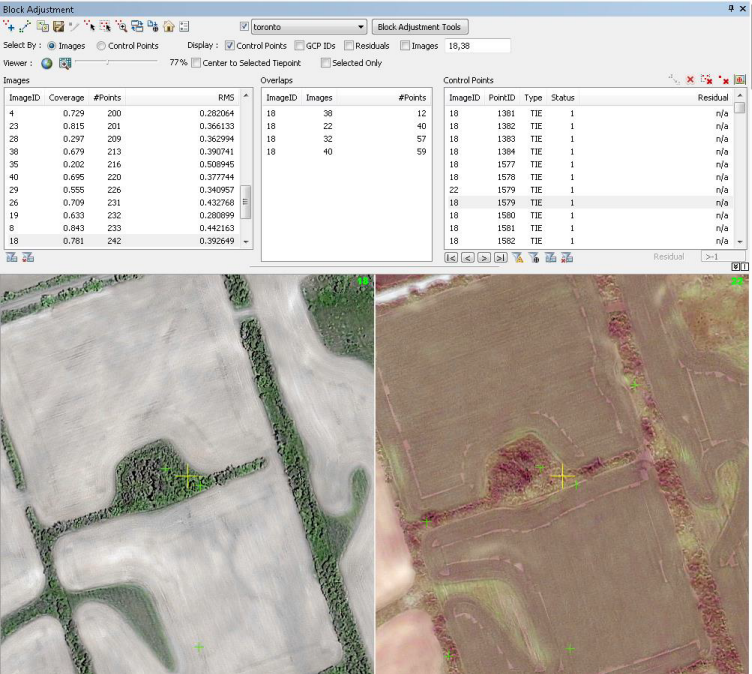
The Images table shows the adjustment information per image. When you select an image, the Overlaps table lists the overlap combinations that exist for the selected image. When you choose an overlap scenario, the bottom part of the window will populate with the images that overlap. The Control Points table lists all the control points that exist for the Image ID that was highlighted.
The many tools within the Block Adjustment window are described below.
| Icon | Label | Description |
|---|---|---|
 | Add | Start a new point set, which will have a new point ID. Clicking a point from the image viewer adds a tie point. Clicking a point from map adds a ground control point. |
 | Auto add | Automatically computes tie points, and adds them to the Control Points table. |
 | Edit | Move a control point from one place to another. |
 | Save | Save the edits to the Control Points table. |
 | Stop editing | Stop the editing session. |
 | Select | Select a set of control points by clicking any point within the set. |
 | Select by graphic | Select control points by drawing a polygon on the map. |
 | Zoom to point | Select the overlapped images based on the point on the map. It zooms and centers the map for each image in the image viewer. |
 | Link viewer to map | Switch between linking or unlinking the map and the image viewer. |
 | Load GCP Table | Load GCP points from a table or a text file. |
 | Reset | Reset the Block Adjustment window. |
 | Options | Bring up the window to set the default settings for the Block Adjustment window. |
 | Layer list | Choose the current mosaic dataset to use in the Block Adjustment window. The check box changes the mosaic dataset's image on the display to on or off. |
 | Block adjustment tools | Click to open a block adjustment geoprocessing tool. |
 | Display Control Points | Display the ground control points, tie points, and check points that are used within the map. |
 | Display GCP IDs | Label the ground control points with the appropriate Point ID. |
 | Display Residuals | Display the residual vectors on the map. These arrows can be adjusted by using the scale factor. The size of the arrow will be |
 | Display Images | Display the images that are used within the map. |
 | Full Extent | Display the images at full extent within the view windows. |
 | Zoom to resolution | Zoom to the image resolution for each image in the image viewer. |
 | Set display scale | Use the scale bar to set the display scale for images in the viewer. |
 | Center to Selected TiePoint | Center the map on the selected tie point. |
 | Selected Only | Display the ground control points, tie points, and check points in the viewers. |
 | Solution Point | Display the solution points in the viewers. |
 | Disable selected points | Points that are disabled will not be used in the adjustment computation, and will have a status of 0. |
 | Delete All | Delete all the points within the Control Point window. |
 | Delete Point Set | Delete all the points with the same point ID as the selected point. |
 | Delete Selected Point | Delete the selected point. |
 | Show Chip | Show the thumbnail of the selected GCP. This will only display if an image chip is available. |
 | Toggle Blunders | Show only the blunders in the Control Point window. |
 | Toggle GCPs | Show only the GCPs in the Control Point window. |
 | Select ground control points by query | Select control points based on a user-defined query. |
 | Clear selected ground control points | Clear selected control points. |
 | Set a minimum residual value | Filter control points based on their residuals. A value of -1 returns all points. |
Block Adjustment options
The Options window allows you to set default settings for your block adjustment workflow. There are several sections within the Options window.
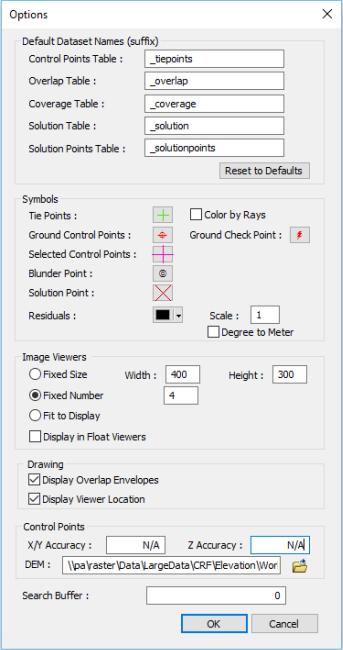
The Default Dataset Names section allows the system to automatically reorganize these tables if they are in the same geodatabase as the mosaic dataset and have the suffixes specified in the defaults. You can also set the paths to the datasets if they have different names or are in different tables. These settings are stored in the registry keys, which won't change unless you click the Reset button.
The Symbols section allows you to customize the display symbols for tie points, ground control points, and selected control points. The Color by Rays check box will color code the tie points based on the number of rays within the tie point set.
Color of rays based on the count
| Number of rays | Color |
|---|---|
2 | Green |
3 | Blue |
4 | Pink |
5 | Yellow |
6 | Cyan |
More than 7 | Dark red |
The Image Viewers section allows you to customize the image viewers using a fixed size, fixed number, or fit to display. Choose which option to use when displaying your image viewers:
- Fixed Size—Choose this option if you want to display the image viewers in width and height.
- Fixed Number—Choose this option to define the number of image viewers that will be used.
- Fit to Display—Choose this option to display all image viewers. This is the default.
- Display in Float Viewers—Choose this option to show the image viewers as stand-alone windows. You can position and resize the windows.
The Display Overlap Envelopes check box allows you to show the overlapping polygons in the map view, where the polygons are rendered with different colors and sizes of outlines to denote the number of images in the overlapping polygon.
The Control Points section allows you to specify the x,y and z accuracy and also allows you to specify a DEM. When you manually add your own GCPs to the block adjustment process, you should specify the horizontal and vertical accuracy, using the X/Y Accuracy and Z Accuracy parameters, respectively. To make your manually created GCPs even more accurate, you should also specify a DEM dataset for your project area.
Setting the Search Buffer will help find the images for your GCPs. This is especially needed when your images are initially inaccurate, where the GCPs do not overlap with the correct images. The unit for the Search Buffer is in the units as the mosaic dataset.
Use the Block Adjustment window
The following is an overview of steps for using the Block Adjustment window.
- Open the Block Adjustment window and set it up.
- Enter the GCPs.
- Edit the control points.
- Add tie points.
- Save your control points.
Set up the Block Adjustment window
To start this workflow, you need to set up your block adjustment environment.
- Add the mosaic dataset to ArcMap.
- Click the Block Adjustment icon
 to open the Block Adjustment window. You can dock the window on
the right side of ArcMap or drag the window to another monitor
if you have dual monitors.
 - Select the mosaic dataset in the combo box.
If a tie point has not been computed, you will be prompted to compute. Click OK to close the dialog box, and use the Compute Tie Points tool from the Block Adjustment Tools drop-down box.
- Optionally, if you need to specify custom suffix names, do the following.
- Click Options.
The default suffix names are _tiepoints, _overlap, _coverage, _solution, _solutionpoints, and _DEM.
- You can modify the default suffixes or set the paths to your data.
- Click OK to accept the changes made to the Options window.
- Click Options.
Enter GCPs
'There are three ways to add GCPs to the control point table, depending on the type of ground control information you have:
- Georeferenced layers or maps as a ground control reference
- A ground control point table or text file
- Georeferenced image chips or an image as a ground control reference
If you have georeferenced layers or maps as a ground control reference, use the following steps:
- Add the georeferenced layers to ArcMap.
- Make sure you have defined the DEM in the block adjustment Options window for your study area.
- On
the map, pan and zoom to find the location where you can enter
a control point and click Zoom to point
 to center your map and image viewers to the
point.
 - Optionally click Link viewer to map
 to link the map with image viewers so you can navigate
the map and image viewers at the same time.
 - Click Add
 to start a new point set.
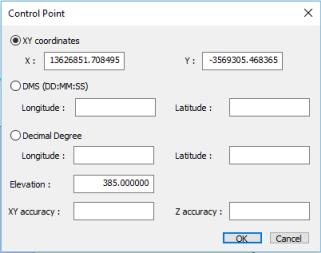
 - Right-click the map at the GCP location. The Control Point window opens with the coordinates of the GCPs.
- Here, you can enter the x,y accuracy and z accuracy, if you have that information available.
- Press the E key to end the point set.
- Repeat the previous two steps to enter additional points.
- Click the Save button
 to save the edits.
 to only display GCPs that are within the map display.
 If you have a ground control point table, use the following steps:
- Click the Load GCP button
 to open the Load GCPs window.
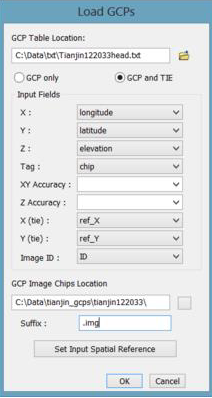
- Set the file path where the GCP table is stored.
- Define the input fields.
- Once the GCPs are loaded, click Select by Control Points and click the Toggle GCPs button
 to select all the imported GCPs. Click each GCP, and then enter the image point of each GCP from the Image viewer using the Add button
  .
. - Optionally, press the E key to end this point set.
- Click the Save button
 to save your edits.
If you have georeferenced image chips or an image as a ground control reference, use the following steps:
- Use the Compute Control Points tool to compute GCPs from the referenced image.
- If you have a collection of image chips instead of one image, create a mosaic dataset from these images. Use the mosaic as a reference to compute GCPs.
- Merge the result to the control point table using the Append Control Points tool.
Enter check points
Check points are similar to GCPs, which depict a known location onto the image, but are used in examining the adjustment accuracy.
You can enter check points the same way you enter GCPs, and then change the type to be a check point.
- In the Control Points table, choose the row that you want to change from type GCP (to a check point).
- Right-click and choose Change Type.
The type changes to CHK (check point).
Edit control points
Some tie points used in the block adjustment might have large residual and RMS values. You can use the Block Adjustment window to examine and find high error points. You can then edit or delete them. There are a few ways to navigate to those potential points to edit:
- Select by control points.
- Sort by images.
- Select a point from map.
- Select spatially.
- Select by attribute.
You can select the control points you want to edit.
- Click the Select Points button
 to select control points.
 - Click the Residual column to sort by descending values; points that have a larger residual appear at the top of the table.
- Click each point set you want to examine. A point set is a set of points that all have the same PointID.
- Examine the points in the
point ID.
If a point needs to be moved—Click the Edit button
 and click the new location of the point. Optionally,
you can use the number keys
(4, 6, 2, 8) to fine-tune the location of the cursor.
- If a point needs to be deleted—Click the Delete button
 and click the point to delete.
 - If a point set needs to be deleted—Click the Delete button
 and click a point within the point set while pressing the Shift key. Alternatively, right-click the row in the Control Points table and access the context menu to delete a point or a point set.
You can select control points by sorting by images.
- Click the option to sort by images.
- Click the RMS column to sort by descending values; points that have a larger residual appear at the top of the table.
- Click an image that has a large RMS value.
The Overlaps list box displays the combination of the images that overlap with the image you just chose.
- Click a row.
The overlapped images are displayed in the image viewers and the corresponding control points are displayed in the Control Points list box.
- Click the control point to examine the accuracy.
- Edit or delete the control points that will produce large residuals by clicking the Delete button
 .
.
You can select control points by selecting a point from a map.
- Click the Select button
 and click a control point
in the map display.
- Click the
Zoom to point button
 and click the map display.
The overlapped images are selected, based on the point where you clicked the map. It zooms and centers the map for each of the images in the image viewers.
- Click the Query button
 , which is located above the Control Points list box.
 - To remove the results from the query, click the Reset button
 .
.
Remove the blunders from the Control Points table.
-
Click the Select blunder points button
 , which is located on the bottom of the Control Points list box.
- Click the Delete All button
 to delete the blunders.
 - To remove the results from the query, click the Reset button
 .
.
Add tie points
Sometimes the automatic tie point generation will not generate tie points for some areas. This may be due to images in different years or seasons, or when there have been many changes in the images. In these cases, you will need to use the Block Adjustment window to manually add tie points. There are two ways to identify areas that need more tie points:
- Visually examine the map view.
- Use the percentage of point coverage tool.
To visually examine where control points may be needed, you can look at the overlapping polygons and control point distribution in the map view.
- Turn on the overlap feature class by enabling the Display Overlap Envelope check box in the Options settings.
- In the map, find the areas that have fewer control points, based on the control points and overlapping polygons.
- Use the Zoom to point button
 to zoom in on each image within the viewers to the location you clicked in the main map display.
- Optionally click the Link view to map button
 . This allows you to zoom and pan the map and all the viewers simultaneously.
- Optionally click the Link view to map button
- Click the Add button
 to start a point set with a new point ID. Then click the image viewers to create the tie points.
- If you need to add a point to an existing point set, right-click the row of the same point ID and choose to add to the point set.
- Press the E key to end the point set.
Use the percentage of point coverage tool to identify where control points may be needed.
- Click the option to sort by Images.
- In the Images list box, click the column to sort by Coverage or #Points.
- In the Overlaps list box, click each row to display the overlapped images.
- If you need to enter more tie points, continue with the steps below.
- Click the Zoom to point button
 . This allows you to zoom each image viewer to the same location that was clicked in the main map display.
- Optionally click the Link view to map button
 . Zoom and pan the map and the viewers simultaneously.
- Optionally click the Link view to map button
- Click the Add button
 to start a point set with a new point ID. Then click the image viewers to create the tie points.
- If you need to add a point to an existing point set, right-click the row of the same point ID and choose to add to the point set.
- Press the E key to end the point set.
Save your control points
To save the points you finished editing,
click the Save button  . Click the Stop editing button
  to stop editing and to remove the locks on mosaic datasets
and control point tables.
Here is a list of keyboard shortcuts that can help you with editing.
| Shortcut | Description |
|---|---|
E | End a point set. |
Number key 4 | Move cursor left. |
Number key 6 | Move cursor right. |
Number key 2 | Move cursor down. |
Number key 8 | Move cursor up. |
Double-click an image in the Images list box | A raster view with the image pops up. |
Related topics
- Bundle block adjust satellite images
- Bundle block adjust aerial images
- Bundle block adjust UAV or UAS data
- Schemas of block adjustment tables
- Analyze Control Points
- Append Control Points
- Apply Block Adjustment
- Compute Block Adjustment
- Compute Control Points
- Compute Tie Points
- Compute Camera Model
- Build Stereo Model
- Generate Point Cloud
- Interpolate From Point Cloud
- Ortho mapping with mosaic datasets