The Image Coordinate System (ICS) displays your images without distortion. It can do this because the coordinate system of the Data Frame is the same as the one that captured your images. Since there is no distortion with images in the image coordinate system, it is ideal for using with oblique imagery and mensuration. Image Coordinate Systems are supported in ArcMap and the ArcGIS Server image services REST API.
Image coordinates are available on images that have sensor transformation information, such as rational polynomial coefficients (RPC) or frame cameras. An image coordinate system consists of domain (native extent), Geodata transformations, and map spatial reference information from the corresponding image.
Image Coordinate Systems
Typically, your Data Frame is using a map coordinate system. This means the pixels of your image are transformed into map coordinates using sensor models and projections. Converting your imagery into map coordinates can cause your images to look skewed or distorted because of the various transformations and terrain corrections that are used—especially for oblique images.
When using the image coordinate system, you can set the Data Frame to use the coordinate system of one image to establish the coordinate system for the map data frame. This image is displayed undistorted in its native extent without the need for various transformations and projections. All other images, features, labels, and annotations are projected to overlay this image in its Image Coordinate System.
To work with Image Coordinate Systems in ArcMap, use the Image Analysis window.
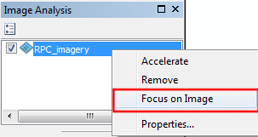
- In the Image Analysis window, highlight the raster image on which to base the image coordinate system.
- Right-click the layer and click Focus on Image.

If the image you clicked does not have an image coordinate system associated with it, the Focus on Image option is not available.
The coordinate of the data frame will be set with the image coordinate of the selected image. The image and the layers in map display will be displayed in the same coordinates.
An Image Coordinate System can only be chosen for one image within the Data Frame. This means that only one image within a mosaic dataset can be used to set the coordinate system. Below are steps for setting the image coordinate system for an image within a mosaic dataset.
- Make a selection within the mosaic dataset.
- In the TOC, right-click on your Footprint sublayer and choose Add Selected Rasters to Map.
Now each individual raster layer can be set as the focus image.
Mosaic dataset item preview
Each item within the mosaic dataset has its own properties window.
In this properties window, you are able to preview your mosaic dataset item with the Map coordinate system or the ICS coordinate system. You can also toggle between the North Up view and the Top Up view of the image.

To access the properties of the mosaic dataset item, follow these steps.
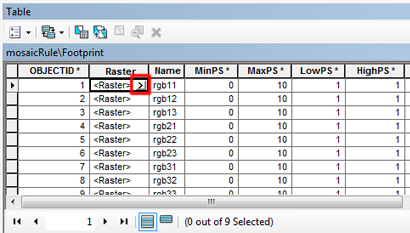
- In the TOC, right-click on the Footprint table and click Open Attribute Table.
- In the attribute table, click the Raster field for the mosaic dataset item you want to preview.
A small arrow will appear.

- Click the small arrow.
The mosaic dataset item property window will open.
- Click the Preview tab.
You can now choose which coordinate system in which to preview your mosaic dataset item.