How to use
See How to use ArcGIS samples for help on compiling, setting up the debugger, and running the sample. If the sample has associated data, you will find that the sample's zip file includes a "data" folder alongside the language folders. However, you will need to update the sample to point to the location of the data once you have extracted all the files.
Add and use menu and submenu commands in ArcMap
- Open and compile the solution in Visual Studio.
- Start ArcMap.
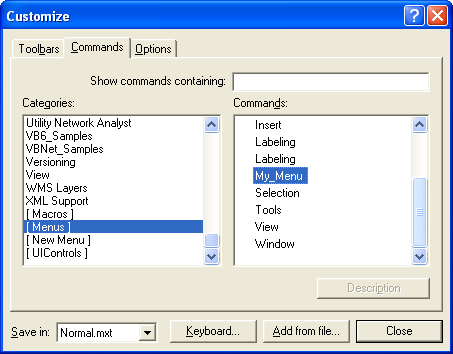
- Click the Customize menu and click Customize Mode. The Customize dialog box appears.
- Click the Commands tab, and in the Categories area, scroll down and click [Menus].
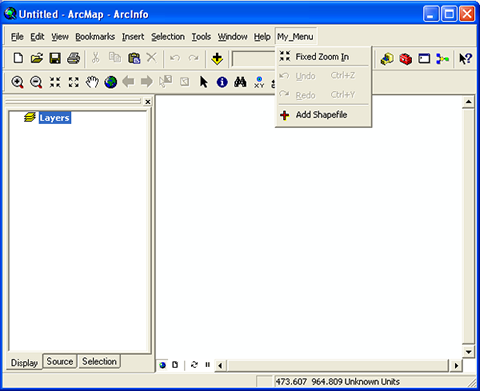
- In the Commands area, click My_Menu and drag it onto the ArcMap graphical user interface (GUI) in the menu bar area.
- Click Close. You can now access the functionality on your custom menu and submenu items. See the following screen shots:


| MyBaseMenu.cs | Demonstrates the creation of a root-level menu and the addition of submenu ArcObjects functionality. |
| AddShapefile.cs | Demonstrates the creation of a custom command to add shapefiles to the ActiveView used as a submenu. |
| MyBaseMenu.vb | Demonstrates the creation of a root-level menu and the addition of submenu ArcObjects functionality. |
| AddShapefile.vb | Demonstrates the creation of a custom command to add shapefiles to the ActiveView used as a submenu. |
Download the files for all languages
See Also:
Walkthrough: Adding a custom menu created in .NET to ArcGIS for DesktopCreating toolbars and menus
Creating commands and tools
| Development licensing | Deployment licensing |
|---|---|
| ArcGIS for Desktop Basic | ArcGIS for Desktop Basic |
| ArcGIS for Desktop Standard | ArcGIS for Desktop Standard |
| ArcGIS for Desktop Advanced | ArcGIS for Desktop Advanced |
