In this topic
About deploying a custom component using a setup project
Review the following assumptions before proceeding:
- You have created an ArcGIS Desktop custom component for ArcMap (called CustomComponent) using the Esri integrated development environment (IDE) features in Visual Studio on a development computer (called DevelopmentPC). The name of the CustomComponent in this topic is ArcMapClassLibrary_Implements.dll.
- Within the CustomComponent, COM component category registration code calls have been used and the Visual Studio project properties have the "Register for COM interop" check box selected. For more information, see How to ensure that COM component category and COM interop are used in custom components.
-
Within the CustomComponent, you can determine the Category and Caption properties. For more information, see Obtaining the Category and Caption property information of a custom component. In this topic, CustomComponents have a Developer Samples category and an ArcMapClassLibrary_Implements caption.
-
The CustomComponent was built using the release version (not the debug version) in Visual Studio. This makes a smaller deployment footprint and an optimized binary file.
-
The CustomComponent .dll file's location is \\DevelopmentPC\image\bin.
-
You want to deploy the CustomComponent on another computer (called TargetPC) that has ArcGIS Desktop installed and fully licensed.
- You want to deploy the CustomComponent using a setup.exe application using Visual Studio's setup project template.
- Your deployment is essentially an out-of-the-box type of customization. Other developers will not consume or extend your custom .dll file via additional programming.
Creating the setup.exe file
There are several steps to create a setup project and generate a setup.exe file. This topic provides a basic example of how to accomplish the task.
Creating the setup project and setting properties
Do the following steps to create a setup project and set properties:
- Start Visual Studio. Click File, New, then Project. The New Project dialog box appears.
- On the New Project dialog box, click to expand the Other Project Types node, select the Setup and Deployment project type, then select the Setup Project template.
- Specify the following information on the New Project dialog box:
- Name—MyGISApp.
- Location—Specify an appropriate location.
- Solution Name—MyGISApp.
See the following screen shot that shows the New Project dialog box: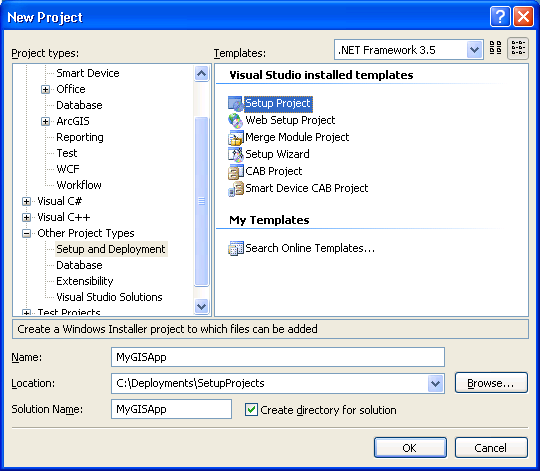
- Click OK. The project is created and opens.
- Select the MyGISApp project in the Solution Explorer, then press F4. The Properties window appears.
- Specify the following properties for your application:
- Author—GISDeveloper.
- InstallAllUsers—Set to True to install for all users on the machine. Set to False, if you want the application to only install for the user running the setup.
- Manufacturer—MyGISCompany.
- ProductName—MyGISApp.
- Version—1.0.0.
See the following screen shot that shows the specified properties: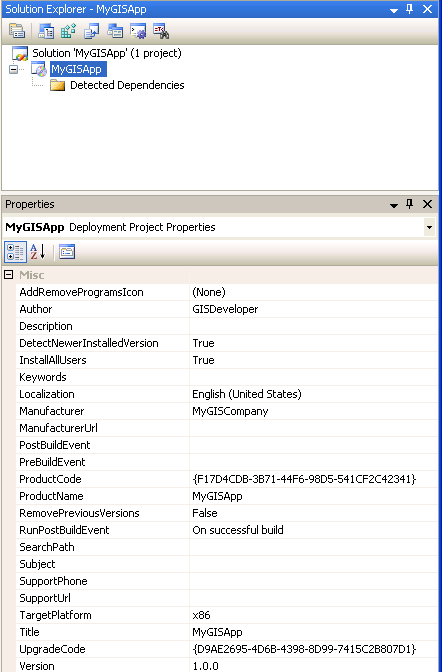
Adding application files to the setup project
The setup project is ready for the CustomComponent .dll file that will be deployed to the TargetPC. Since the image folder with the .dll file exists, add it to the setup project by dragging and dropping it into Visual Studio. Do the following steps to add application files to the setup project:
-
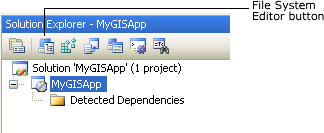
On the Solution Explorer, click the File System Editor button. The File System Editor tabbed window appears. See the following screen shot that shows the File System Editor button:
-
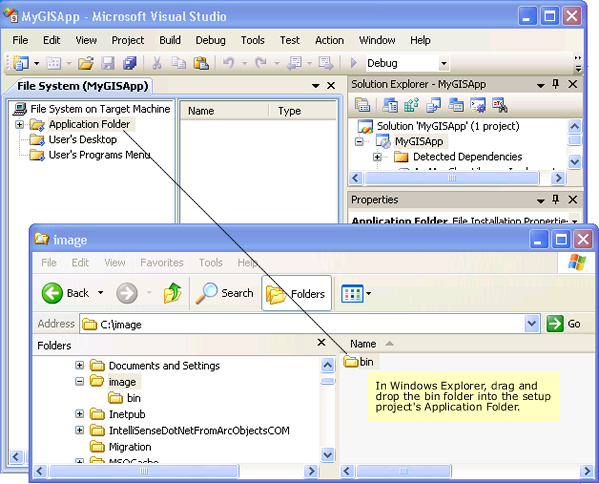
On the File System Editor window, the File System on Target Machine node shows with an Application Folder node. Drag and drop the bin folder (DevelopmentPC\image\bin) in Windows Explorer into the Application Folder. See the following screen shot that shows the bin folder and the Application Folder:
- Visual Studio automatically adds dependency files that are used by the CustomComponent .dll file into the setup project. These added dependency files show on the Solution Explorer in the Detected Dependencies folder. It is a violation of the Esri license agreement to distribute Esri assemblies and binary files as part of setup project. All Esri assemblies and binary files are installed as part of the core ArcGIS Desktop installation.
- Select the automatically detected Esri assemblies and binary files on the Solution Explorer.
- Right-click and choose Exclude. The only files that are not excluded is the CustomComponent .dll and the Microsoft .NET Framework.
See the following screen shot that shows the excluded dependencies: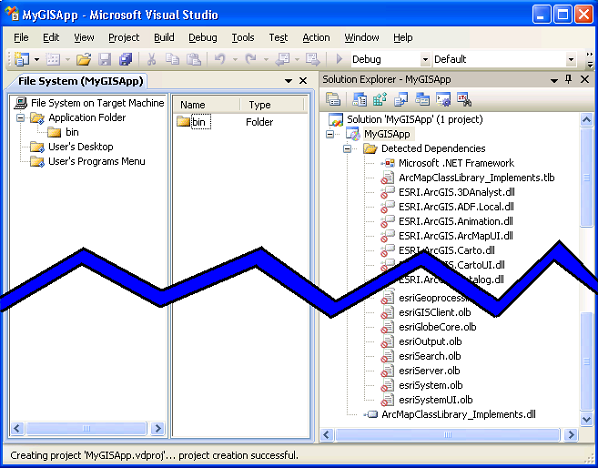
Setting the default installation location
When the user runs the setup.exe file on the TargetPC, the default location the install uses needs to make sense. Do the following steps to set this location:
- Click the Application Folder on the File System Editor window, then press F4. The Properties window appears.
- Set the DefaultLocation property to [ProgramFilesFolder]\[ProductName]. See the following screen shot that shows the DefaultLocation property:
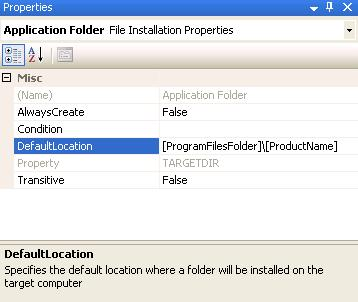
On the preceding screen shot, the square brackets ([]) around ProgramFilesFolder and ProductName indicate that they are properties; therefore, the DefaultLocation will be set to match the values of those properties in your setup project (the DefaultLocation is stored to the TARGETDIR property).
Adding launch conditions
The setup program now knows where to put the CustomComponent .dll file on disk. A successful setup program verifies that requirements are met before allowing the installation to complete. With an ArcGIS custom component, the ArcGIS Desktop host application should exist first. Do the following steps to add an error message that shows if the TargetPC does not have ArcGIS Desktop installed:
-
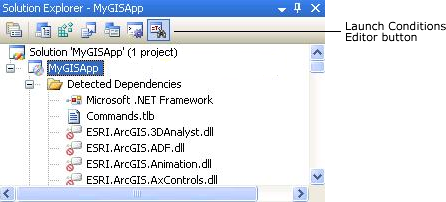
On the Solution Explorer, click the Launch Conditions Editor button. The Launch Conditions Editor tabbed window appears. See the following screen shot that shows the Launch Conditions Editor button:
-
On the Launch Conditions Editor window, there is a Requirements on Target Machine node. Under the Launch Conditions node, Visual Studio detected and added a launch condition for the .NET Framework.
-
Select the Requirements on Target Machine node.
-
Right-click and choose Add Registry Launch Condition (since you know the registry key for ArcGIS Desktop).
-
A Search for RegistryEntry1 node is added under the Search Target Machine folder and a Condition1 is added under the Launch Conditions folder.
See the following screen shot that shows the added launch conditions: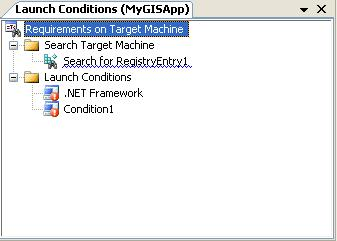
-
-
Click the Search for RegistryEntry1 node, then specify the following properties on the Properties window:
-
RegKey—SOFTWARE\ESRI\Desktop10.0
-
Value—RealVersion
See the following screen shot that shows the specified properties on the Properties window: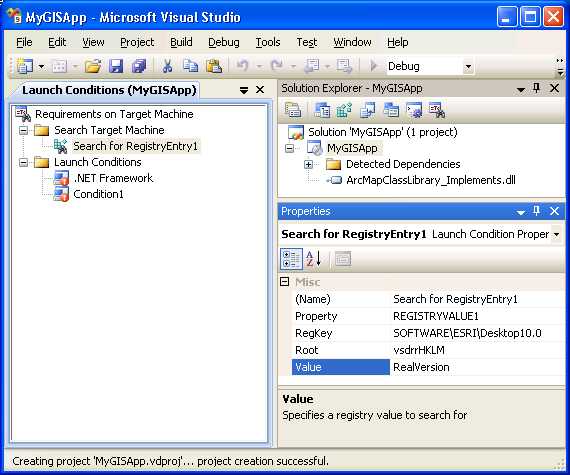
-
- On the Launch Conditions Editor window, click Launch Conditions, then Condition1. On the Properties window, check for ArcGIS Desktop 10, and specify the following properties:
- Condition property—REGISTRYVALUE1="10.0"
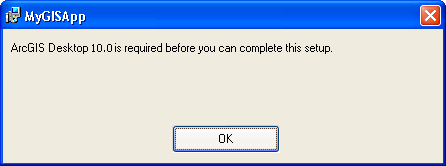
- Message property—ArcGIS Desktop 10.0 is required before you can complete this setup.
See the following screen shot that shows the Condition and Message properties: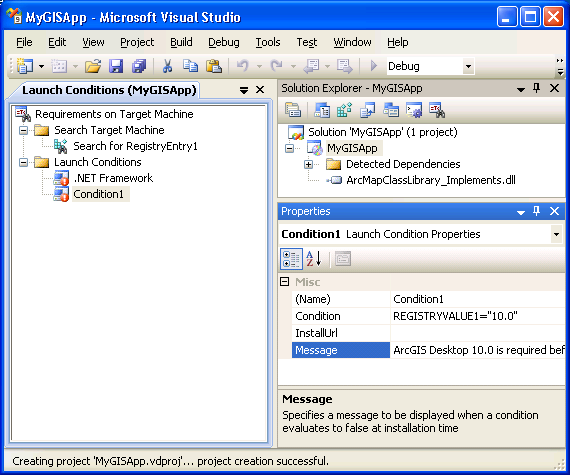
To view the RealVersion Value Data attribute in the Registry Editor, type regedit on the Run dialog box (click Start, then Run), then click to expand the following nodes:
- My Computer\HKEY_LOCAL_MACHINE\SOFTWARE\ESRI\Desktop10.0
If you run setup.exe at this point and you do not have ArcGIS Desktop 10 installed, the following dialog box appears and the installation stops:
Registering the CustomComponent .dll file using ESRIRegAsm.exe
The final step in creating the setup.exe is registering the CustomComponent .dll on the TargetPC using the ESRIRegAsm.exe utility. To execute the ESRIRegAsm utility from within the setup project, create another Class Library project and use an installer class. The setup project consumes the installer class and passes it the appropriate arguments. Do the following steps to register the custom component:
- Start Visual Studio and click File, then New Project. The New Project dialog box appears.
- Specify the following information on the New Project dialog box:
- Name—InvokeESRIRegAsm.
- Location—Provide an appropriate location.
- Solution Name—InvokeESRIRegAsm.
See the following screen shot that shows the specified information: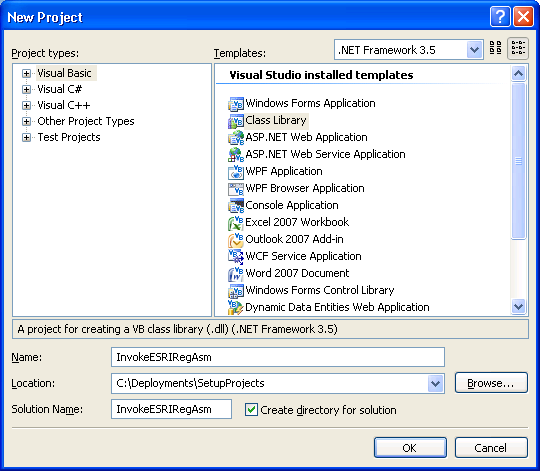
- On the Solution Explorer, delete the default Class1 file.
- Right-click the project and choose Add, then New Item. The Add New Item dialog box appears.
- On the Add New Item dialog box, click the General category, then select the Installer Class template. Keep the template's default name, then click Add.
See the following screen shot that shows the Installer Class template on the Add New Item dialog box: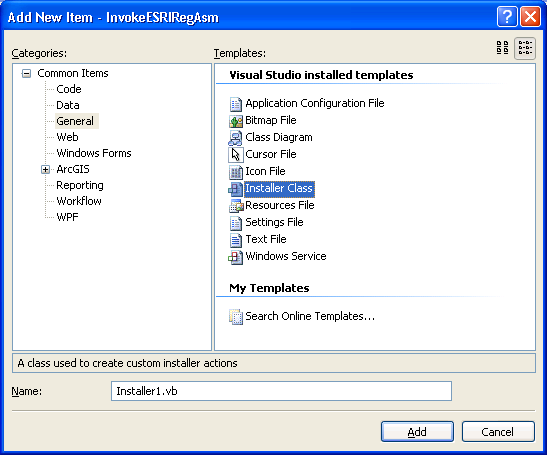
- When the installer class is added to the project, click the "click here to switch to code view" link to edit the code. See the following screen shot that shows "click here to switch to code view:"
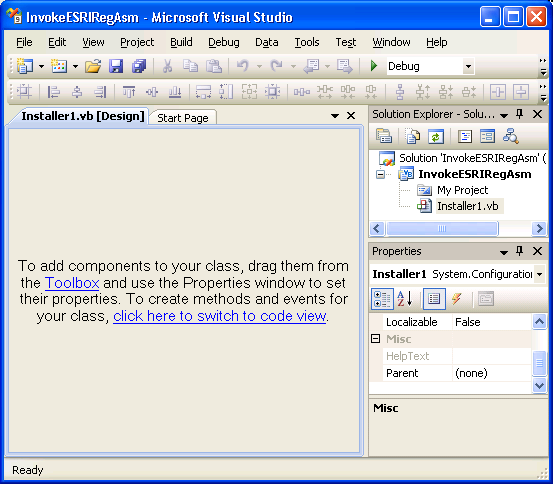
- On the code view window, add the following code example in the Installer1 class file:
using System;
using System.Collections;
using System.Collections.Generic;
using System.ComponentModel;
using System.Configuration.Install;
using System.Linq;
using System.Diagnostics;

namespace InvokeESRIRegAsm
{
    [RunInstaller(true)]
    public partial class Installer1: Installer
    {
        public Installer1()
        {
            InitializeComponent();
        }

        public override void Install(System.Collections.IDictionary stateSaver)
        {
            base.Install(stateSaver);

            //Register the custom component.
            //-----------------------------
            //The default location of the ESRIRegAsm utility.
            //Note how the whole string is embedded in quotes because of the spaces in the path.
            string cmd1="\"" + Environment.GetFolderPath
                (Environment.SpecialFolder.CommonProgramFiles) +
                "\\ArcGIS\\bin\\ESRIRegAsm.exe" + "\"";
            //Obtain the input argument (via the CustomActionData Property) in the setup project.
            //An example CustomActionData property that is passed through might be something like:
            // /arg1="[ProgramFilesFolder]\[ProductName]\bin\ArcMapClassLibrary_Implements.dll",
            //which translates to the following on a default install:
            //C:\Program Files\MyGISApp\bin\ArcMapClassLibrary_Implements.dll.
            string part1=this.Context.Parameters["arg1"];

            //Add the appropriate command line switches when invoking the ESRIRegAsm utility.
            //In this case: /p:Desktop=means the ArcGIS Desktop product, /s=means a silent install.
            string part2=" /p:Desktop /s";

            //It is important to embed the part1 in quotes in case there are any spaces in the path.
            string cmd2="\"" + part1 + "\"" + part2;

            //Call the routing that will execute the ESRIRegAsm utility.
            int exitCode=ExecuteCommand(cmd1, cmd2, 30000);
        }

        public override void Uninstall(System.Collections.IDictionary savedState)
        {
            base.Uninstall(savedState);

            //Unregister the custom component.
            //-----------------------------
            //The default location of the ESRIRegAsm utility.
            //Note how the whole string is embedded in quotes because of the spaces in the path.
            string cmd1="\"" + Environment.GetFolderPath
                (Environment.SpecialFolder.CommonProgramFiles) +
                "\\ArcGIS\\bin\\ESRIRegAsm.exe" + "\"";
            //Obtain the input argument (via the CustomActionData Property) in the setup project.
            //An example CustomActionData property that is passed through might be something like:
            // /arg1="[ProgramFilesFolder]\[ProductName]\bin\ArcMapClassLibrary_Implements.dll",
            //which translate to the following on a default install:
            //C:\Program Files\MyGISApp\bin\ArcMapClassLibrary_Implements.dll.
            string part1=this.Context.Parameters["arg1"];

            //Add the appropriate command line switches when invoking the ESRIRegAsm utility.
            //In this case: /p:Desktop=means the ArcGIS Desktop product, /u=means unregister the Custom Component, /s=means a silent install.
            string part2=" /p:Desktop /u /s";

            //It is important to embed the part1 in quotes in case there are any spaces in the path.
            string cmd2="\"" + part1 + "\"" + part2;

            //Call the routing that will execute the ESRIRegAsm utility.
            int exitCode=ExecuteCommand(cmd1, cmd2, 30000);
        }

        public static int ExecuteCommand(string Command1, string Command2, int
            Timeout)
        {
            //Set up a ProcessStartInfo using your path to the executable (Command1) and the command line arguments (Command2).
            ProcessStartInfo ProcessInfo=new ProcessStartInfo(Command1, Command2);
            ProcessInfo.CreateNoWindow=true;
            ProcessInfo.UseShellExecute=false;

            //Invoke the process.
            Process Process=Process.Start(ProcessInfo);
            Process.WaitForExit(Timeout);

            //Finish.
            int ExitCode=Process.ExitCode;
            Process.Close();
            return ExitCode;
        }
    }
}
Imports System.ComponentModel
Imports System.Configuration.Install

Public Class Installer1

    Public Sub New()
        MyBase.New()

        'This call is required by the Component Designer.
        InitializeComponent()

        'Add initialization code after the call to InitializeComponent.
    End Sub

    Public Overrides Sub Install(ByVal stateSaver As System.Collections.IDictionary)
    MyBase.Install(stateSaver)

    'Register the custom component.
    '-----------------------------

    'The default location of the ESRIRegAsm utility.
    'Note how the whole string is embedded in quotes because of the spaces in the path.
    Dim cmd1 As String="""" + Environment.GetFolderPath(Environment.SpecialFolder.CommonProgramFiles) + "\ArcGIS\bin\ESRIRegAsm.exe" + """"

    'Obtain the input argument (via the CustomActionData Property) in the setup project.
    'An example CustomActionData property that is passed through might be something like:
    '/arg1="[ProgramFilesFolder]\[ProductName]\bin\ArcMapClassLibrary_Implements.dll",
    'which translates to the following on a default install:
    'C:\Program Files\MyGISApp\bin\ArcMapClassLibrary_Implements.dll.
    Dim part1 As String=Me.Context.Parameters.Item("arg1")

    'Add the appropriate command line switches when invoking the ESRIRegAsm utility.
    'In this case: /p:Desktop=means the ArcGIS Desktop product, /s=means a silent install.
    Dim part2 As String=" /p:Desktop /s"

    'It is important to embed the part1 in quotes in case there are any spaces in the path.
    Dim cmd2 As String="""" + part1 + """" + part2

    'Call the routing that will execute the ESRIRegAsm utility.
    Dim exitCode As Integer=ExecuteCommand(cmd1, cmd2, 30000)

End Sub

Public Overrides Sub Uninstall(ByVal savedState As System.Collections.IDictionary)
MyBase.Uninstall(savedState)

'Unregister the custom component.
'---------------------------------

'The default location of the ESRIRegAsm utility.
'Note how the whole string is embedded in quotes because of the spaces in the path.
Dim cmd1 As String="""" + Environment.GetFolderPath(Environment.SpecialFolder.CommonProgramFiles) + "\ArcGIS\bin\ESRIRegAsm.exe" + """"

'Obtain the input argument (via the CustomActionData Property) in the setup project.
'An example CustomActionData property that is passed through might be something like:
'/arg1="[ProgramFilesFolder]\[ProductName]\bin\ArcMapClassLibrary_Implements.dll",
'which translates to the following on a default install:
'C:\Program Files\MyGISApp\bin\ArcMapClassLibrary_Implements.dll.
Dim part1 As String=Me.Context.Parameters.Item("arg1")

'Add the appropriate command line switches when invoking the ESRIRegAsm utility.
'In this case: /p:Desktop=means the ArcGIS Desktop product, /u=means unregister the Custom Component, /s=means a silent install.
Dim part2 As String=" /p:Desktop /u /s"

'It is important to embed the part1 in quotes in case there are any spaces in the path.
Dim cmd2 As String="""" + part1 + """" + part2

'Call the routing that will execute the ESRIRegAsm utility.
Dim exitCode As Integer=ExecuteCommand(cmd1, cmd2, 30000)

End Sub

Public Shared Function ExecuteCommand(ByVal Command1 As String, ByVal Command2 As String, ByVal Timeout As Integer) As Integer

'Set up a ProcessStartInfo using your path to the executable (Command1) and the command line arguments (Command2).
Dim ProcessInfo As ProcessStartInfo=New ProcessStartInfo(Command1, Command2)
ProcessInfo.CreateNoWindow=True
ProcessInfo.UseShellExecute=False

'Invoke the process.
Dim Process As Process=Process.Start(ProcessInfo)
Process.WaitForExit(Timeout)

'Finish.
Dim ExitCode As Integer=Process.ExitCode
Process.Close()
Return ExitCode
End Function

End Class
- Build the Solution, ensure there are no errors, and close the Visual Studio project for the installer class.
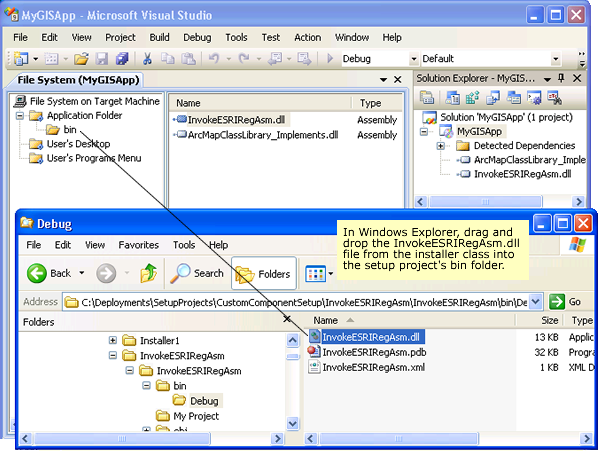
- Return to the setup project. On the File System Editor window, click to expand the Application Folder and bin nodes. Drag and drop the .dll file that was created from the installer class into the bin folder. See the following screen shot that shows the .dll file, bin folder, and Application Folder:
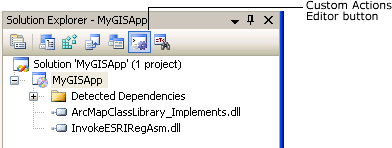
- On the Solution Explorer, click the Custom Actions Editor button. The Custom Actions tabbed window appears. See the following screen shot that shows the Custom Actions Editor button:
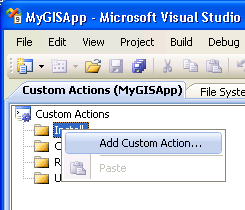
- Right-click the Install node and choose Add Custom Action. See the following screen shot that shows the Add Custom Action option:
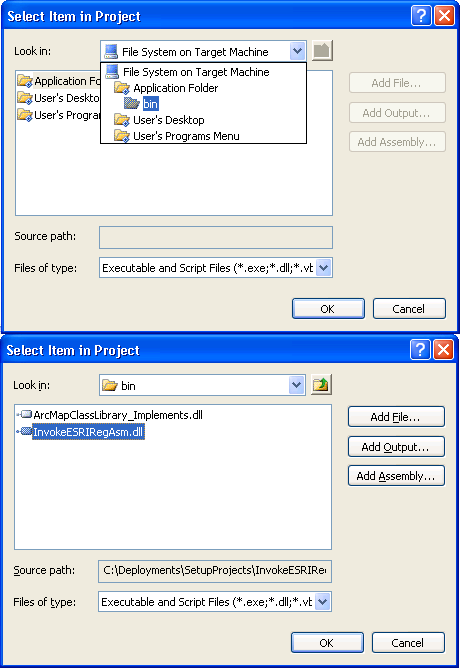
- When you choose Add Custom Action, the Select Item in Project dialog box appears. Click the drop-down arrow and locate the File System on Target Machine, Application Folder, then bin folder. Select the .dll file that was created by the installer class and click OK. See the following screen shots that show the Select Item in Project dialog box:
- On the Properties window for the custom installer .dll file that was added to the Install node, specify the CustomActionData property to the following:
/arg1="[ProgramFilesFolder]\[ProductName]\bin\ArcMapClassLibrary_Implements.dll"
See the following screen shot that shows the specified CustomActionData property: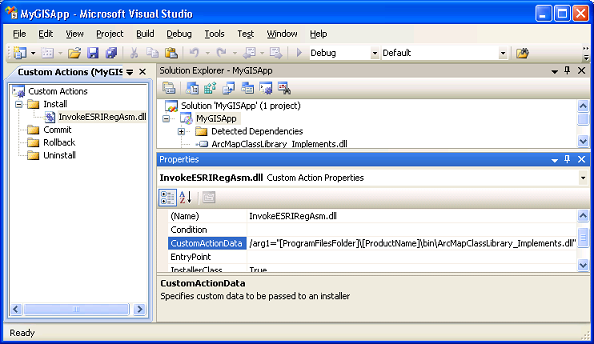
Each argument begins with a forward slash (/) and has a name-value pair. Multiple arguments can be added to the CustomActionData. Separate multiple arguments with one space. For example, a two argument example can resemble the following:
- /name1="Hello World" /name2="What is your name?"
Variables that are used in the setup project are encased in square brackets ([]). For example, [ProgramFilesFolder] translates to C:\Program Files on a machine that has a default install of the Windows Operating System (OS).
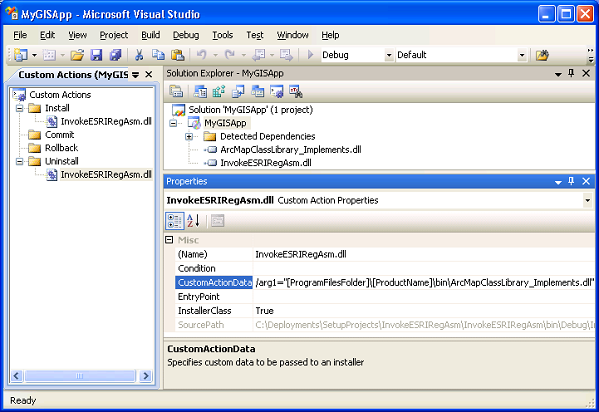
- Repeat Steps 11 through 13 to add a custom action for the Uninstall. See the following screen shot that shows the Uninstall folder under the Custom Actions node:
- Click Build, then Rebuild Solution to generate the setup.exe and setup.msi files.
Testing the setup.exe file
Do the following steps to test the setup program on the TargetPC:
- Copy the setup.exe and setup.msi files from the DevelopmentPC onto the TargetPC.
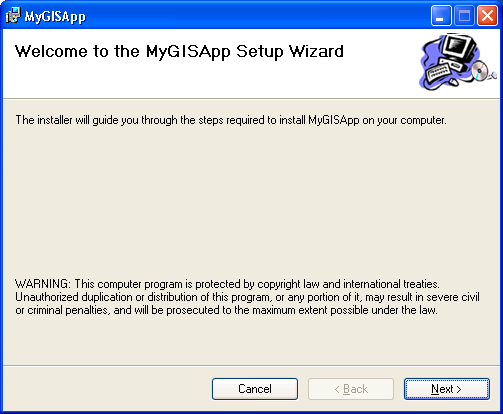
- Double-click the setup.exe file and progress through the wizards. See the following screen shot that shows the setup wizard:
- When the setup is complete, start ArcMap.
- Click Customize, then Customize Mode. The Customize dialog box appears.
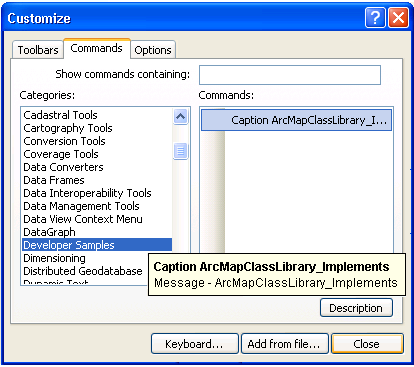
- Click the Commands tab, scroll down in the Categories section, then select the Developer Samples category. The Developer Samples category has the ArcMap ClassLibrary_Implements command. See the following screen shot that shows the category and command on the Customize dialog box:
- Look on your hard drive for the location you specified as part of the setup to see where the .dll file was placed. See the following screen shot that shows this location:
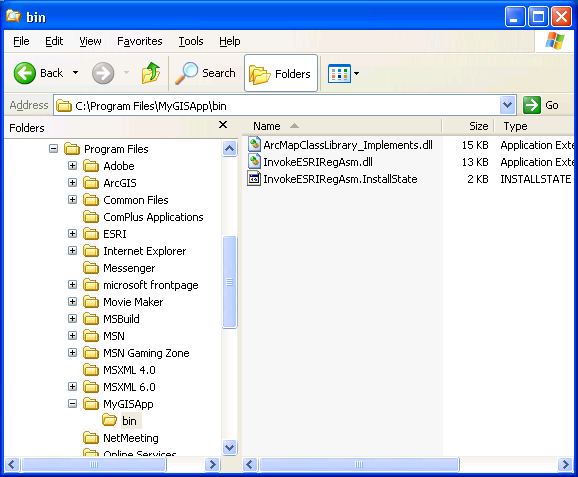
At a minimum, two additional files will be added with the CustomComponent .dll. The .dll file for the installer class and an .InstallState will also be placed on disk during the install.
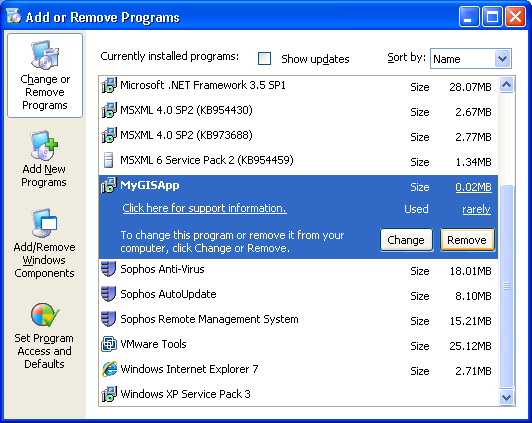
- A successful setup program uninstalls all files on the hard drive and unregisters any .dll files that were used. To test the uninstall, open the Add or Remove Programs dialog box on the Control Panel, then click Remove next to the MyGISApp program. See the following screen shot that shows the MyGISApp program on the Add or Remove Programs dialog box:
- When the uninstall is finished, the CustomComponent is not available on the ArcMap Customize dialog box, and all of the MyGISApp application files and directories are removed from the hard drive.
See Also:
Deploying custom componentsHow to ensure that COM component category and COM interop are used in custom components
Obtaining the Category and Caption property information of a custom component
ESRIRegAsm utility
| Development licensing | Deployment licensing |
|---|---|
| ArcGIS for Desktop Basic | ArcGIS for Desktop Basic |
| ArcGIS for Desktop Standard | ArcGIS for Desktop Standard |
| ArcGIS for Desktop Advanced | ArcGIS for Desktop Advanced |
| Engine Developer Kit | Engine |
