In this topic
- About working with the editor's snap environment
- Snap agents
- Snapping in x,y,z
- Snap symbology
- Snap point method
About working with the editor's snap environment
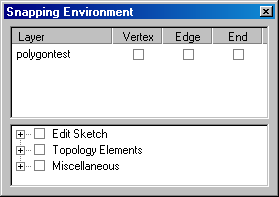
The editor's snap environment controls the snap agents, snap tolerance, and hit type settings. All these settings can be manually modified or verified on the Snapping Environment dialog box when classic snapping is enabled. See the following screen shot:

ISnapEnvironment provides the methods and properties to control the snap environment within the editor. ISnapEnvironment2 adds the capability to turn on and set the SnapZTolerance value, which is used when snapping in the z-dimension is enabled on the feature class.
It is important to note that these interfaces are only available to your tools within the edit environment. The topic Working with the ArcGIS snapping environment provides simpler interfaces and allows your tools to use snapping inside and outside the editor environment.
The editor's snap environment provides a great deal of control with respect to which particular snap agents and layers are considered as snap candidates. This level of control comes at a cost to the user if not managed properly. You should carefully consider whether you need this level of control; if not, use the ArcGIS snapping environment.
See the following code example:
[C#] public void QuerySnapEnvironmentSettings(IEditor editor)
{
//Get the snap environment from the editor.
ISnapEnvironment snapEnvironment=m_editor as ISnapEnvironment;
//Make sure there is a snap agent turned on in the snap environment.
if (snapEnvironment.SnapAgentCount == 0)
{
System.Windows.Forms.MessageBox.Show("No snap agents are on");
}
//Set the snap tolerance and unit.
snapEnvironment.SnapToleranceUnits =
esriSnapToleranceUnits.esriSnapToleranceMapUnits;
snapEnvironment.SnapTolerance=15;
}
Private Sub QuerySnapEnvironmentSettings(ByVal editor As IEditor)
    'Get the snap environment from the editor.
    snapEnvironment=CType(m_editor, ISnapEnvironment)

    'Make sure there is a snap agent turned on in the snap environment.
    If snapEnvironment.SnapAgentCount=0 Then
        System.Windows.Forms.MessageBox.Show("No snap agents are on")
    End If

    'Set the snap tolerance and unit.
    snapEnvironment.SnapToleranceUnits=esriSnapToleranceUnits.esriSnapToleranceMapUnits
    snapEnvironment.SnapTolerance=15
End Sub
Snap agents
Snap agents implement the ISnapAgent interface and when registered as a component category, are inserted into the ESRI snap agents component category. However, the feature snap agent is a more detailed class of snap agent, and each feature class has a feature snap agent instantiated when the snap environment window is first opened. See the following code example:
[C#] public void AddNewSnapAgent()
{
//Get editor extension.
UID editorUID=new UIDClass();
editorUID.Value="esriEditor.Editor";
IEditor editor=m_application.FindExtensionByCLSID(editorUID)as IEditor;
IEditLayers editLayers=editor as IEditLayers;
ISnapEnvironment snapEnvironment=editor as ISnapEnvironment;
//Clear all existing snap agents.
snapEnvironment.ClearSnapAgents();
//Create a feature snap agent.
IFeatureSnapAgent featureSnapAgent=new FeatureSnap();
if (editLayers.CurrentLayer == null)
{
System.Windows.Forms.MessageBox.Show("Please start an edit session");
return ;
}
IFeatureClass layerFeatureClass=editLayers.CurrentLayer.FeatureClass;
featureSnapAgent.FeatureClass=layerFeatureClass;
featureSnapAgent.HitType=esriGeometryHitPartType.esriGeometryPartBoundary;
snapEnvironment.AddSnapAgent(featureSnapAgent);
}
Private Sub AddNewSnapAgent()
    'Get the editor extension.
    Dim editorUID As UID=New UIDClass()
    editorUID.Value="esriEditor.Editor"
    m_editor=TryCast(app.FindExtensionByCLSID(editorUID), IEditor)

    Dim snapEnvironment As ISnapEnvironment
    snapEnvironment=CType(m_editor, ISnapEnvironment)
    Dim featSnapAgent As IFeatureSnapAgent
    featSnapAgent=New FeatureSnap
    Dim editLayers As IEditLayers
    editLayers=m_editor
    If editLayers.CurrentLayer Is Nothing Then
        System.Windows.Forms.MessageBox.Show("Please start an edit session")
        Return
    End If
    Dim layerFClass As IFeatureClass
    layerFClass=editLayers.CurrentLayer.FeatureClass
    featSnapAgent.FeatureClass=layerFClass
    featSnapAgent.HitType=esriGeometryHitPartType.esriGeometryPartBoundary
    snapEnviroment.AddSnapAgent(featSnapAgent)
End Sub
When working with existing snap agents, it can be confusing because you can clear what is set by default and have no snap agents left in the snap environment.
Turning on a snap also uses the ISnapEnvironment AddSnapAgent method, as shown in the following code example:
[C#] private void ActivateSnapAgent(ISnapAgent snapAgent, IEditor editor)
{
ISnapEnvironment snapEnvironment=editor as ISnapEnvironment;
if (!(snapAgent is IFeatureSnapAgent))
{
snapEnvironment.AddSnapAgent(snapAgent);
}
else
{
IFeatureSnapAgent featureSnapAgent=(IFeatureSnapAgent)snapAgent;
featureSnapAgent.HitType=esriGeometryHitPartType.esriGeometryPartBoundary
| esriGeometryHitPartType.esriGeometryPartEndpoint |
esriGeometryHitPartType.esriGeometryPartVertex;
}
//Where you refresh the snapping window, which is explained in the next code example.
}
Private Sub ActivateSnapAgent(ByVal snapAgent As ISnapAgent, ByVal editor As IEditor)
    If snapAgent Is Nothing Or editor Is Nothing Then Return
    Dim snapEnvironment As ISnapEnvironment=CType(editor, ISnapEnvironment)
    If Not TypeOf snapAgent Is IFeatureSnapAgent Then
        snapEnvironment.AddSnapAgent(snapAgent)
    Else
        Dim featureSnapAgent As IFeatureSnapAgent=New FeatureSnap
        featureSnapAgent.HitType=esriGeometryHitPartType.esriGeometryPartBoundary Or _
                                   esriGeometryHitPartType.esriGeometryPartEndpoint Or esriGeometryHitPartType.esriGeometryPartVertex
    End If
    'Where the code to refresh the snapping window goes, which is explained in the next
    'code example.
End Sub
Programmatically changing the snap environment parameters does not require opening the snap window to change the settings. However, if you want to programmatically open the snap environment window, use the globally unique identifier (GUID) and use the editor to get a reference to it as shown in the following code example:
[C#] UID snapWindowUID=new UIDClass();
snapWindowUID.Value="esriEditor.SnappingWindow";
ISnappingWindow snapWindow=editor.FindExtension(snapWindowUID)as ISnappingWindow;
ISnapEnvironment snapEnvironment=editor as ISnapEnvironment;
snapWindow.Show();
Dim snapWindowUID As New UID
snapWindowUID.Value="esriEditor.SnappingWindow"
Dim snapWindow As ISnappingWindow
snapWindow=CType(m_editor.FindExtension(snapWindowUID), ISnappingWindow)
snapWindow.Show()
Snapping in x,y,z
Editing tools have the capability to logically assign z-values at ArcGIS 9.3. Z-values define elevation and can be extrapolated from surfaces, existing features, or a manually entered value (these are defined by the esriZCaptureType enumeration). This is useful for users that are building z-aware data with available related elevation information. When editing or creating z-aware features and snapping to an existing vertex, give the new vertex a matching z-value.
This z-snapping behavior is controlled for each z-aware layer in the map. Z-snapping is only available when one or more x,y snap agents are active for a layer; z-snapping is a secondary test once a x,y-snap agent has been satisfied. To enable z-snapping, get the appropriate snap agent as an IFeatureSnapAgent2 object and set the Boolean ZSnappingEnabled property to true.
Z-snapping serves as an override to any other z-assignment behavior (previously discussed). For example, if the user is in surface mode and snaps to a z-aware feature, the z-value is taken from the snapped feature and not calculated from the surface. For more information on z-editing behavior associated with snapping, see Updating geometry of existing features.
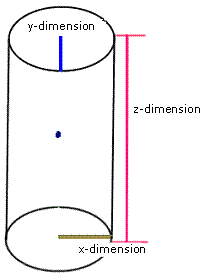
Z-snapping is common for cases when the user needs to snap to a 3D feature only if it is within a height range of the current sketch. Specifying an acceptable z-tolerance is similar to the existing x,y-snapping tolerance already included in the editor. By default, z-tolerance snapping will be disabled with a value of 0. This tolerance value is accessed from the ISnapEnvironment2 interface by setting the UseSnapZTolerance Boolean property to true and setting a tolerance value in z-units (defined from the first layer added to the map) using the SnapZTolerance property.
This SnapZTolerance will be used in conjunction with the x,y-tolerance and applied to the current snap environment to describe a cylinder. This cylinder will be used to determine if snap conditions are met in x,y,z. The central z-value for this snap cylinder is current-z, as shown in the following illustration:

The following code example is from the previously mentioned z-management sample that includes a dockable window to control the z-snapping. This method handles the item check event that occurs when the user selects one of the check boxes next to the z-aware layer.
[C#] /// <summary>
/// Occurs when an item in the snap dockable window is checked.
/// Checks the selected property and sets the z-snap enabled based on it.
/// </summary>
/// <param name="sender"></param>
/// <param name="e"></param>
void featureSnapAgentListBox_ItemCheck(object sender, EventArgs e)
{
ISnapEnvironment2 snapEnvironment=m_editor as ISnapEnvironment2;
ISnapAgent snapAgent;
//Cast the selected item to a string, search the snap agents,
//and find the one with the same name.
string selectedAgent=featureSnapAgentListBox.SelectedItem as String;
for (int sn=0; sn < snapEnvironment.SnapAgentCount; sn++)
{
snapAgent=snapEnvironment.get_SnapAgent(sn);
if (snapAgent.Name == selectedAgent)
{
if (snapAgent is IFeatureSnapAgent2)
{
IFeatureSnapAgent2 featureSnapAgent=snapAgent as
IFeatureSnapAgent2;
int selIndex=featureSnapAgentListBox.SelectedIndex;
Boolean ischecked=featureSnapAgentListBox.GetItemChecked(selIndex);
if (ischecked == false)
{
featureSnapAgent.ZSnappingEnabled=true;
}
else
{
featureSnapAgent.ZSnappingEnabled=false;
}
}
}
}
}
Private Sub featureSnapAgentListBox_ItemCheck(ByVal sender As Object, ByVal e As System.Windows.Forms.ItemCheckEventArgs) Handles featureSnapAgentListBox.ItemCheck
    Dim snapEnvironment As ISnapEnvironment2=TryCast(m_editor, ISnapEnvironment2)
    Dim snapAgent As ISnapAgent
    'Cast the selected item to a string, search the snap agents,
    'and find the one with the same name.
    Dim selectedAgent As String=CType(featureSnapAgentListBox.SelectedItem, String)
    Dim sn As Integer
    For sn=0 To snapEnvironment.SnapAgentCount - 1
        snapAgent=snapEnvironment.SnapAgent(sn)
        If snapAgent.Name=selectedAgent Then
            If TypeOf snapAgent Is IFeatureSnapAgent2 Then
                Dim featureSnapAgent As IFeatureSnapAgent2=CType(snapAgent, IFeatureSnapAgent2)
                Dim selIndex As Integer=featureSnapAgentListBox.SelectedIndex
                Dim ischecked As Boolean=featureSnapAgentListBox.GetItemChecked(selIndex)
                If ischecked=False Then
                    featureSnapAgent.ZSnappingEnabled=True
                Else
                    featureSnapAgent.ZSnappingEnabled=False
                End If
            End If
        End If
    Next
End Sub
Snap symbology
For the user to determine if the sketch has been snapped in x,y or x,y,z, the snap symbology is different than the regular snap symbol and it can be customized to create a symbol to immediately identify that z-snapping is working.
The following C# code example shows a characterMarkerSymbol that you can use to symbolize with a z and the VB .NET code example uses the SimpleMarkerSymbol:
[C#] private void setupzSnapSymbol(m_editor)
{
IRgbColor pvertexColor=new RgbColorClass();
ICharacterMarkerSymbol pVertexSymbol=new CharacterMarkerSymbolClass();
pvertexColor.Blue=30;
pVertexSymbol.Color=pvertexColor;
stdole.IFontDisp fontDisplay=(stdole.IFontDisp)new stdole.StdFont();
fontDisplay.Name="Arial";
fontDisplay.Size=20;
pVertexSymbol.CharacterIndex=12;
//Challenge, try to find the index for the letter z.
pVertexSymbol.Font=fontDisplay;
IEditorZ peditZ=m_editor;
peditZ.ZSnapSymbol=pVertexSymbol;
}
Private Sub setupZSnapSymbol(ByVal m_editor As IEditor)
    Dim pEditz As IEditorZ
    Set pEditz=m_editor
    'Create a color object.
    Dim pVertexColor As IRgbColor=New RgbColor
    pVertexColor.Blue=30

    'Create a MarkerSymbol and apply it to the edit sketch properties.
    Dim pVertexSym As ISimpleMarkerSymbol=New SimpleMarkerSymbol
    With pVertexSym
        .Color=pVertexColor
        .Style=esriSMSDiamond
        .Size=8
    End With
    'Add testing code.

    'Set the SnapSymbol.
    Set pEditProperties4.ZSnapSymbol=pVertexSym
Snap point method
To use the SnapPoint method from the ISnapEnvironment interface, an IPoint is passed to the method and used to find the closest feature to snap to. If only one feature class is in the map and it is set to snap, it returns true because it is snapping to itself. If there is a second feature class, it snaps to features in the second feature class.
See the following note:
Without a cache built, the point can look at features in its own feature class, which is undesirable. Implement an IFeatureCache when creating a snap agent; otherwise, the snap point method can return a true value without snapping to other features because it found itself.
Otherwise, have two feature classes in the map when using snapping and target features of the other feature class. Using SnapPoint calls the ISnapAgent.Snap method to then call each snap agent until it finds one that returns true. This results in new coordinates that are then assigned to the original point.
| Development licensing | Deployment licensing |
|---|---|
| ArcGIS for Desktop Basic | ArcGIS for Desktop Basic |
| ArcGIS for Desktop Standard | ArcGIS for Desktop Standard |
| ArcGIS for Desktop Advanced | ArcGIS for Desktop Advanced |
