In this topic
- Creating the WPF application
- Adding a button to the WPF window
- Modifying XAML attributes
- Adding a Windows Forms template
- Binding to a specific ArcGIS product
- Using updated styles for Windows Forms controls
- Adding ArcGIS Engine controls and initializing the ArcGIS Engine license
- Loading the map
- Showing the form
- Releasing COM objects
- Running the project
Creating the WPF application
To create a WPF application, perform the following steps:
- Start Visual Studio.
- Create a WPF application project and name it WinFormsInWPF.
- Add the following references to the WinFormsInWPF project:
- ESRI.ArcGIS.Version—Contains runtime manager functionality to bind a specific ArcGIS installation on your machine
- ESRI.ArcGIS.ADF.Local
Adding a button to the WPF window
To add a button to the WPF window, perform the following steps:
- Double-click MainWindow.xaml in the Solution Explorer to open the designer.
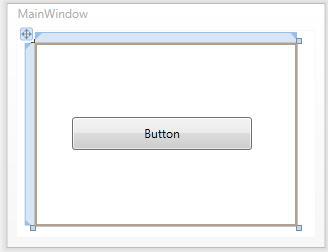
- From the toolbox in the Controls section, drag-and-drop a Button element onto the window and resize it as shown in the following illustration:

Modifying XAML attriutes
- In the XAML editing pane, change the button's Content attribute to Show Windows Forms.
- To add the button click event with the default name button1_Click, follow these steps:
- Type Click= in the markup code tag for the button. A context menu showing <New Event Handler> opens.
- Press the Tab key to automatically insert the Button1_Click text string, which provides a button1_Click stub in the code behind file.
WPF elements have IntelliSense support in XAML. If the Tab key is not pressed, the button1_Click stub code is not automatically provided. Ensure that the name of the Click event in the markup code matches the exact name of the event handler in the code behind file.
See the following code example:
[C# XAML] <Window
x:Class="WinFormsInWPF.MainWindow"
xmlns="http://schemas.microsoft.com/winfx/2006/xaml/presentation"
xmlns:x="http://schemas.microsoft.com/winfx/2006/xaml"
Title="MainWindow"
mc:Ignorable="d"
xmlns:d="http://schemas.microsoft.com/expression/blend/2008"
xmlns:mc="http://schemas.openxmlformats.org/markup-compatibility/2006"
Height="245"
Width="319">
<Grid Height="183" Width="262">
<Button
Content="Button"
Height="33"
HorizontalAlignment="Left"
Margin="37,74,0,0"
Name="button1"
VerticalAlignment="Top"
Width="180"
Click="button1_Click"/>
</Grid>
</Window>
<Window
  x:Class="MainWindow"
  xmlns="http://schemas.microsoft.com/winfx/2006/xaml/presentation"
  xmlns:x="http://schemas.microsoft.com/winfx/2006/xaml"
  Title="MainWindow"
  mc:Ignorable="d"
  xmlns:d="http://schemas.microsoft.com/expression/blend/2008"
  xmlns:mc="http://schemas.openxmlformats.org/markup-compatibility/2006"
  Height="245"
  Width="319">
  <Grid Height="183" Width="262">
    <Button
      Content="Button"
      Height="33"
      HorizontalAlignment="Left"
      Margin="37,74,0,0"
      Name="button1"
      VerticalAlignment="Top"
      Width="180"
      Click="button1_Click"/>
  </Grid>
</Window>
Adding a Windows Forms template
To add a Windows Forms template, perform the following steps:
- Right-click the project, select Add, and click New Item. The Add New Item dialog box opens.
- On the left panel, select Windows Forms categories, then select Windows Forms template on the right panel.
- Click Add.
A Windows Form with the default name Form1 is added. In addition, Visual Studio automatically adds the following references:
- System.Windows.Forms.dll
- System.Drawing.dll
Binding to a specific ArcGIS product
Starting from ArcGIS 10, it is required that you bind to a specific ArcGIS product installation on your machine. The RuntimeManager functionality of the ESRI.ArcGIS.Version assembly handles the binding. Binding should be performed prior to the logic of ArcGIS license initialization, preferably at application startup.
To bind to ArcGIS Engine, perform the following steps:
- Click to expand the App.xaml (C#) or Application.xaml (VB .NET) node in the Solution Explorer.
- Double-click App.xaml.cs or Application.xaml.vb to open the code behind file for the application.
- Replace the file's content with the following code example to bind ArcGIS Engine when the application starts:
using System.Windows;
namespace WinFormsInWPF
{
    public partial class App: Application
    {
        protected override void OnStartup(StartupEventArgs e)
        {
            base.OnStartup(e);
            ESRI.ArcGIS.RuntimeManager.Bind(ESRI.ArcGIS.ProductCode.Engine);
        }
    }
}
Class Application

    Protected Overrides Sub OnStartup(ByVal e As System.Windows.StartupEventArgs)
    MyBase.OnStartup(e)

    ESRI.ArcGIS.RuntimeManager.Bind(ESRI.ArcGIS.ProductCode.Engine)
End Sub

End Class
Binding is required starting at ArcGIS 10 and higher versions.
Using updated styles for Windows Forms controls
By default, the form uses the old-fashioned (pre-Windows XP) styles for common controls in a WPF application. To enable the newer styles, add the following line of code directly after the RuntimeManager.Bind method:
[C#] System.Windows.Forms.Application.EnableVisualStyles();
System.Windows.Forms.Application.EnableVisualStyles()
Adding ArcGIS Engine controls and initializing the ArcGIS Engine license
To add ArcGIS Engine controls and initialize the ArcGIS Engine license, perform the following steps:
- From the toolbox, drag and drop AxMapControl and AxLicenseControl onto the form in the same way you do in a Windows Forms project.
Alternatively, if the ArcGIS Engine controls are not available in the toolbox, right-click the toolbox, and select Choose Items from the menu. The Choose Toolbox Items dialog box opens. On the .NET Framework Components tab, select AxMapControl and AxLicenseControl. - Right-click AxLicenseControl, select Properties, and check the ArcGIS Engine option.
You can also programmatically initialize the ArcGIS Engine license. For more information, see How to host an ArcGIS Engine MapControl in a WPF application.
Loading the map
The map or layers can be added either at design time through the MapControl Properties dialog box or at run time programmatically, the same as when working in a Windows Forms project. To simplify the process, load World.mxd at design time by browsing to the <ArcGIS install location>\DeveloperKit\Samples\data\World folder.
Showing the form
To show the form, double-click the MainWindow.xaml.cs or MainWindow.xaml.vb file within the button1_Click event, and add the following two lines of code:
[C#] private void button1_Click(object sender, RoutedEventArgs e)
{
Form1 frm=new Form1();
frm.Show();
}
Private Sub Button1_Click(ByVal sender As System.Object, ByVal e As System.Windows.RoutedEventArgs)
    Dim frm As Form1=New Form1()
    frm.Show()
End Sub
Showing a modeless form
To show a modal form in a WPF application, you can use the same Windows Form project code shown previously. For modeless forms, however, call the method shown in the following code before showing any form (preferably at application startup). If you don't call this method, your modeless form will still appear, but it won't recognize all keyboard input.
[C#] WindowsFormsHost.EnableWindowsFormsInterop();
WindowsFormsHost.EnableWindowsFormsInterop()
Releasing COM objects
To release Component Object Model (COM)-related objects, open the Form1.cs code, and add the following line of code in the FormClosing event:
[C#] private void Form1_FormClosing(object sender, FormClosingEventArgs e)
{
ESRI.ArcGIS.ADF.COMSupport.AOUninitialize.Shutdown();
}
Private Sub Form1_FormClosing(ByVal sender As System.Object, ByVal e As System.Windows.Forms.FormClosingEventArgs) Handles MyBase.FormClosing
    ESRI.ArcGIS.ADF.COMSupport.AOUninitialize.Shutdown()
End Sub
This step is important. You must ensure that COM references that are no longer in use are unloaded prior to shutdown.
Running the project
To run the project, perform the following steps:
- Save the project.
- Press F5 to run the application.
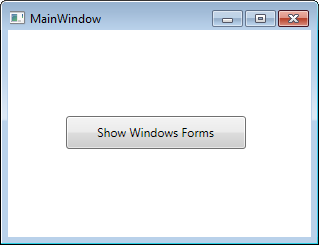
- Click the Show Windows Forms button. See the following screen shot:

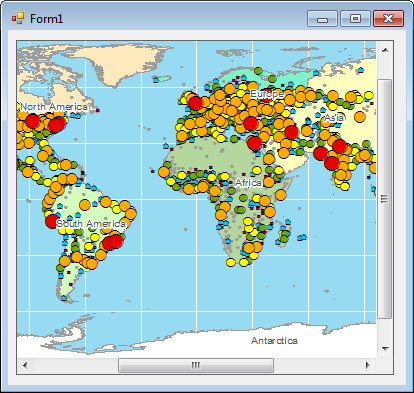
The map displays as shown in the following screen shot:

See Also:
Using ArcGIS Engine controls in WPFHow to host an ArcGIS Engine MapControl in a WPF application
| Development licensing | Deployment licensing |
|---|---|
| Engine Developer Kit | ArcGIS for Desktop Basic |
| ArcGIS for Desktop Standard | |
| ArcGIS for Desktop Advanced | |
| Engine |
