In this topic
Add-in projects
On the Visual Studio New Project dialog box, four types of add-in projects are available for each supported language (C# and VB .NET). Each project type corresponds to a particular ArcGIS for Desktop application: ArcMap, ArcCatalog, ArcGlobe, or ArcScene. A single add-in project can contain any number—and any combination—of add-in components. See the following screen shot:

Once the language and project type are accepted, basic information concerning the add-in project can be entered on the Welcome page of the ArcGIS Add-Ins Wizard. The provided fields are Add-in Name, Company/Publisher, Description, and Image. This information is presented to users in the Add-In Manager dialog box and is automatically incorporated into the Add-In File each time the project is built. See the following screen shot:

In addition, you can have the wizard stub out add-in starter classes. Additional add-in types can always be added later.
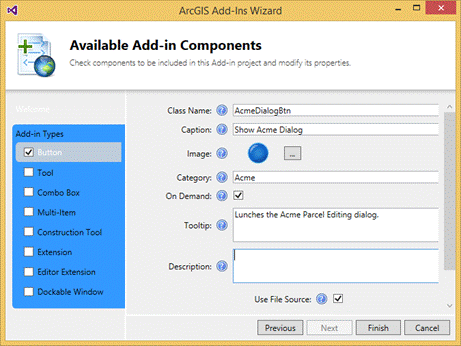
When you select an add-in type from the check list on the left and click Next, the Available Add-in Components dialog box displays a pane containing fields relevant to that type. These fields represent the static or declarative aspects of the add-in type, such as caption, tooltip, and image. The associated managed class name can also be filled in at this point. See the following screen shot:


As with the Welcome page, data entered into these fields can always be updated at a later time. Once you have completed the project settings and clicked Finish, the wizard generates the initial C# or VB .NET project elements.
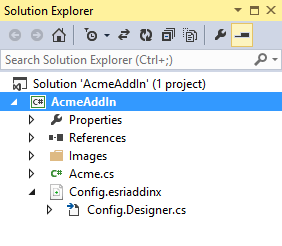
The basic structure of an add-in project is shown in the following screen shot. Alongside the .NET class files generated for the selected add-in types, there is a config.esriaddinx file. This is an Extensible Markup Language (XML) file containing the metadata for the add-in project, including the declarative portions of any add-in components. The Visual Studio project and item templates automatically update this file when changes are made using the wizard; however, there are cases where you may want to edit the XML manually to make simple updates.

Add-in declarations
Add-in declarations are grouped together in named sections in the config.esriaddinx file. At the root level are attributes that describe the add-in as a whole and that are available to users when they browse for or manage add-ins.
Every add-in is assigned an ID, which is typically a globally unique identifier (GUID). The add-in framework uses this ID to distinguish add-ins. The framework can also distinguish between versions of the same add-in using the Version attribute. The add-in installation utility uses this to prevent older versions from replacing newer versions of the same add-in file.
The Targets section is used to specify which version of ArcGIS the add-in is compatible with. See the following code:
[XML] <Name>Acme Utilities</Name>
<AddInID>{9b673d69-4d24-40eb-9481-dd7815d952e4}</AddInID>
<Description>Type in a description for the add-in.</Description>
<Version>1.0</Version>
<Image>Images\Acme.png</Image>
<Author>John Locke</Author>
<Company>AcmeCorporation</Company>
<Date>8/27/2009 12:53:19 PM</Date>
<Targets>
<Target name="Desktop" version="10.5"/>
</Targets>
The AddIn section contains all other XML declarations, including the declarative portions of any and all add-in components contained in the project. See the following code:
[XML] <AddIn language="CLR" library="AcmeAddIn.dll" namespace="Acme"></AddIn>
The language attribute on the AddIn section is used to specify the programming environment used by the add-in. The supported values are CLR, which indicates a .NET managed add-in, and Java.
Though add-in files can contain multiple assemblies, most rely on a single assembly, which is declared using the library attribute. The default namespace can also be specified here instead of in front of every instance where a class name needs to be specified.
All add-in types are assigned a unique ID. This ID can be used to refer to the add-in programmatically; for instance, extension add-ins can be found using the usual IApplication.FindExtension method, but instead of a ProgID, the add-in ID is used.
The class attribute is used to specify the managed class associated with the add-in component. An instance of this class is created by the add-in framework when necessary. Esri makes it easy to navigate and edit the XML of the type shown in the following code by providing an XML Schema Definition (XSD) file. This file validates the XML and provides IntelliSense feedback showing available attributes and legal values.
[XML] <Commands>
<Button
id="ESRI_AcmeAddIn_AcmeDialogBtn"
class="AcmeDialogBtn"
message=""
caption="Show Acme Dialog"
tip="Launches the Acme Parcel Editing dialog."
category="Acme"
image="Images\AcmeDialogBtn.png">
<Help heading="Acme Parcel Editing Dialog">Opens the Acme Parcel Editing Dialog...</Help>
</Button>
</Commands>
Since many of the aspects associated with add-in components are specified declaratively, implementing the active portion of the add-in requires considerably fewer lines of code. You can derive a class from the appropriate Esri-provided base class and override the appropriate methods.
There is no OnCreate override: object initialization should be performed in the class constructor, while access to the rest of the ArcGIS application object model is provided through a global object named for the target application.
See the following code:
[C#] public class AcmeDialogBtn: ESRI.ArcGIS.Desktop.AddIns.Button
{
public Button1(){}
protected override void OnClick()
{
ArcMap.Application.Caption="Hello World";
}
protected override void OnUpdate()
{
Enabled=true
}
}
Public Class AcmeDialogBtn
    Inherits ESRI.ArcGIS.Desktop.AddIns.Button

    Public Sub New()
    End Sub

    Protected Overloads Overrides Sub OnClick()
    ArcMap.Application.Caption="Hello World"
End Sub

Protected Overloads Overrides Sub OnUpdate()
Enabled=True
End Sub

End Class
Registration logic and component category related code associated with traditional component programming is entirely absent in the add-in model.
To use the code in this topic, reference the following assemblies in your Visual Studio project. In the code files, you will need using (C#) or Imports (VB .NET) directives for the corresponding namespaces (given in parenthesis below if different from the assembly name):
