In this topic
- About building custom UI elements
- Creating a custom button and tool
- Creating a custom combo box
- Creating a custom toolbar
- Creating a custom menu
- Uninstalling an add-in
About building custom UI elements
Using add-ins is the easiest way to create custom user interface (UI) elements that can be configured within ArcGIS Desktop applications (ArcMap, ArcCatalog, ArcGlobe and ArcScene). The following custom UI elements are supported by add-ins:
- Buttons
- Tools
- Construction Tools
- Tool palettes
- Combo boxes
- Menus
- Toolbars
- Multi-items
- Dockable windows
Esri provides integrated development environment (IDE) templates for building and deploying these custom UI elements. This walkthrough describes the steps to create custom UI elements for ArcMap using ArcGIS project and item templates.
Creating a custom button and tool
It's easy to create a button and a tool using the ArcGIS Add-Ins Wizard. The following subsections detail how to create a button that zooms to the active layer of the current map and how to create a tool that allows you to add new graphics to your map.
Creating a Visual Studio project
To create a Visual Studio project, complete the following steps:
-
Start Visual Studio.
-
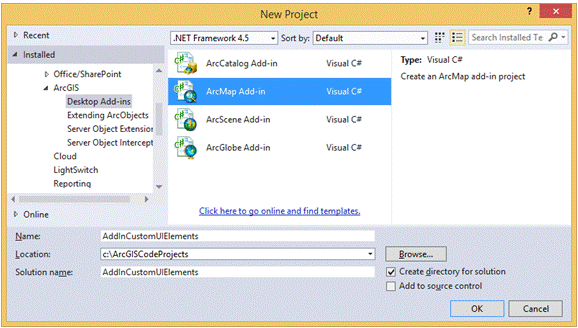
Click File, select New, and click Project. The New Project dialog box appears.
-
Under Project types, expand the Visual Basic or Visual C# project node, expand the ArcGIS node, and click Desktop Add-Ins.
If there are no templates in the Templates pane associated with the Desktop Add-Ins node, verify that your target .NET Framework is set to .NET Framework 4.5 or higher in the drop-down list in the upper right corner of the New Project dialog box.
-
Select the ArcMap Add-in template in the Templates pane. Add-in customizations are specific to ArcGIS Desktop applications and can also be created for ArcCatalog, ArcScene, and ArcGlobe.
-
Name the project AddInCustomUIElements and browse to the location where you want to save the project. See the following screen shot:
-
Click OK to close the dialog box and open the ArcGIS Add-Ins Wizard.
Using the ArcGIS Add-Ins Wizard
The ArcGIS Add-Ins Wizard creates appropriate Extensible Markup Language (XML) elements and managed classes required for the add-in based on the input that you provide. To define the customizations to include in your add-in, complete the following steps:
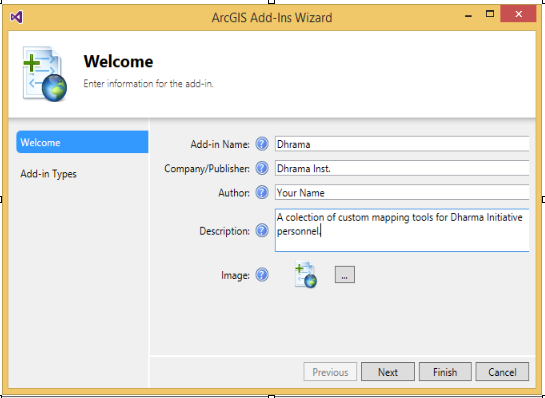
- On the Welcome page, fill in the basic information about the add-in: name, company/publisher, description, and the image. The metadata information you provide about an add-in on the Welcome page displays on the Add-In Manager dialog box. Add the information as shown in the following screen shot:
- Click Next. The Available Add-in Components page appears. The Add-in Types section on the left lists the type of customizations that you can add to your add-in.
- Under Add-in Types, select the Button check box. The declarative properties of the button, such as caption, image, and ToolTip become active.
- Add the button information as shown in the following screen shot:
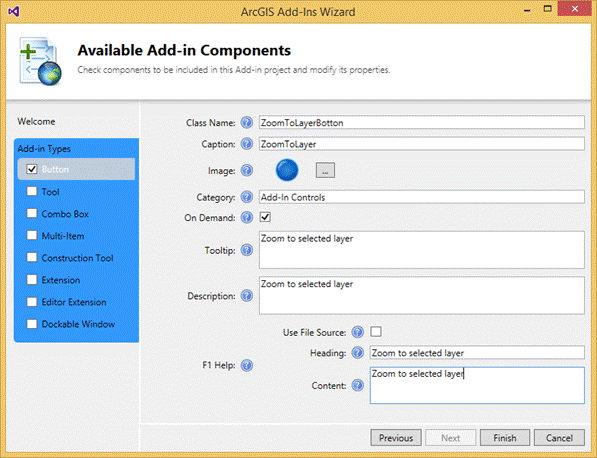
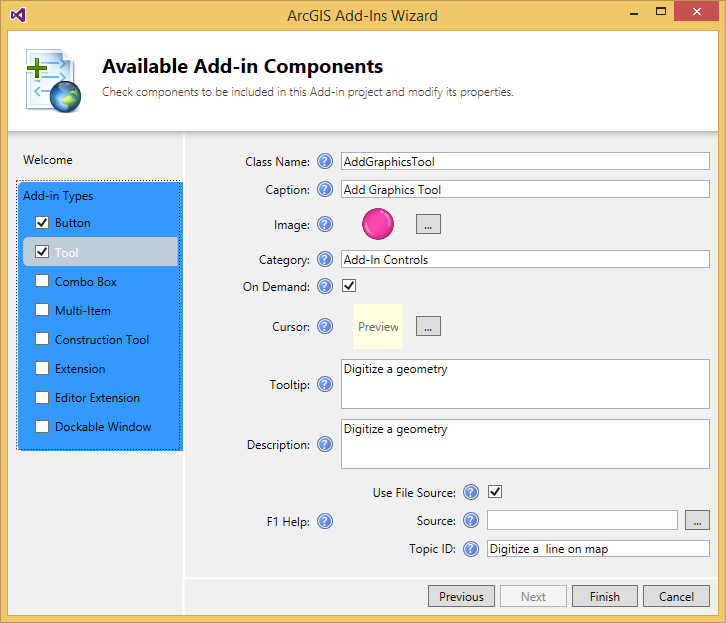
You can find help tips about each entry in the dialog box by hovering the mouse pointer over the appropriate help icon. The ZoomToLayerButton class will be the managed class that implements the run time behavior of the button. The managed class will be created by the wizard. - Select the Tool check box to add a custom tool to the add-in.
- Type AddGraphicsTool as the class name, which must implement the run time behavior of the tool, and add the other declarative properties of the tool as shown in the following screen shot:
- Click Finish. An add-in project is created. The following screen shot shows the files created by the wizard as seen in the Solution Explorer:
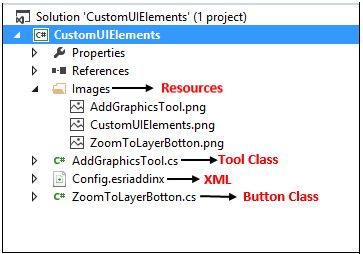
Any images and cursors you select for the button and tool are copied to the new Images folder. The config.esriadddinx XML file is created by the wizard with appropriate XML elements that define the declarative properties of the button and tool. The following section explains the contents of the XML in detail. Note the corresponding managed classes created for the button and tool implementations.
Understanding the XML
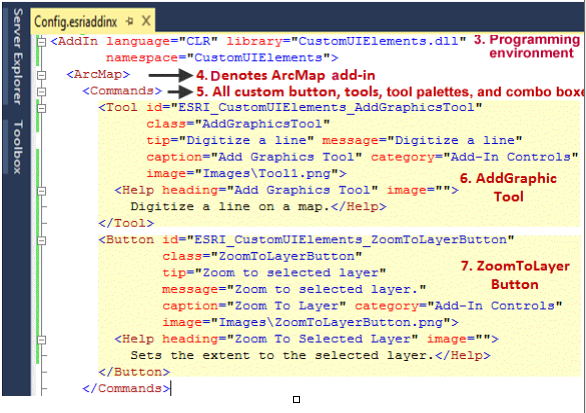
XML elements describing the add-in and its custom components are auto-generated by the wizard based on your input. This section describes the XML declarations in config.esriaddinx as generated by the ArcGIS Add-Ins Wizard. The numbers in this section are not steps; rather, they correspond to the numbers in the referenced screen shots.
- Each metadata element defined in the add-in has a significant purpose. The Add-in Manager relies on the name, description, version, image, author, and company elements to provide a description of the installed add-ins. The AddInID element uniquely identifies the add-in. To guarantee uniqueness, this is typically a globally unique identifier (GUID). The Add-in installation utility relies on the AddInID and Version elements.
- The Targets element specifies the most compatible version and product of ArcGIS for the add-in. The Add-in installation utility will install the add-in only to the product and version specified in the Targets element.

The AddIn element is the parent element that includes all the add-in customization elements. The language attribute on the AddIn element specifies the programming environment of the add-in. The supported values are component language runtime (CLR), which indicates a .NET managed add-in, and Java, which indicates a Java add-in. The library attribute indicates to the add-in framework the related assembly to load. Though add-in files can contain multiple assemblies, most rely on a single assembly. The namespace attribute is the default namespace for all classes in the assembly. - The ArcMap element denotes that the specified add-in customizations are for the ArcMap application. You can also create add-in custom components for ArcCatalog, ArcScene, and ArcGlobe.
- All your custom button, tool, tool palette, multi-item, and combo box add-in components must be defined in the Commands element. You can define any number of buttons, tools, combo boxes, and tool palettes in the Commands XML element.
- The Tool element denotes the custom AddGraphics tool that you created through the wizard. The class attribute specifies the corresponding managed class that defines the run time behavior of the tool. The id attribute uniquely identifies the custom tool across all customizations. The tool is identified by the unique id when included in other customizations such as a toolbar or menu. You can find more information about the attributes of the Tool element by hovering your mouse over the attribute or refer to the add-in XML reference document.
- The Button element denotes the custom ZoomToLayer button that you created through the wizard. The ZoomToLayerButton class attribute specifies the corresponding managed class in which the run time behavior of the button must be described. The id attribute is the unique ID of the button and serves the same purpose as that of the Tool element. See the following screen shot:
Adding ZoomToLayer functionality to the custom button
To add zoom-to-layer functionality to the custom button, complete the following steps:
- Open the ZoomToLayerButton C# or VB.NET class file. The custom button must inherit from the ESRI.ArcGIS.Desktop.AddIns.Button abstract class and must override the following two methods:
- OnClick—This method is invoked and executed when the custom button is clicked in ArcMap.
- OnUpdate—This method is invoked and executed at frequent intervals (in milliseconds) to update the enabled and checked status of the button. See Add-in coding patterns for more information about this method.
- To implement ZoomToLayer functionality in your button, use the ArcGIS Snippet Finder tool. The ArcGIS Snippet Finder tool provides code snippets for common workflows. You can insert the code in your managed class as needed. To implement the ZoomToLayerFunctionality, perform the following step:
- Add ArcGIS snippets by right-clicking the Visual Studio code editor window at the necessary insertion point (before the end of the class file), and Insert Snippet: Double-click `ArcObjects` from the popup window. Double-click 'Mapping' and Double-click 'Zoom to Active Layer in ToC'.
- Add ArcGIS snippets by right-clicking the Visual Studio code editor window at the necessary insertion point (before the end of the class file), and Insert Snippet: Double-click `ArcObjects` from the popup window. Double-click 'Mapping' and Double-click 'Zoom to Active Layer in ToC'.
- Invoke the ZoomToLayer method upon OnClick() method implementation. The ZoomToLayer() method requires IMxDocument as method parameters. The ArcGIS Add-Ins Wizard creates static classes depending on the customizations in your add-in in the config.designer.cs file. Since you're building an ArcMap component, the add-in template generated an ArcMap class with several static members—such as Application and Document—for you to use. Use the object browser to get a complete list of all the class members. See the following screen shot:
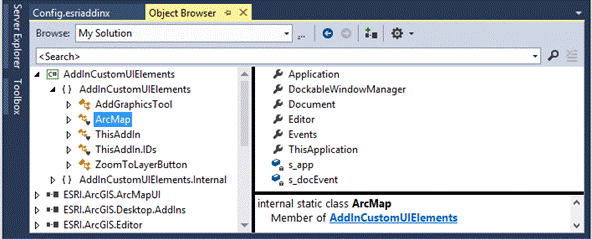
The following code example utilizes the static instances:
protected override void OnClick()
{
    ZoomToActiveLayerInTOC(ArcMap.Application.Document as IMxDocument);
}
Protected Overrides Sub OnClick()
ZoomToActiveLayerInTOC(TryCast(ArcMap.Application.Document, IMxDocument))
End Sub
Adding AddGraphics functionality to the custom tool
To add add-graphics functionality to the custom tool, complete the following steps:
- Open the AddGraphicsTool.cs class file. The custom tool class must inherit from the ESRI.ArcGIS.Desktop.AddIns.Tool abstract base class and must override the OnUpdate() method. The wizard generates the plumbing code for you. The Tool base class provides several methods to capture the UI events—such as OnMouseDown() and OnMouseUp. You can override any of these methods depending on the behavior of your custom tool. The OnMouseDown() method must be overridden for the AddGraphics tool.
- Before you override the OnMouseDown() method, you must implement the AddGraphics functionality as an independent method using the ArcGIS Snippet Finder as shown in the following step:
-
Add ArcGIS snippets, by right-clicking the Visual Studio code editor window at the necessary insertion point (before the end of the class file), and Insert Snippet: Double-click 'ArcObjects' from the popup window. Double-click 'Mapping' and Double-click 'Add Graphic to Map'.
-
- Use the snippet finder to add polygon graphics functionality to the tool as shown in the following steps:
-
Add ArcGIS snippets, by right-clicking the Visual Studio code editor window at the necessary insertion point (before the end of the class file), and Insert Snippet: Double-click 'ArcObjects' from the popup window. Double-click 'Geometry' and Double-click 'Get Polyline From Mouse Clicks'.
-
Invoke these methods appropriately on your OnMouseDown implementation as shown in the following code:
[C#] protected override void OnMouseDown(ESRI.ArcGIS.Desktop.AddIns.Tool.MouseEventArgs
arg)
{
//Get the active view from the ArcMap static class.
IActiveView activeView=ArcMap.Document.ActiveView;
//If it's a polyline object, get from the user's mouse clicks.
IPolyline polyline=GetPolylineFromMouseClicks(activeView);
//Make a color to draw the polyline.
IRgbColor rgbColor=new RgbColorClass();
rgbColor.Red=255;
//Add the user's drawn graphics as persistent on the map.
AddGraphicToMap(activeView.FocusMap, polyline, rgbColor, rgbColor);
//Best practice: Redraw only the portion of the active view that contains graphics.
activeView.PartialRefresh(esriViewDrawPhase.esriViewGraphics, null, null);
}
Protected Overrides Sub OnMouseDown(ByVal arg As ESRI.ArcGIS.Desktop.AddIns.Tool.MouseEventArgs)
MyBase.OnMouseDown(arg)
'Get the active view from the ArcMap static class.
Dim activeView As IActiveView=My.ArcMap.Document.ActiveView
'If it's a polyline object, get from the user's mouse clicks.
Dim polyline As IPolyline=GetPolylineFromMouseClicks(activeView)
'Make a color to draw the polyline.
Dim rgbColor As IRgbColor=New RgbColorClass()
rgbColor.Red=255
'Add the user's drawn graphics as persistent on the map.
AddGraphicToMap(activeView.FocusMap, polyline, rgbColor, rgbColor)
'Best practice: Redraw only the portion of the active view that contains graphics.
activeView.PartialRefresh(esriViewDrawPhase.esriViewGraphics, Nothing, Nothing)
End Sub
Installing the custom button and tool
To install the custom button and tool through the Visual Studio IDE, complete the following steps:
- Save the project.
- Click the Build menu and select Build Solution.
- View the output window in your Visual Studio .NET IDE. If the project builds correctly, the necessary files for customization are bundled as an add-in file (.ESRIAddIn) and installed using the ESRIRegasm utility. These steps are conducted automatically by a post-build MSBuild task included by the wizard in your project.
Testing the custom button and tool
To test the custom button and tool, complete the following steps:
- Start ArcMap and open a map document.
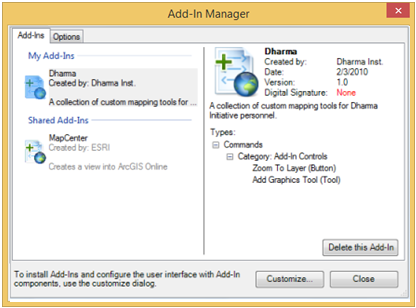
- Click Customize and click Add-In Manager. The Add-In Manager dialog box appears. The Add-In Manager dialog box lists the installed add-ins that are targeting the current application. Add-in information—such as name, image, and description—is included in the Add-In Manager dialog box. See the following screen shot:
- Click the Customize button. The Customize dialog box appears. (Alternatively, access the Customize dialog box through the Customize menu, and click Customize Mode.)
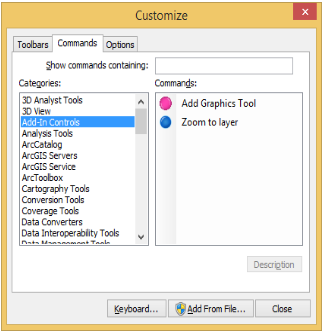
- Click the Commands tab and select the Add-In Controls category. The custom button and tool you created are listed under Commands as shown in the following screen shot:
- Drag and drop the commands onto the Application toolbar to test their behavior.
Creating a custom combo box
A combo box contains an editable field and a drop-down list. The user can select a value from the drop-down list, which appears at the user's request. If you make the combo box editable, the combo box includes an editable field into which the user can type a value.
This section describes the steps to create a combo box that adds ArcGIS Online layer data to your current document. A combo box can be included in an add-in using the Project template described previously. However, you can also add supported customizations to your existing add-in projects using the Item templates.
To add a combo box customization to your existing add-in project, complete the following steps:
- Open the CustomUIElement project that you previously created.
- In the Project Explorer, right-click your project, select Add, and click New Item. The Add New Item dialog box appears as shown in the following screen shot:
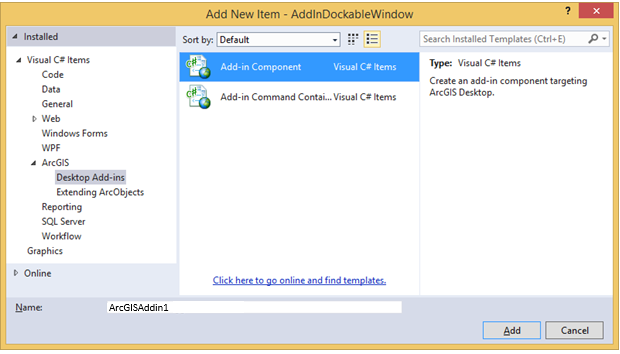
- Expand the Visual Basic or Visual C# project node, expand the ArcGIS node, and select Desktop Add-ins.
- Select Add-in component from the Templates pane and click Add. The ArcGIS Add-Ins Wizard opens.
- Under Add-in Components, select Combo Box, and add the general properties of the combo box as shown in the following screen shot:
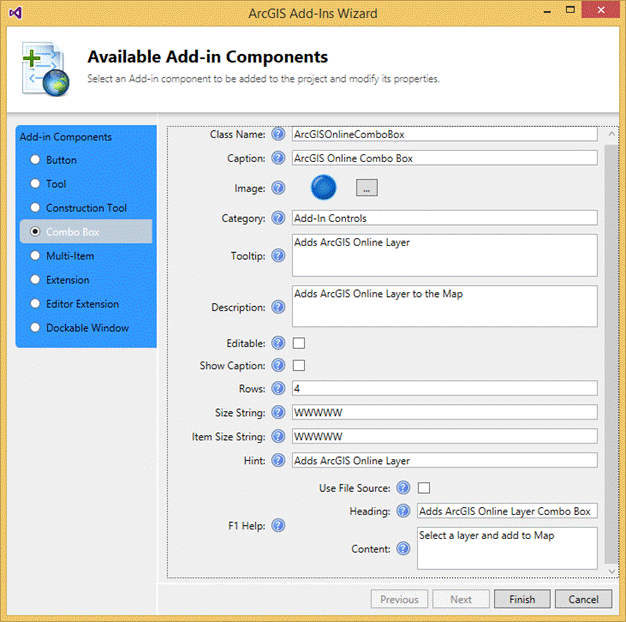
- Click Finish. The XML elements specific to the combo box are added to the config.xml file, the images specified in the wizard are copied to the image folder, and the .NET managed class is created in the project with some template code.
Adding functionality to the custom combo box
The combo box functionality is implemented using the managed class previously created. The managed class must inherit from the ESRI.ArcGIS.Desktop.Addins.Combobox base class. The Add() and Remove() methods must be overridden to add and remove items. The ComboBox class provides several event handlers, such as OnSelChange() and OnEditChange(), that you can override to implement the functionality of the combo box.
The following code shows where ArcGIS Online links are added as items to the combo box in the constructor. When the selection is changed, the corresponding ArcGIS Online hyperlink is opened using the default browser.
[C#] public ArcGISAddin1()
{
string[] serviceLinks=
{
"Add a World Map Service", "World_Topo_Map", "World_Terrain_Base"
};
foreach (string currLink in serviceLinks)
{
Add(currLink);
}
}
protected override void OnSelChange(int cookie)
{
string selectedURL=null;
// The value property provides the selected item.
switch (Value)
{
case "World_Topo_Map":
{
selectedURL=
"http://services.arcgisonline.com/ArcGIS/rest/services/World_Topo_Map/MapServer?f=lyr&v=9.2";
break;
}
case "World_Terrain_Base":
{
selectedURL=
"http://services.arcgisonline.com/ArcGIS/rest/services/World_Terrain_Base/MapServer?f=lyr&v=9.2";
break;
}
}
if (selectedURL != null)
{
System.Diagnostics.Process.Start(selectedURL);
}
base.OnSelChange(cookie);
}
Public Sub New()
    Dim serviceLinks As String()={"Add a World Map Service", "World_Topo_Map", "World_Terrain_Base"}
    For Each currLink As String In serviceLinks
        Add(currLink)
    Next
End Sub

Protected Overloads Overrides Sub OnSelChange(ByVal cookie As Integer)
Dim selectedURL As String=Nothing
' The value property provides the selected item.
Select Case Value
    Case "World_Topo_Map"
        If True Then
            selectedURL="http://services.arcgisonline.com/ArcGIS/rest/services/World_Topo_Map/MapServer?f=lyr&v=9.2"
            Exit Select
        End If
    Case "World_Terrain_Base"
        If True Then
            selectedURL="http://services.arcgisonline.com/ArcGIS/rest/services/World_Terrain_Base/MapServer?f=lyr&v=9.2"
            Exit Select
        End If
End Select
If selectedURL IsNot Nothing Then
    System.Diagnostics.Process.Start(selectedURL)
End If
MyBase.OnSelChange(cookie)
End Sub
Installing the custom combo box
To install the custom combo box, complete the following steps:
- In Visual Studio, save the project.
- Click the Build menu and click Build Solution.
- View the output window in your Visual Studio .NET IDE. If the project builds correctly, the output shows that the build has succeeded and the add-in has been deployed to the user location. You can also verify the installation of the add-in using the Add-In Manager dialog box.
Testing the custom combo box
To test the custom combo box, complete the following steps. (You must have access to the Internet to test the combo box.)
- Start ArcMap and open a map document.
- Click the Customize menu and click Customize Mode. The Customize dialog box appears.
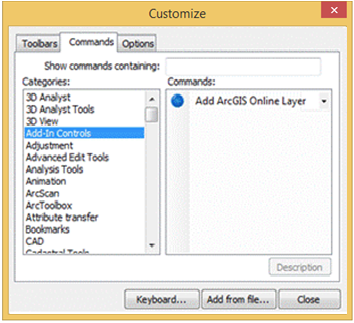
- Click the Commands tab and scroll to the Add-In Controls category. See the following screen shot:
- Drag and drop the combo box command onto the main toolbar.
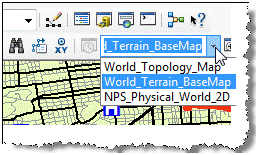
- Select one of the items. The ArcGIS Online File Download dialog box appears.
- Click Open. The layer is added to ArcMap. See the following screen shot:
Creating a custom toolbar
A custom toolbar can contain tools, buttons, tool palettes, combo boxes, and menus. These toolbar items can be built-in or custom created through other add-ins or Component Object Model (COM) components.
To create a custom toolbar that can be docked along with the built-in toolbars, complete the following steps:
- In Visual Studio, in the Project Explorer, right-click your project, select New Item, and click Add. The Add New Item dialog box appears.
- Expand the Visual Basic or Visual C# project node, expand the ArcGIS node, and select Desktop Add-ins.
- Select Add-in Command Container from the Templates pane and click Add. The ArcGIS Add-Ins Wizard opens.
- Click Add-in Command Bars, and select Toolbar.
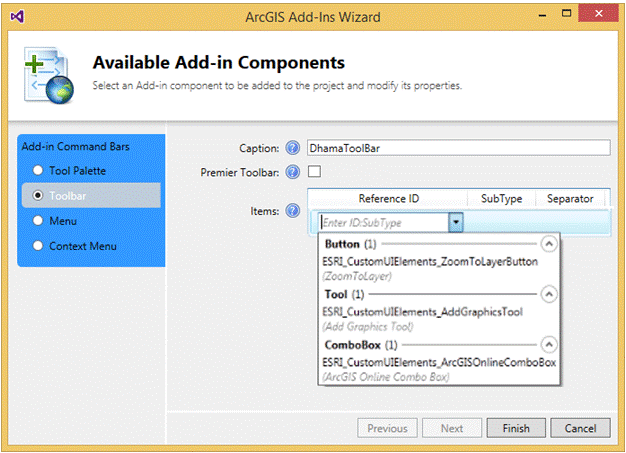
- Type DharmaToolbar in the Caption field.
- Click Add Item to add items to the toolbar. A toolbar can contain one or more buttons, tools, combo boxes, menus, and tool palettes. A drop-down box appears listing the custom add-in components in the project.
- Add custom add-in components from your project to the toolbar, as well as any built-in menu, tool, button, or combo box using its ProgID or class identifier (CLSID) as shown in the following screen shot:
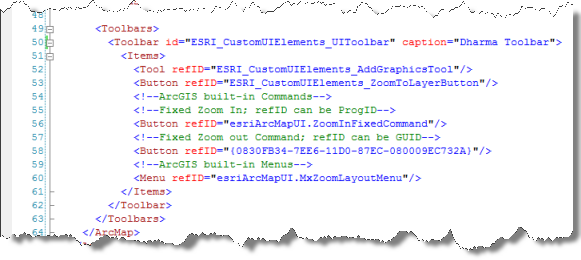
- Click Finish. The appropriate XML elements are added to create a custom toolbar as shown in the following screen shot:
Installing the custom toolbar
To install the custom toolbar, complete the following steps:
- Save the project.
- Click the Build menu and click Build Solution.
- View the output window in your Visual Studio .NET IDE. If the project builds correctly, the output shows that the build has succeeded and the add-in has been deployed to the user location.
Testing the custom toolbar
To test the custom toolbar, complete the following steps:
- Start ArcMap and open a map document.
- Click Customize and click Customize Mode. The Customize dialog box appears.
- Click the Toolbars tab and select Dharma Toolbar as shown in the following screen shot:

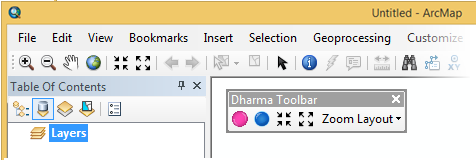
- Click Close. The custom toolbar is added to ArcMap as shown in the following screen shot:
Creating a custom menu
You can create custom menus for ArcGIS Desktop applications using add-ins that can be dragged to toolbars or added as a root menu to the application's main menu. Unlike toolbars, custom menus save toolbar space since they are similar to drop-down controls. However, a menu can contain built-in and custom buttons, menus, and multi-items only.
To create a custom menu using Item templates, complete the following steps:
- In Visual Studio, in the Project Explorer, right-click your project, select New Item, and click Add. The Add New Item dialog box appears.
- Expand the Visual Basic or Visual C# project node, expand the ArcGIS node, and select Desktop Add-ins.
- Select Add-in Command Container from the Templates pane and click Add. The ArcGIS Add-Ins Wizard opens.
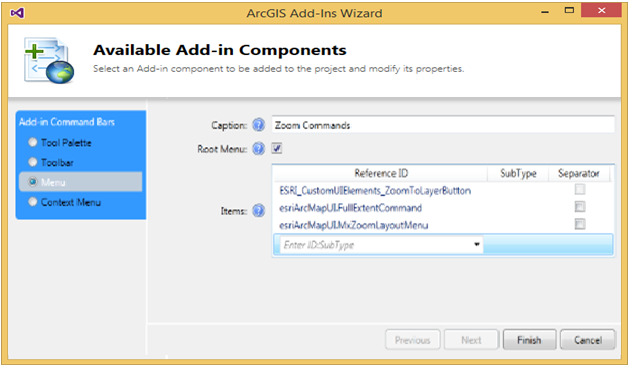
- Click Add-in Command Bars, and select Menu.
- Type Zoom Commands in the Caption field.
- Click Add item to add items to your menu. You can select and add the custom buttons and menus already defined in the add-in from the drop-down list. You can also add other built-in or custom items using their ProgID or CLSID. See the following screen shot:
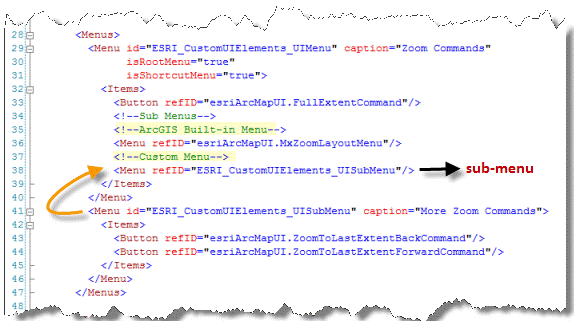
- Click Finish. The appropriate XML elements are added to the config.esriaddinx XML file as shown in the following screen shot. Any custom menu created through the add-ins can also be added as a sub-menu.
- Add the menu to the custom toolbar by specifying the menu's ProgID.
Installing the custom menu
To install the custom menu, complete the following steps:
- Save the project.
- Click the Build menu and click Build Solution.
- View the output window in your Visual Studio .NET IDE. If the project builds correctly, the output shows that the build has succeeded and the add-in has been deployed to the user location.
Testing the custom menu
To test the custom menu, complete the following steps:
- Start ArcMap and open a map document. (If ArcMap is already open, close the application and start it again.) The custom menu you created has been added to the custom add-in toolbar. See the following screen shot:

- If the custom add-in toolbar does not display, follow these steps:
- Click Customize and click Customize Mode. The Customize dialog box appears.
- Select Dharma Toolbar and click Close.
Uninstalling an add-in
To uninstall the add-in you created, follow these steps:
- In ArcMap, click Customize, and click Add-In Manager. The Add-In Manager dialog box appears.
- Select the CustomUIElement add-in and click Uninstall Add-In. This moves the add-in from your add-ins folder to the system's recycle bin.
See Also:
Building add-ins for ArcGIS DesktopAdd-in coding patterns
| Development licensing | Deployment licensing |
|---|---|
| ArcGIS Desktop Basic | ArcGIS Desktop Basic |
| ArcGIS Desktop Standard | ArcGIS Desktop Standard |
| ArcGIS Desktop Advanced | ArcGIS Desktop Advanced |
