In this topic
- Engine editing vs. ArcMap editing
- Edit session
- Edit and sketch operations
- Editing target layer
- Edit tasks
- Edit sketch
- Edit events
- Feature inspectors
- Snap agents
Engine editing vs. ArcMap editing
ArcGIS for Desktop editing functionality is delivered through the Editor library, whereas in ArcGIS Engine, it is contained in the Controls library. Both support a user interface (UI) and an application programming interface (API).
Although the ArcGIS for Desktop editing environment is more feature rich, ArcGIS Engine provides many commands that offer similar functionality, such as the Editor menu, Sketch tool, Edit tool, Target Layer control, Edit Task control, Snapping dialog box, and Attributes dialog box.
The primary editing object in the ArcGIS for Desktop environment is the Editor, whereas in ArcGIS Engine, it is the EngineEditor singleton. In their respective applications, these objects are responsible for managing the edit sketch, current task, current target layer, edit workspace, edit selection, edit session properties, and snap environment. The following table shows the main editing interfaces for each application:
|
|
ArcGIS Engine
|
ArcGIS for Desktop
|
|
Editing environment
|
IEngineEditor
|
IEditor
|
|
Edit tasks
|
IEngineEditTasks
|
IEditTasks
|
|
Edit sketch
|
IEngineEditSketch
|
IEditSketch
|
|
Edit layers
|
IEngineEditLayers
|
IEditLayers
|
|
Edit properties
|
IEngineEditProperties
|
IEditProperties
|
|
Edit events
|
IEngineEditEvents
|
IEditEvents
|
Although the interface names and their purpose are very similar, they do not expose the exact same properties and methods. For example, the IEngineEditEvents interface effectively combines the events exposed on the IEditEvents and IEditEvents2 interfaces in the desktop.
Interfaces that are not shared between ArcGIS Engine and ArcGIS for Desktop make it difficult to create individual components that work in both types of applications. Maintain separate classes, but share program logic in helper classes where appropriate.
Edit session
It is recommended that all data editing takes place in an edit session except when an application bulk loads or bulk updates simple features using insert or update cursors. An edit session is used to implement a long transaction that can encapsulate edit and sketch operations. Data changes made during an edit session can only be seen by the application performing the edit session. Data changes made by other concurrently executing applications (if allowed) are not seen until those edit sessions are saved. For more information on the correct rules of object editing on geodatabases, see IWorkspaceEdit.
An edit session can be created using IEngineEditor (controls) or IWorkspaceEdit (geodatabase). The type of application determines the most appropriate approach. See the following:
- Use IWorkspaceEdit to programmatically perform edits in console applications or graphical user interface (GUI) based applications that do not require user interaction.
- Use IEngineEditor for GUI based editing applications that involve any of the following:
- Uses out-of-the-box editing commands
- Works with the edit sketch
- Controls the snapping environment
- Listens to events that are raised while editing
Use IEngineEditor.StartEditing to start an edit session and IEngineEditor.StopEditing to stop an edit session. For more information, see How to create an edit session.
Edit and sketch operations
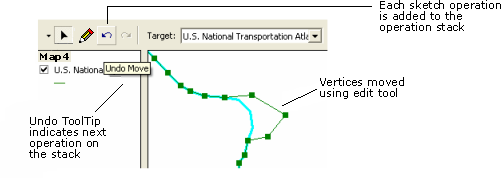
Perform all edits made in an edit session within an operation. Edit operations can create, modify, or delete features, whereas sketch operations modify the edit sketch. Edit and sketch operations can be thought of as short transactions nested within the long transaction corresponding to the edit session.
Operations provide the capability to undo or redo edits made in the edit session by adding each operation onto the operation stack. When the edit session is finished, all operations are removed from the operation stack. See the following screen shot:

Within the life cycle of the edit session, any sketch operations added to the operation stack are temporary. When the sketch is finished, sketch operations are removed and replaced with a single edit operation. When the edit session is finished, the operation stack is cleared.
For more information, see How to create a sketch operation, How to work with the operation stack, and the previously referenced topic, "How to create an edit session."
Editing target layers
The target layer represents the IFeatureLayer currently being edited. Use IEngineEditLayers.SetTargetLayer to programmatically set the target layer for the edit tool, sketch tool, and any custom commands. Alternatively, provide the ControlsEditingTargetToolControl to allow the user to set the target layer as required. Use IEngineEditLayers.TargetLayer to return a reference to the layer being edited.
Using the ControlsEditingTargetToolControl automatically sets the target layer to be the first layer in the map when editing starts. When this control is not present, IEngineEditLayers.TargetLayer will be null until explicitly set.
Use the IEngineEditEvents.OnTargetLayerChanged event to detect when the target layer has been changed.
Edit tasks
ArcGIS Engine edit tasks are components that acquire the geometry stored in an edit sketch, then perform a specific edit operation with it. The following out-of-the-box edit tasks are provided:
- Create New Feature
- Modify Feature
It is also possible to create custom edit tasks by implementing the IEngineEditTask interface. For example, the Reshape polyline edit task sample shows an edit task that allows the user to perform a reshape on the selected feature. See the following screen shot:

The IEngineEditTask interface allows edit tasks to be logically grouped in the ControlsEditingTaskToolControl using the IEngineEditTask.GroupName property. This is not available for ArcGIS for Desktop edit tasks.
Use the IEngineEditEventsOnCurrentTaskChangedEvent event to detect when the edit task has been changed.
Typically, edit tasks are registered in the ESRI Engine Edit Tasks component category; however, since Java classes cannot be registered in the registry, add them programmatically using the IEngineEditor.AddTask method.
Use the IEngineEditor.CurrentTask property to set or return the current edit task. Alternatively, provide the ControlsEditingTaskToolControl to allow users to select the current edit task.
Edit sketch
The edit sketch, which is managed using the IEngineEditSketch interface, contains a geometry that is used as input for completion of the current edit task. The type of sketch geometry can be a multipoint, polyline, or polygon and is set by the current edit task. For example, the Create New Feature task sets the edit sketch geometry type (esriGeometryType) to be the same as the geometry type of the target layer. Edit tasks often set the edit sketch geometry to esriGeometryNull, causing the sketch tool to become inactive. For example, the Reshape polyline edit task sample sets the edit sketch geometry to esriGeometryNull if a single polyline feature is not selected. This prevents users from creating an edit sketch that would otherwise do nothing.
When the edit sketch is finished, the current edit task takes the geometry stored in the edit sketch and performs a specific operation with it. For example, completing the sketch of a building outline when the current task is set to Create New Feature and the target layer is set to the Buildings feature class, creates a Building feature.
Access the edit sketch geometry using the IEngineEditSketch.Geometry property. Use the sketch tool (ControlsEditingSketchTool) or the IEngineEditSketch.AddPoint method to add points to the edit sketch. Create an IEngineSketchOperation to programmatically modify the edit sketch.
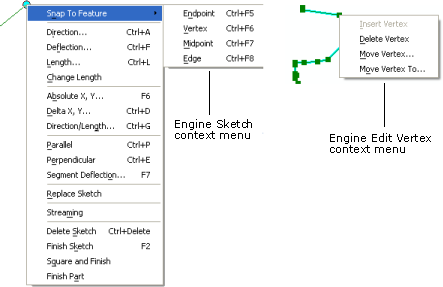
Two context menus are provided to aid manipulating the edit sketch geometry. The sketch context menu (ControlsEditingSketchContextMenu) is typically used with the sketch tool in conjunction with the Create New Feature task. The edit vertex context menu (ControlsEditingVertexContextMenu) is typically used with the edit tool in conjunction with the Modify Feature task. See the following screen shot:

When using the ControlsEditingVertexContextMenu, set the mouse click location first using the IEngineEditSketch.SetEditLocation method.
Edit events
Use the IEngineEditEvents interface to trap specific events that occur within an edit session. For example, custom validation code can be executed when a user completes the edit sketch by listening to the IEngineEditEvents.OnSketchFinished event. For more information, see How to listen to an edit event.
Feature inspectors
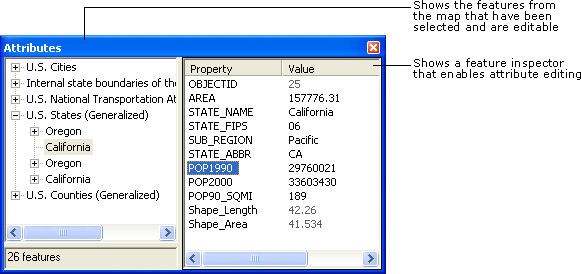
The ControlsEditingAttributeCommand dialog box contains two panels. The left panel lists the features from the map that have been selected and are editable. The features are listed under the feature class to which they belong. Any related features are also listed on this panel under the selected feature to which they are related. The right panel contains a feature inspector that enables attribute editing. See the following screen shot:

It is also possible to replace the default feature inspector with a custom feature inspector by implementing the IEngineObjectInspector interface and registering the class as a feature class extension. Currently, this functionality is limited to Component Object Model (COM) compliant languages, such as Visual Basic and .NET, and is not available for Java developers.
Custom feature inspectors can only be assigned to feature classes in a geodatabase.
Snap agents
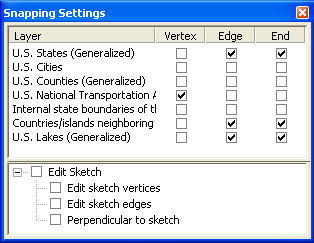
Snap agents help position features and edit sketch vertices. They can be accessed using ControlsEditingSnappingCommand or programmatically through the IEngineSnapEnvironment interface. Custom snap agents can be created by implementing the IEngineSnapAgent interface. See the following screen shot:

See Also:
How to create an edit sessionHow to create a sketch operation
How to work with the operation stack
How to listen to edit events
Sample: Reshape polyline edit task
Sample: Editing custom application
Sample: Buffer snap agent
Sample: Manage snap agents
Sample: Events life cycle
| Development licensing | Deployment licensing |
|---|---|
| Engine Developer Kit | Engine |
| ArcGIS for Desktop Basic | |
| ArcGIS for Desktop Standard | |
| ArcGIS for Desktop Advanced |