As explained in the “Adding Properties to SOEs” topic, properties allow modification of behavior of SOEs at runtime. You can modify values of these properties using ArcMap or ArcCatalog’s Services Editor dialog or ArcGIS Server Manager. This topic describes how to create a property page to edit properties of a Java SOE inside the Services Editor in ArcMap or ArcCatalog.
When you wish to modify values of SOE properties, you must edit the map service and select your SOE from the list of the map service’s capabilities. If using ArcGIS Desktop (ArcMap or ArcCatalog), such editing must occur in the Map Service Editor. You must provide Service Editor with a property page that will be rendered when the SOE is selected in the Map Service Editor dialog. For Java SOEs, this property page is a Java Swing JFrame and will contain one or more Swing controls that administrators can interact with to provide new values for SOE properties.
How to create a property page for Java SOEs?
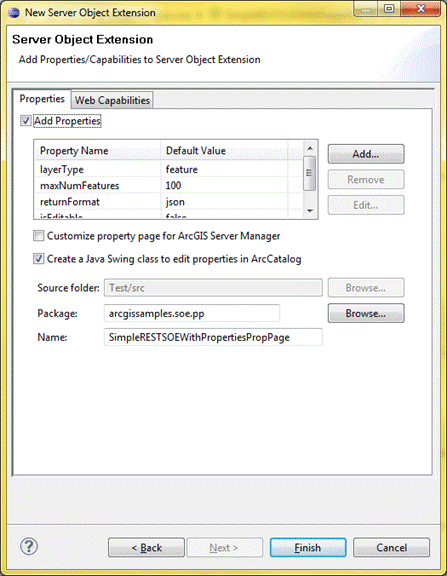
During SOE creation in the Eclipse SOE creation wizard, the “Properties” page allows you to specify properties and their default values. It also allows you to create a Java class that returns a property page to edit properties. When you check the “Create a Java Swing class to edit…” checkbox (as shown below), the Java class is created in the specified package. Remember to uncheck the “Customize property page for ArcGIS Server Manager” check box, since this topic does not discuss property pages for ArcGIS Manager. To learn more about creating custom property pages for Manager, see the “Creating Custom Property Pages for Manager” topic.

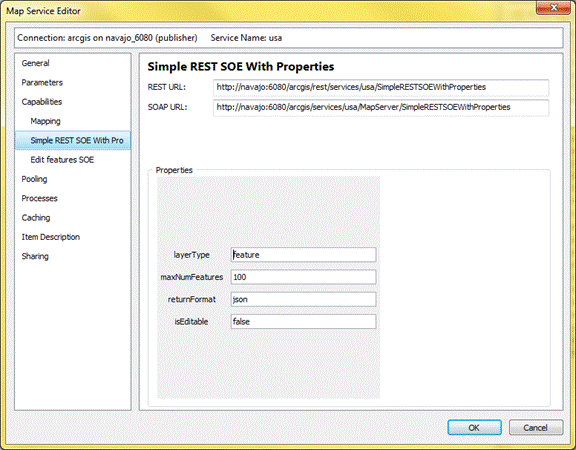
By default, this class defines a form that contains a pair of JLabel and JTextBox elements for each property. This class can then be packaged into a JAR file and deployed to ArcMap, thereby providing a read-to-use property page for your SOE. The following is a snapshot of a default property page generated by the Eclipse SOE creation wizard for the SimpleRESTSOEWithProperties SOE sample, and rendered in Services Editor. Because it is the default page, it contains only pairs of labels and text boxes for each property.

As seen above, this SOE sample has four properties:
|
Property
|
Description
|
|
layerType
|
Type of layer the SOE needs to look for, from among a limited list such as feature, raster or all.
|
|
maxNumFeatures
|
Maximum number of features the SOE can return.
|
|
returnFormat
|
Format in which information must be returned to the client app. Some acceptable formats are json, html and text.
|
|
isEditable
|
Indicates if new features could be created and saved to the geodatabase via an SOE operation.
|
Property values, however, are not always textual in nature, and the use of text boxes alone as user interface media leaves ample scope for users to enter incorrect or vague values for properties that need accurate and precise values. In such scenarios, richer and more appropriate user interface elements such as drop down boxes, lists, check boxes, radio buttons, etc. are necessary to present the true nature of the properties and elicit accurate and precise values from the server administrator.
To use advanced user interface controls, therefore, the above property page Java class could be enhanced by using some advanced Swing controls, thereby providing a richer user interface to edit properties in the Service Editor.
How to use advanced user interface elements in a property page
Each Java SOE property page class extends a base class called com.esri.arcgis.server.BaseSOEPropertyPage. The property page class must override the base class’s initGUI() method. This method defines the user interface using the Java Swing API and returns a JFrame that contains all Swing controls. As mentioned earlier, the class generated by the Eclipse wizard after SOE creation contains a pair of JLabel and JTextBox elements for each property, which are contained inside the JFrame returned by the initGUI() method. Therefore, to implement an advanced user interface, you must modify initGUI() and replace the JLabels and JTextBoxes with the Swing controls of your choice. As an example, please consult the property page Java class SimpleRESTSOEWithProperties SOE sample.
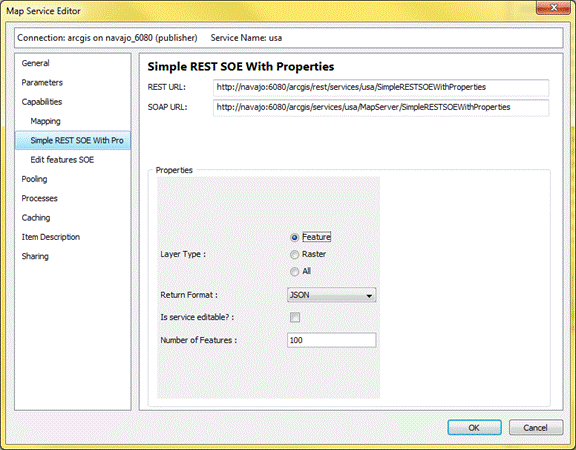
The property page associated with the SimpleRESTSOEWithProperties sample uses richer Swing controls than just JTextBoxes. Since the layerType property corresponds to the type of layers in a map, the acceptable values are limited to “feature”, “raster”, and “all”. Thus a radio button group or a drop down list would be appropriate to convey existence of such a domain for this property. Let’s choose a radio button group for this property.
The maxNumFeatures property holds an integer that indicates the maximum number of features this SOE could return at a time. Thus a JTextBox should suffice.
The returnFormat property value is allowed only three values, namely html, json and text, and therefore is represented by a JComboBox.
The isEditable property is a flag that indicates if certain functionality (in this case, editing) should be enabled. A JCheckBox allows users to turn on/off this flag. Note that this is a dummy property for this sample SOE and editing functionality is not implemented.
Thus, a short inquiry into the nature of properties and the value domain allows you to design a richer and more user-friendly user interface to edit properties. The following is a snapshot of the updated property page for the SimpleRESTSOEWithProperties SOE.

To view implementation of this enhanced property page, please consult the arcgissamples.soe.pp. SimpleRESTSOEWithPropertiesPropPage.java file in the SimpleRESTSOEWithProperties sample SOE.
How to deploy a property page to ArcMap or ArcCatalog
The following outlines deployment of a property page to ArcMap or ArcCatalog for Java SOEs.
- Deploy your SOE to ArcGIS Server and enable it on a map service.
- Ensure that ArcGIS Desktop is installed on the deployment machine.
- Export your property page Java class to a JAR file. Ensure that this JAR file does not contain your Java SOE class, but only the properties page class and any dependencies that the property page may have.
- Place the JAR file in the <ArcGIS Desktop Home>/java/lib/ext folder.
- Start ArcMap or ArcCatalog, or restart it if it was already open.
- Create a connection to the ArcGIS Server you deployed your SOE to.
- Stop the map service your SOE is enabled on.
- Click Service Properties, and select the “Capabilities” tab.
- Select your SOE from the list of capabilities.
- Ensure that a property page displaying Swing user interface controls is rendered in the bottom right hand section of the Services Editor.
- Modify values of one or more of the properties and click “OK”.
- Edit the map service in ArcGIS Server Manager and select the same SOE as above. Verify that the values of properties match what you provided in ArcMap/ArcCatalog.
| Development licensing | Deployment licensing |
|---|---|
| Server | Server |