The pattern for developing REST server object extensions (SOEs) is to create a Java class that implements the mandatory IServerObjectExtension and IRestRequestHandler interfaces. The IServerObjectExtension interface provides init() and shutdown() methods that are called when your map service starts and shuts down, while the IRestRequestHandler methods handle HTTP requests to your SOE.
This topic walks you through
This topic walks you through
- Creating a REST SOE using the SOE Eclipse wizard
- Adding business logic to the SOE
- Exporting the SOE to a .soe file
- Deploying the SOE to ArcGIS for Server, and
- Consuming the SOE using the ArcGIS for Server Services Directory
The SOE that you will end up creating in this walk-through is also provided as a sample, called SimpleRESTSOE, in the Java ArcObjects SDK.
- Creating a REST SOE using the SOE Eclipse wizard
Step 0. Ensure that the "bin" folder in a JDK (version 1.6.0_41 or above) is added to the PATH environment variable.
Step 1. Ensure that the Java ArcObjects software development kit (SDK) is installed on your computer. The SDK provides access to libraries required for developing ArcObjects Java extensions, as well as the Eclipse plugins that hold Java extension creation and export wizards.
Step 2. Ensure that ArcGIS Eclipse plugins are installed in your copy of Eclipse. The minimum supported version of Eclipse is Helios Update 2. For instructions on how to install ArcGIS Eclipse plugins, see the "Using ESRI Eclipse Plugins" topic in "Developing Desktop Applications" -> "Using ESRI Eclipse Plugins" section of the ArcGIS Java Developer Help.
Step 3. Create a new Eclipse Java project, or use an existing one.
Step 4. Create a new REST SOE. Call it “SimpleRESTSOE”.
With your project selected, right click your source folder, typically 'src' and select “New -> Other …” from the context window. The “New…” dialog will pop up with a list of wizards. Note that these wizards become available only after the ArcGIS Eclipse plugins are installed.
- With your project selected, right click your source folder, typically 'src' and select “New -> Other …” from the context window. The “New…” dialog will pop up with a list of wizards. Note that these wizards become available only after the ArcGIS Eclipse plugins are installed.

- Expand ”ESRI templates”, then ”ArcGIS Extension” and then the “Server” folder and find the ”Server Object Extension” wizard.
- Select the “Sever Object Extension” wizard and click “Next” to get started. This opens up the “New Server Object Extension” wizard. On the first page of this wizard you create your new Java SOE class.
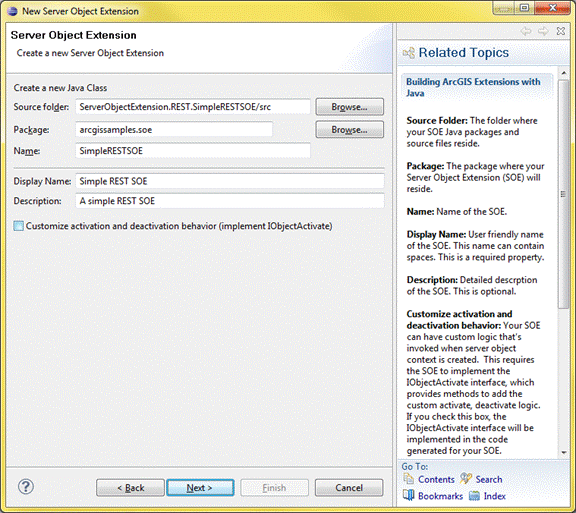
- Enter a package name and class name for your SOE. If the text box for name is pre-filled with an auto-generated name, you can replace it with your own text.
- Enter a display name (can contain spaces) and a user-friendly description.
- There is an option to implement the IObjectActivate interface. This interface provides methods to invoke custom logic upon SOE creation/destruction. Since your SimpleRESTSOE will not have any custom logic at creation/destruction time, leave this checkbox unchecked.
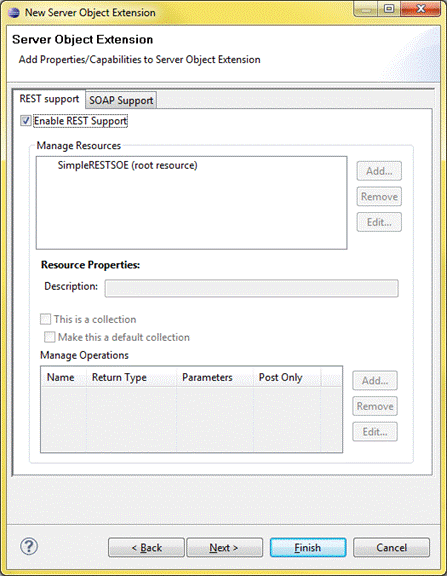
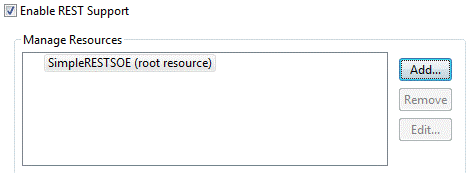
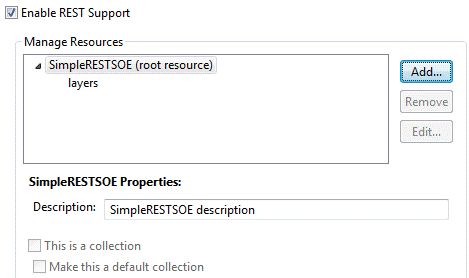
- Ensure that the “REST Support” tab is selected. Check the “Enable REST Support” checkbox. This displays a dialog to add subresources and operations.
- Add a subresource to the root resource. To do so, select the root resource and click “Add”.
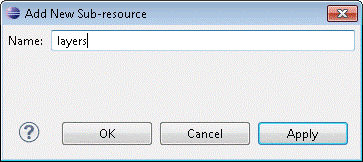
- You’ll call this subresource “layers”, because it will return all layers in the associated map service in JSON format. Type in the name “layers” for this subresource and click “OK”, in the dialog that pops up. If you’d like to add more subresources, click “Apply” and continue typing name of the new subresource. When done, click “OK”.
This lists the newly created subresource below the root resource in a tree-like structure.
Note that the “layers” subresource could have its own subresources as well. To add one, you would select “layer” and repeat the process for adding subresources. Since this is a simple REST SOE, we’ll restrict the subresource hierarchy to one level.
- Modify description for your newly create subresource. This is optional.
- If you wish to make your subresource a collection, check the “This is a Collection” checkbox. A subresource is tagged “Collection” only when developers intend to expose elements of a similar nature together as one subresource. This allows developers to specify operations on the whole collection, and also on individual elements of the collection. A good example of a collection subresource is layers in a map service.
- A subresource that is already tagged as collection can be further tagged as default collection. The distinguishing factor between a collection and default collection is that elements in a default collection can be accessed without naming the collection. If you wish to tag your subresource as default collection, check the “Make this a default collection” check box. Please note that if you have tagged several subresources as collection, you must tag only one of them as the default.
- Add an operation to the root resource and call it “getLayerCountByType”. So why add an operation instead of another subresource? An operation allows users to provide input and uses that to generate output, whereas subresources only return pre-determined output. Your operation will take in a layer type from the user (such as “feature”, “raster”, “dataset”, or “all”) and then return a count of that type of layer in the associated map service.
To add the operation, select the root resource, and click “Add” in the “Manage Operations” section.
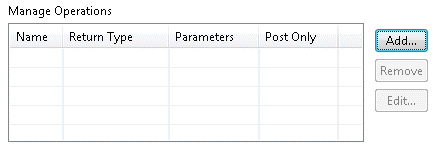
This displays the “Add New Operations” dialog. Type in the operation name and input parameters and select “json” as its return type. If you wish to add more operations, just click “Apply” and the input fields are ready to accept the second operation. Click “OK” when done.

- You now have a REST resource called “SimpleRESTSOE” with one subresource and one operation.
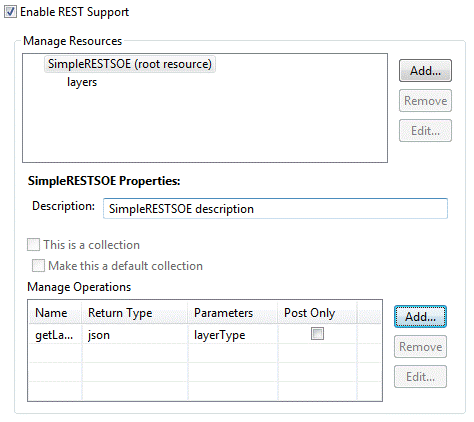
- Leave the “Post Only” check box unchecked. This flag is used to indicate that a REST operation is accessible only though the HTTP POST method.
- Click Finish. A dialog may come up asking you if you would like to add the ArcGIS library to your build path. Select 'OK' to add the required arcobjects.jar to your project’s build path.
-
Verify that the wizard generated one Java class, SimpleRESTSOE.java
- Adding business logic to the SOE
The SimpleRESTSOE.java class generated by the wizard includes methods that correspond to the choices you made in the wizard, in terms of subresources and operations. The wizard generates the following methods for an SOE created as described in the previous sections.
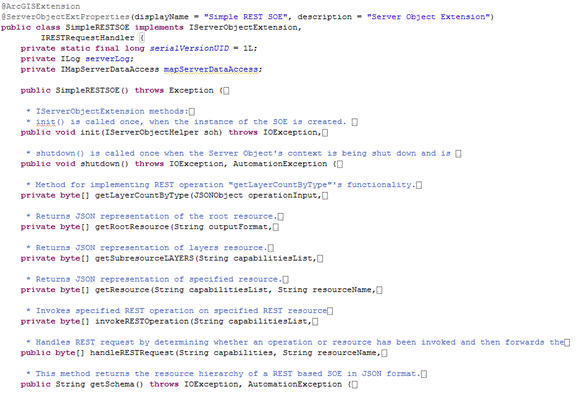
Starting from methods listed at the top:
- The init() and shutdown() methods, declared in the IServerObjectExtension interface, are called when SOE is instantiated and destroyed respectively. These methods are common to SOAP and REST SOEs.
- The getLayerCountByType() method corresponds to the REST operation by same name. This is the suggested implementation point for this REST operation.
- The getRootResource() method corresponds to the root resource (the SOE itself) . Its implementation, as generated by the wizard, includes creating a JSON object with name of SOE in it. This can be customized to add more information to the root resource, such as description.
- The getSubResourcelayers() method stub is generated to hold business logic for the “layers” subresource. Thus, this is the suggested implementation point for this subresource.
- The invokeRESTOperation() method is an internal method and is used to provide all the internal logic needed invoke the correct REST operation at runtime. You don't need to modify this method, unless new REST operations are added to the SOE and/or existing ones removed or modified.
- The handleRESTRequest() method is the entry point into a REST SOE at runtime. This method is called by Server’s REST handler and all information regarding the REST request is made available to this method. This method needs to be modified only if new subresources are added or existing ones removed.
- The getSchema() method returns the resource hierarchy for your RESTSOE in JSON format. If using Eclipse IDE wizard to create SOEs, this method will be generated automatically based on the resource hierarchy you specify on the “REST Support” page. This method should be modified only if you wish to modify the resource hierarchy after SOE has been created by the Eclipse wizard.
Step 1: Implement SOE initialization logic.
The following code snippet includes the init() and shutdown() methods of the SOE. The init() method prepares ArcObjects members that the SOE requires at runtime, include a handle to the map service that the SOE extends.
[Java]
public class SimpleRESTSOE implements IServerObjectExtension, IRESTRequestHandler{
    private static final long serialVersionUID = 1L;
    private IServerObjectHelper soHelper;
    private ILog serverLog;
    private IMapLayerInfos layerInfos;

    public SimpleRESTSOE()throws Exception{
        super();
    }

    /**
     * init() is called once, when the instance of the SOE is created.
     */
    public void init(IServerObjectHelper soh)throws IOException, AutomationException{
        this.soHelper = soh;
        this.serverLog = ServerUtilities.getServerLogger();

        IMapServer3 ms = (IMapServer3)this.soHelper.getServerObject();
        IMapServerInfo mapServerInfo = ms.getServerInfo(ms.getDefaultMapName());
        this.layerInfos = mapServerInfo.getMapLayerInfos();

        serverLog.addMessage(3, 200, "Initialized " + this.getClass().getName() +
            " SOE.");
    }

    /**
     * shutdown() is called once when map service is shutting down
     */
    public void shutdown()throws IOException, AutomationException{
        serverLog.addMessage(3, 200, "Shutting down " + this.getClass().getName() +
            " SOE.");
        this.soHelper = null;
        this.serverLog = null;
    }
Step 2: Implement business logic for “layers” subresource.
The following code snippet implements the “layers” subresource. The ArcObjects API is used to gather information about all layers in the associated map service, through use of methods in the com.esri.arcgis.carto.IMapLayerInfos interface. This information is then poured into a JSONObject and is returned as an array of bytes to the user. Copy this code snippet into the SimpleRESTSOE class.
/**
 * Returns info about layers in associated map service
 *
 * @return
 * @throws Exception
 */
private byte[] getLayersInfoAsJSON()throws Exception{
    JSONObject json = new JSONObject();
    int count = layerInfos.getCount();
    json.put("layerCount", count);

    JSONArray layerArray = new JSONArray();
    for (int i = 0; i < count; i++){
        IMapLayerInfo layerInfo = layerInfos.getElement(i);

        JSONObject layerJSON = new JSONObject();
        layerJSON.put("name", layerInfo.getName());

        String layerType = layerInfo.getType();
        layerJSON.put("layerType", layerType);

        int id = layerInfo.getID();
        layerJSON.put("id", id);

        layerJSON.put("description", layerInfo.getDescription());
        if (layerInfo.isFeatureLayer()){
            FeatureClass fc = new FeatureClass
                (this.mapServerDataAccess.getDataSource("", id));
            layerJSON.put("featureCount", fc.featureCount(null));
        }

        layerArray.put(i, layerJSON);
    }
    json.put("layersInfo", layerArray);

    return json.toString(4).getBytes();
}
Step 3: Implement business logic for the “getLayerCountByType” operation.
The following code snippet shows implementation of the “getLayerCountByType” operation. The com.esri.arcgis.carto.IMapLayerInfos interface provides access to individual layers and other information such as type. This method below merely returns a count of layers of the type specified by the user. Acceptable types in the following code are feature, raster, dataset, or all. This list can easily be extended to include other types as well. Copy this code snippet into the SimpleRESTSOE class.
[Java]
private byte[] getLayerCountByType(JSONObject operationInput){
    String type = operationInput.getString("layerType");

    JSONObject json = new JSONObject();
    try{
        int count = 0;
        if (type != null && !type.isEmpty()){
            String aoType = "";
            if (type.equalsIgnoreCase("all")){
                count = layerInfos.getCount();
            }
            else if (type.equalsIgnoreCase("feature")){
                aoType = "Feature Layer";
            }
            else if (type.equalsIgnoreCase("raster")){
                aoType = "Raster Layer";
            }
            else if (type.equalsIgnoreCase("dataset")){
                aoType = "Network Dataset Layer";
            }

            for (int i = 0; i < layerInfos.getCount(); i++){
                if (layerInfos.getElement(i).getType().equalsIgnoreCase(aoType)){
                    count++;
                }
            }

            json.put("count", count);

            return json.toString().getBytes();
        }
        else{
            throw new Exception(
                "Invalid layer type provided. Available types are: \"all\", \"feature\", \"raster\", \"dataset\".");
        }
    }
    catch (AutomationException e){
        e.printStackTrace();
    }
    catch (JSONException e){
        e.printStackTrace();
    }
    catch (IOException e){
        e.printStackTrace();
    }
    catch (Exception e){
        e.printStackTrace();
    }

    return null;
}
III. Exporting the SOE to a .soe file
Once the implementation of REST subresource and operation is complete, the SOE needs to be packaged into a .SOE container file. The “Export SOE” wizard could be used to accomplish this. For more details on using this wizard, please see the “Exporting SOAP and REST SOEs" topic in the “Java ArcObjects Developer Guide” -> “Developing Extensions” -> “Server Object Extensions” -> "Exporting SOEs" section of the ArcGIS Java Developer Help.
- Deploying the SOE to ArcGIS for Server
To learn how to deploy SOE, see the “Deploying and Un-deploying SOEs” topic in the “Java ArcObjects Developer Guide” -> “Developing Extensions” -> “Server Object Extensions” section of the ArcGIS Java Developer Help. To learn how to enable the SOE on a map service, see the “Enabling and Disabling SOEs” in the section mentioned above. Note that the term “Deploy” is used here to signify uploading of the .soe file to ArcGIS for Server and registering it as an extension to map services.
- Consuming the SOE using the Services Directory
Step 1: Open the Services Directory at http://<server name>:6080/arcgis/rest/services/.
Step 2: Navigate to your map service’s root page (its URL ends with “/MapServer”) and scroll down to the “Supported Extensions” section.
Step 3: Click the “SimpleRESTSOE” hyperlink. This brings up the SimpleRESTSOE’s root resource web page, which lists name and description of the root resource, along with the “layers” subresource in the “Child Resources” section and the “getLayerCountByType” operation in the “Supported Operations” section.
Step 4: Click on the “layers” subresource. It displays information about all layers in JSON format.
Step 5: Navigate back to the root resource page and click on the “getLayerCountByType” operation. Enter “feature” in the layerType field and click “GET”. The JSON response will include the number of feature layers. Test this operation with other types, such as “raster”, “dataset”, or “all”.
Undeploy the SOE when done. To learn how to undeploy an SOE, see the “Deploying and Undeploying SOEs” topic in the “Java ArcObjects Developer Guide” -> “Developing Extensions” -> “Server Object Extensions” section of the ArcGIS Java Developer Help.
| Development licensing | Deployment licensing |
|---|---|
| Server | Server |