
In this topic
- Delay loading
- File structure
- Help
- Well-known folder locations
- Add-in compatibility across newer versions of ArcGIS
- Administrator settings
Delay loading
By default, the assemblies associated with add-in buttons and tools are not loaded until the corresponding item on a toolbar or menu is clicked by the user. This behavior helps conserve application memory and other resources. Since the enabled state of an add-in button or tool is controlled by the OnUpdate method within code, the button or tool will initially appear enabled. If you need tighter control over the initial enabled state of a button or tool, you need to override the default behavior and force the item to load at startup by setting the onDemand Extensible Markup Language (XML) attribute to false.
File structure
An add-in is a collection of files and folders conveniently packaged in a Zip archive. Instead of a .zip extension, add-ins use .esriAddin to make them easily identifiable by users and the Esri ArcGIS Add-In Installation Utility. For example, if you double-click an add-in in Windows Explorer, on a Web site, or in an e-mail, the add-in installation utility automatically installs the add-in on your machine - deploying it to a well-known folder.
Add-ins must have a Config.xml file located at the root level of the add-in archive. This file describes the add-in and declares its customizations. Localized versions of this file may be present as well, one for each language that the add-in supports. For more information, see Localizing add-ins.
Most add-ins also have an Install folder. Everything in the Install folder is unpacked to a temporary location on the user's machine. The main purpose of the Install folder is to hold the executable code (the active portion) of the add-in. For example, a button is declared in the configuration file but its custom behavior is defined in its associated library. If your add-in supports multiple languages, your satellite assemblies will be stored in language subfolders following the standard Microsoft model. For .NET add-ins, the active portion must be extracted to disk before it can be loaded.
You can create additional folders and files under the Install folder. This is useful in cases where you want to ship data as part of your add-in. If you're adding data through your Visual Studio project, set the Copy to Output Directory property to the Copy always setting as shown in the following screen shot:

Most of the controls declared in the configuration file have graphics associated with them. All graphics referenced in the configuration files must be packaged in the add-in archive; do not embed them as resources in your library. Graphics are typically added to an Images folder at the root level of the archive, but you can change the folder name. Graphics are read directly from the archive; they do not need to be unpacked like the assemblies, so do not put your Images folder under the Install folder.
When referencing a graphic in your configuration file, you must specify the relative path from the configuration to the image file. For example, in the following code, a button references a .png file in an Images subfolder at the root level of the add-in archive:
[XML] <Button
id="Acme_ShowDVBtn"
class="ShowDVBtn"
tip="Show's the Parcel Editing Window"
message="Shows the Parcel Editing Window."
caption="Show Acme Window"
category="Acme"
image="Images\ShowDVBtn.png"/>
The following graphic illustrates the structure of an add-in:

Help
When you hover over an add-in command, a short help tip appears about the command. Use the command's message attribute to supply a descriptive text and the tip attribute for the heading.

Since 10.1, add-in commands can additionally establish F1 help links in their tips. The F1 help capability is flexible, as the type of link can be any of the following:
- A topic in a registered CHM file
- A topic in a CHM file included with the add-in
- An HTML, TXT, or PDF file included with the add-in
- A URL
- Text declared within the command definition
To support F1 help, source and topicID attributes have been added to the Help element. In addition, an optional helpSource attribute has been added on the root AddIn element where you can define a global help source for all of the components in the add-in. For example, if all of your help topics are in the same .chm file, you can specify the CHM once here instead of repeating it on each component.
If the help source is an HTML file or URL, you can use the topicIDto specify an anchor in the document. If you're embedding a help file in your add-in (CHM, HTML, and so on) make sure the Copy to Output Directory property is set to Copy Always.
The following XML shows some examples:
[XML] <AddIn language="CLR" library="Acme.dll" namespace="Acme" helpSource="Acme.chm">
<ArcMap>
<Commands>
<Button
id="Acme_FixedZoomOut"
class="ZoomOut"
caption="Fixed Zoom Out"
tip="Fixed Zoom Out"
message="Zooms out the map a fixed amount."
category="Acme"
image="Images\ZoomOut.png">
<!-- F1 Help declared inline -->
<Help heading="Zoom out">Zooms the map out...</Help>
</Button>
<Button
id="Acme_FixedZoomIn"
class="ZoomIn"
caption="Fixed Zoom In"
tip="Zoom In"
message="Zooms in the map a fixed amount."
category="Acme"
image="Images\ZoomIn.png">
<Help source="FixedZoomIn.htm" topicID="SectionA"/>
<!--<Help source="Acme.pdf"/><Help source="Acme.txt"/>-->
</Button>
<Tool
id="Acme_Pan"
class="PanTool"
caption="Pan"
tip="Pan."
category="Acme"
image="Images\Pan1.png">
<Help source="ACME_2.chm" topicID="2210001"></Help>
</Tool>
<Button
id="Acme_FullExtent"
class="FullExtent"
caption="Full Extent"
tip="Zooms the map the the full extent."
category="Acme"
image="Images\FullExtent.png">
<Help source="http://www.Acme.com/help.htm" topicID="SectionB"/>
</Button>
</Commands>
</ArcMap>
</AddIn>
Well-known folder locations
Add-ins are automatically discovered at startup in a per user/per desktop version well-known folder at C:\Users\<username>\Documents\ArcGIS\AddIns\Desktop<version>.
There is typically no reason to concern yourself with the actual folder location, as add-ins are automatically added and removed using the Esri Add-In Utility (EsriRegAddIn.exe) and the Add-In Manager dialog box. The Add-In Manager dialog box also lets you add your own well-known folders, which can be network shares.
In addition, add-ins automatically unpack their Install folder's contents to a temporary folder at C:\Users\<username>\AppData\Local\ESRI\Desktop<version>\AssemblyCache
This data is automatically removed by the add-in framework once it detects the add-in is no longer installed on the system.
To see the AssemblyCache folder, you might have to modify your Folder options in Windows Explorer: turn on "Show hidden files, folders, and drives", and turn off "Hide protected operating system files".
Add-in compatibility across newer versions of ArcGIS
Add-ins targeting previous versions of ArcGIS will automatically load in newer releases, there is no need to rebuild or reinstall them. For example, ArcGIS 10.4 will automatically discover and load add-ins from the 10.3 well-known folder location. Add-ins are not backward compatible; for example, and add-in targeting ArcGIS 10.4 will not load in 10.3.
Administrator settings
Administrators can control the add-in security level for their users by manually setting the BlockAddIns (REG_DWORD) value inside the Desktop Settings key:
- 32 bit: HKEY_LOCAL_MACHINE\SOFTWARE\ESRI\Desktop10.0\Settings
- 64 bit: HKEY_LOCAL_MACHINE\SOFTWARE\Wow6432Node\ESRI\Desktop10.0\Settings
The valid entries for this value are as follows:
- 0 - Load all add-ins regardless of whether or not they have digital signatures.
- 1 - Only load and use add-ins that are digitally signed by a trusted certificate authority.
- 2 - Only load and use add-ins that have been published by Esri.
- 3 - Only load add-ins from the administrator folders (described below) and all add-ins published by Esri.
- 4 - Do not load or execute any add-ins in this application.
A user can only use the Add-In Manager to change the security setting to something more secure than the administrator setting. For example, if an administrator stipulates that all add-ins can load, a user can override this to either load only trusted add-ins or to load only Esri add-ins. Similarly, if an administrator specifies that only trusted add-ins can load, a user can only change their setting to load only Esri add-ins. Finally, there is nothing for a user to change if an administrator has elected to block all add-ins from loading.
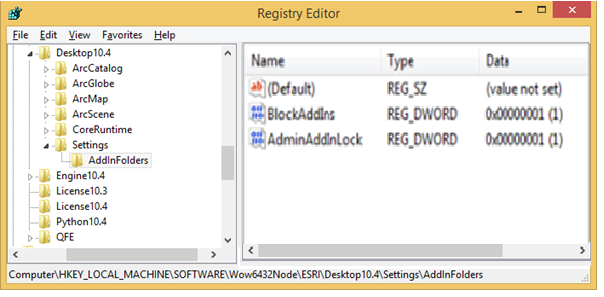
Administrators can block their users from overriding the security level they have set by additionally entering an AdminAddInLock (REG_DWORD) value with its data equal to 1. See the following screen shot:
Administrators can also use the registry to specify additional folders to probe for add-ins. This feature can be used by administrators to control user access to add-ins. To add administrator folders, manually enter a new AddInFolders key under the Settings key and add a new string value for each add-in folder. See the following screen shot:

| Development licensing | Deployment licensing |
|---|---|
| ArcGIS Desktop Advanced | ArcGIS Desktop Advanced |